# Custom Product Details Page for E-commerce Stores
> Build story-driven, branded product pages in GHL Customer Care. Learn to create, assign, and manage Custom PDPs, verify routing from PLP/links, and use safe fallbacks.
- Source: https://docs.ghlcustomercare.com/docs/sites/stores-e-commerce/custom-product-details-page-for-e-commerce-stores
- Section: Sites / Stores (E-commerce)
- Reading time: 5 min
- Images: 7, each explained below
- Modified on Thu, 25 Jun at 8:22 AM
---
**Custom Product Details Page (PDPs)** in GHL Customer Care let you build dedicated, on-brand pages for individual products—perfect for richer storytelling and higher conversions. Use the builder you already know to design, assign, and manage PDPs that override the default product detail experience. Routing from Product Listings Page (PLP), featured sections, and direct links automatically respects your mapping, with a safe fallback to the default PDP if needed. This guide walks you through benefits, setup, and best practices.
---
**TABLE OF CONTENTS**
- [What is Custom Product Details Pages for E-commerce Stores?](#what-is-custom-product-details-page-for-e-commerce-stores)[](#key-benefits-of-custom-product-details-page-for-e-commerce-stores)
- [Key Benefits of Custom Product Details Pages for E-commerce Stores](#key-benefits-of-custom-product-details-page-for-e-commerce-stores)[](#how-to-setup-custom-product-details-page-for-e-commerce-stores)
- [How To Setup Custom Product Details Pages for E-commerce Stores](#how-to-setup-custom-product-details-page-for-e-commerce-stores)[](#assigning-reassigning-and-managing-products)
- [Assigning, Reassigning & Managing Products](#assigning-reassigning-and-managing-products)[](#frequently-asked-questions)
- [Frequently Asked Questions](#frequently-asked-questions)[](#related-articles)
- [Related Articles](#related-articles)
---
# **What is Custom Product Details Page for E-commerce Stores?**
Custom Product Details Pages are purpose-built product pages you create in GHL Customer Care’s Site/Store Builder and map to specific products. Instead of relying on a **single default PDP**, you can craft unique layouts and messages per product while keeping store navigation intact. When a product has a Custom PDP, shoppers who click it from the Product List Page (PLP), featured sections, or any link will be taken to that custom page.
Custom PDPs expand your control over merchandising and brand expression at the product level. By pairing a product with a bespoke page, you can highlight unique value props, upsells, and media—without disrupting your store’s standard flow.
---
## **Key Benefits of Custom Product Details Page for E-commerce Stores**
Understanding the practical wins helps you decide when to create a Custom PDP and how it improves both UX and operations.
- **Enhanced storytelling:** Showcase rich content—benefits, demos, reviews, FAQs—tailored to each product.
- **Personalized design:** Use custom layouts, media, and elements to match your brand and product identity.
- **Accurate routing:** Clicks from PLP, featured sections, and any product link go to the Custom PDP when configured.
- **Single association:** Each product maps to one Custom PDP at a time; switching pages updates the association automatically.
- **Safety fallback:** Deleting a Custom PDP automatically returns mapped products to the default PDP.
- **Operational efficiency:** Assign/reassign products quickly via the creation modal or the page/editor settings.
---
## **How To Setup Custom Product Details Page for E-commerce Stores**
Follow this end-to-end checklist to go from “idea” to published, tested PDPs. Proper setup prevents routing or visibility surprises.
Prerequisites
At least one Product created (Payments → Products) and included in your online store.
Access to Site/Store Builder in your sub-account.
Confirm which store/site you’re editing.
**Setup Steps**
1. Go to **Sites → Stores → Select the Particular Store** → **Add New Page**.
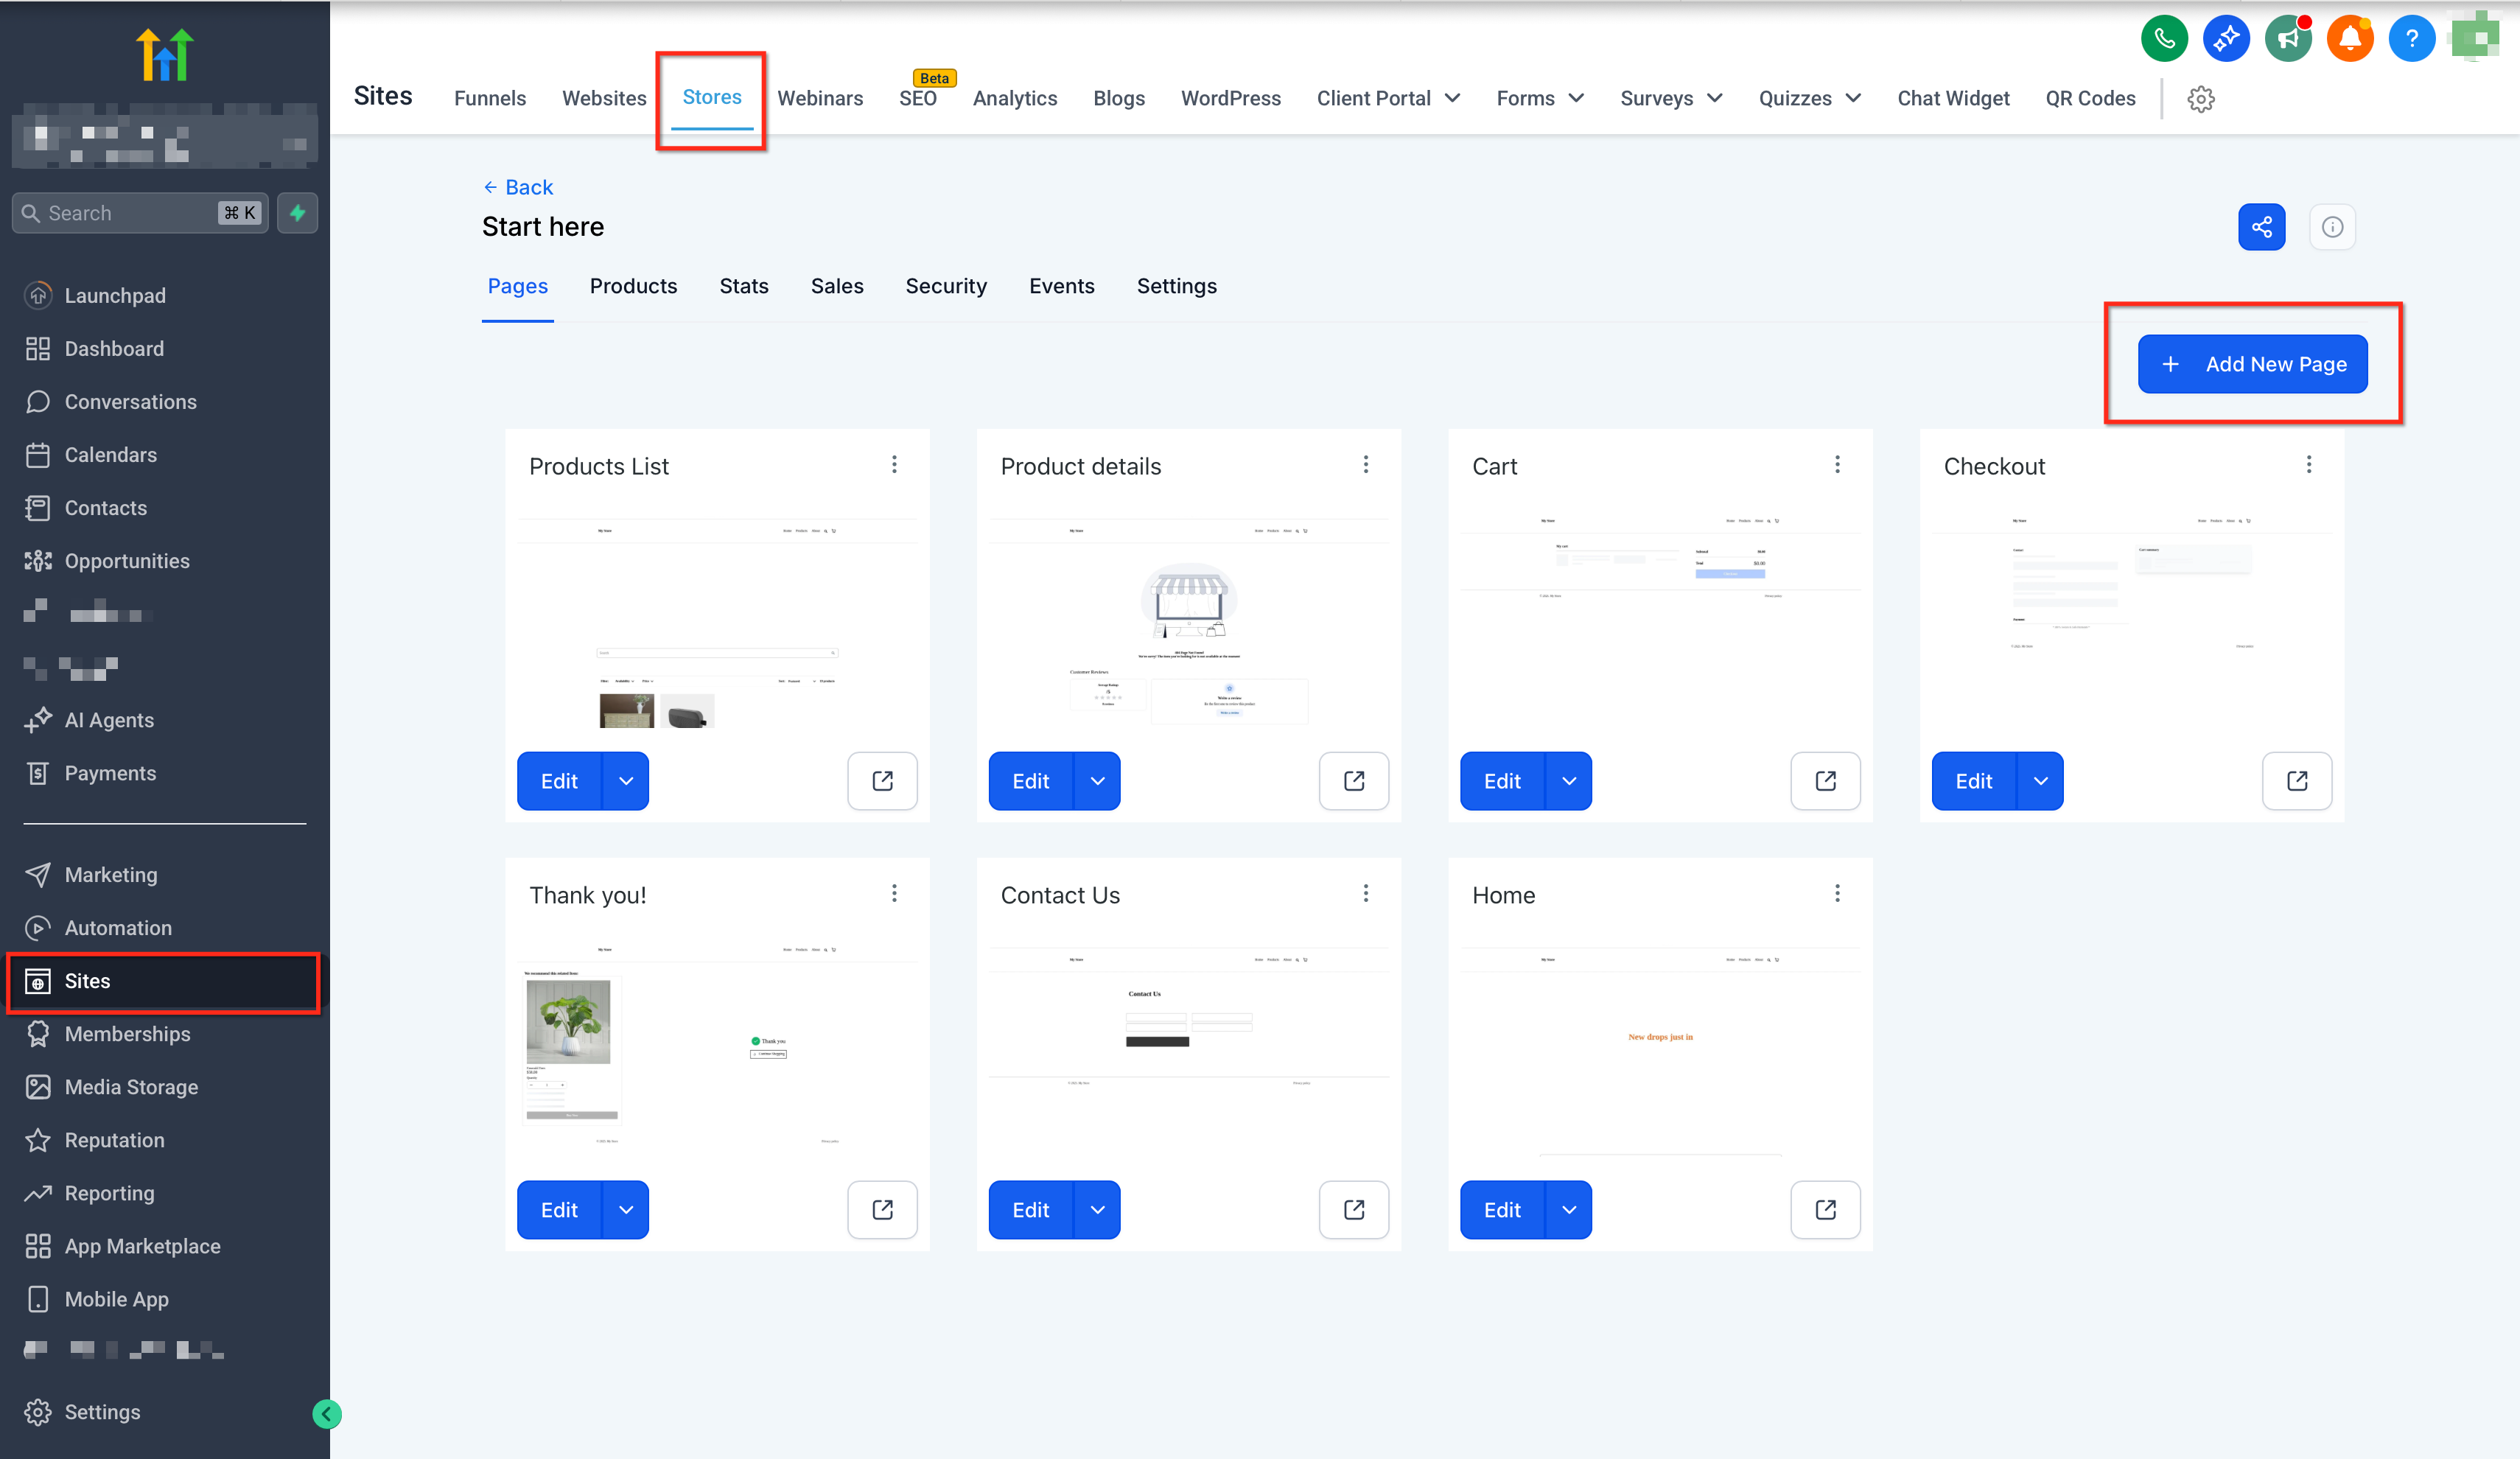
**Step 1 of 4: Go to Sites → Stores → Select the Particular Store → Add New Page**
This screenshot accompanies step 1 of 4 in the "How To Setup Custom Product Details Page for E-commerce Stores" section of "Custom Product Details Page for E-commerce Stores". At this point in the walkthrough you go to Sites → Stores → Select the Particular Store → Add New Page. The next step is to turn on Custom Product Details Page. In the modal, search/select product(s) to map. When you create a new Custom PDP, it starts as a one-time copy of your Default Product Details Page (PDP), so you can edit an existing layout instead of starting from a blank page. The copied design includes, - Section structure and layout - Store elements (media, title, price, variants, CTA, etc.) - Styling (fonts, colors, spacing, borders, shadows) - Visibility rules (desktop/mobile) Note: This inheritance is a one-time copy. Changes to the Default PDP do not update existing Custom PDPs. Turn on Custom Product Details Page. In the modal, search/select product(s) to map.
- Where to go: Go to Sites → Stores → Select the Particular Store → Add New Page.
- Controls: Add New Page, Setup Steps, Related Products, Design Tips, Text Customization, Save, Publish
- Next: Turn on Custom Product Details Page. In the modal, search/select product(s) to map. When you create a new Custom PDP, it starts as a one-time copy of your Default Product Details Page (PDP), so you can edit an existing layout instead of starting from a blank page. The copied design includes, - Section structure and layout - Store elements (media, title, price, variants, CTA, etc.) - Styling (fonts, colors, spacing, borders, shadows) - Visibility rules (desktop/mobile) Note: This inheritance is a one-time copy. Changes to the Default PDP do not update existing Custom PDPs. Turn on Custom Product Details Page. In the modal, search/select product(s) to map.
Full procedure:
1. Go to Sites → Stores → Select the Particular Store → Add New Page. <- this image
2. Turn on Custom Product Details Page. In the modal, search/select product(s) to map. When you create a new Custom PDP, it starts as a one-time copy of your Default Product Details Page (PDP), so you can edit an existing layout instead of starting from a blank page. The copied design includes, - Section structure and layout - Store elements (media, title, price, variants, CTA, etc.) - Styling (fonts, colors, spacing, borders, shadows) - Visibility rules (desktop/mobile) Note: This inheritance is a one-time copy. Changes to the Default PDP do not update existing Custom PDPs. Turn on Custom Product Details Page. In the modal, search/select product(s) to map.
3. Build your layout using PDP elements (images, details, CTAs, Related Products). Use the editor to build conversion-focused product pages. PDP elements and global text settings still apply, so you can combine Custom PDP layouts with store components you already use. Design Tips
4. Click Save and Publish. Sample Preview:
2. Turn on Custom Product Details Page. In the modal, search/select product(s) to map.
When you create a new Custom PDP, it starts as a one-time copy of your Default Product Details Page (PDP), so you can edit an existing layout instead of starting from a blank page.
The copied design includes,
\- Section structure and layout
\- Store elements (media, title, price, variants, CTA, etc.)
\- Styling (fonts, colors, spacing, borders, shadows)
\- Visibility rules (desktop/mobile)
**Note: This inheritance is a one-time copy. Changes to the Default PDP do not update existing Custom PDPs.
**
**Turn on Custom Product Details Page. In the modal, search/select product(s) to map.
**
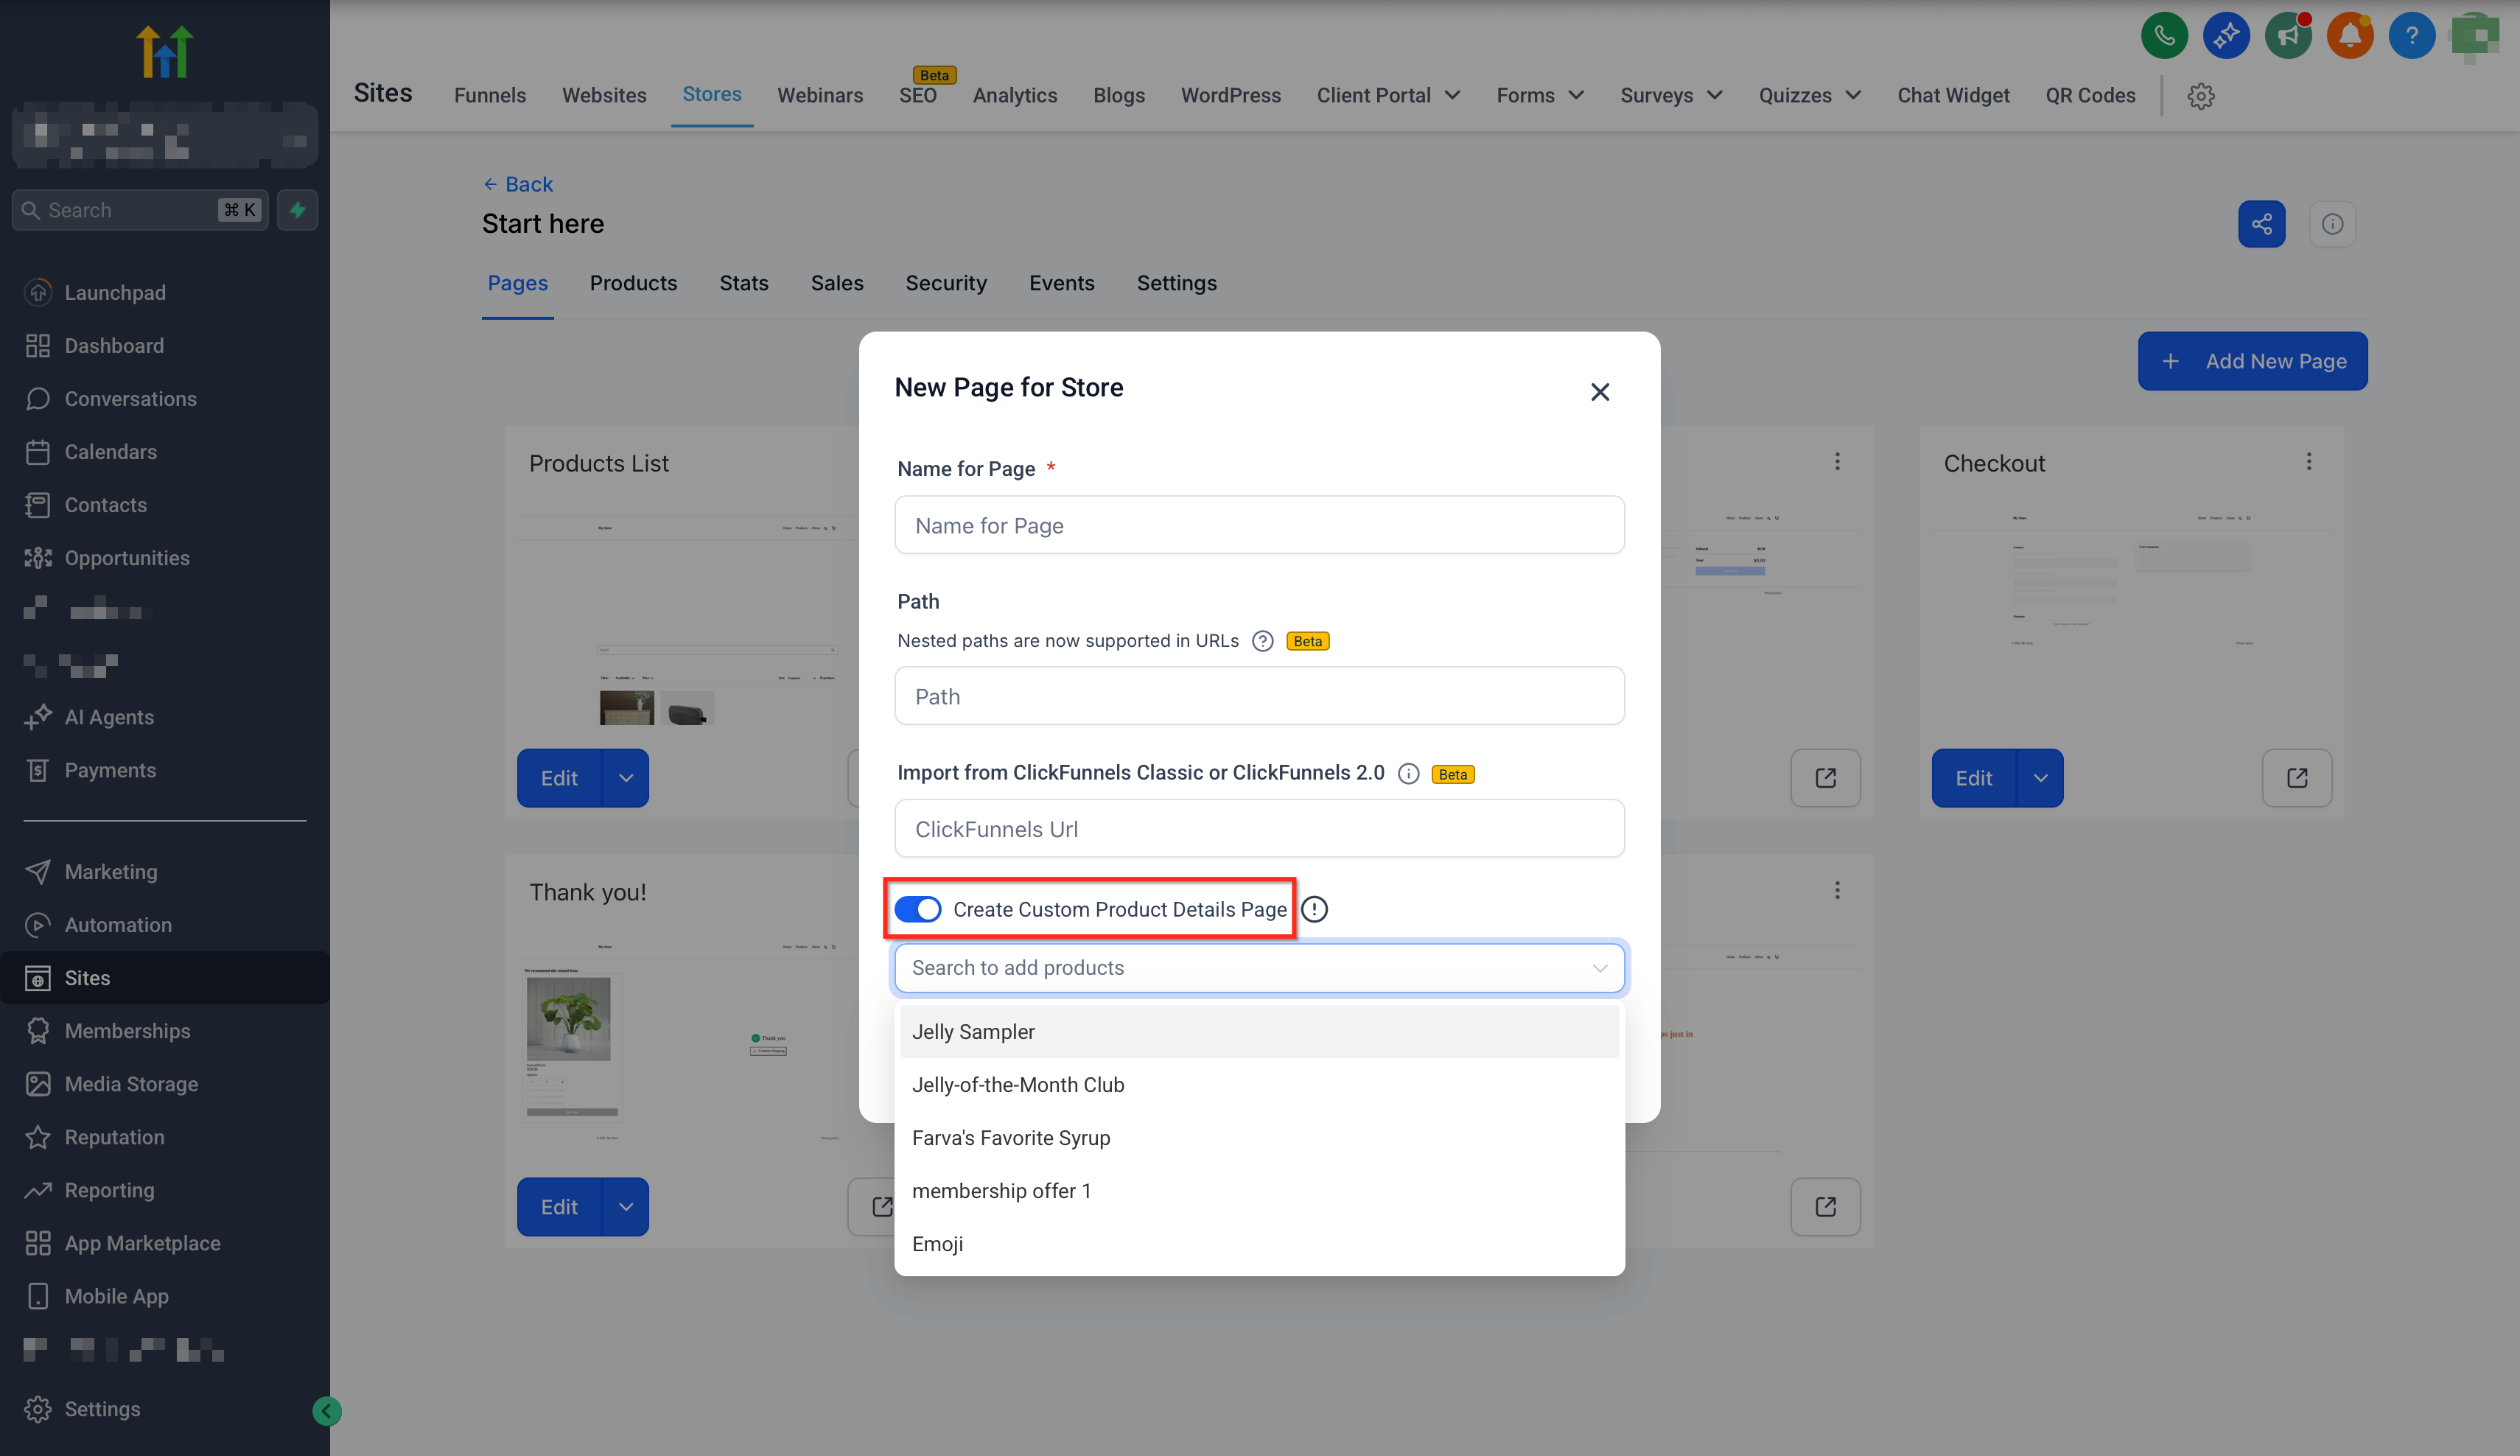
**Step 2 of 4: Turn on Custom Product Details Page. In the modal, search/select…**
This screenshot accompanies step 2 of 4 in the "How To Setup Custom Product Details Page for E-commerce Stores" section of "Custom Product Details Page for E-commerce Stores". At this point in the walkthrough you turn on Custom Product Details Page. In the modal, search/select product(s) to map. When you create a new Custom PDP, it starts as a one-time copy of your Default Product Details Page (PDP), so you can edit an existing layout instead of starting from a blank page. The copied design includes, - Section structure and layout - Store elements (media, title, price, variants, CTA, etc.) - Styling (fonts, colors, spacing, borders, shadows) - Visibility rules (desktop/mobile) Note: This inheritance is a one-time copy. Changes to the Default PDP do not update existing Custom PDPs. Turn on Custom Product Details Page. In the modal, search/select product(s) to map. The next step is to build your layout using PDP elements (images, details, CTAs, Related Products). Use the editor to build conversion-focused product pages. PDP elements and global text settings still apply, so you can combine Custom PDP layouts with store components you already use. Design Tips.
- What to choose: Turn on Custom Product Details Page. In the modal, search/select product(s) to map. When you create a new Custom PDP, it starts as a one-time copy of your Default Product Details Page (PDP), so you can edit an existing layout instead of starting from a blank page. The copied design includes, - Section structure and layout - Store elements (media, title, price, variants, CTA, etc.) - Styling (fonts, colors, spacing, borders, shadows) - Visibility rules (desktop/mobile) Note: This inheritance is a one-time copy. Changes to the Default PDP do not update existing Custom PDPs. Turn on Custom Product Details Page. In the modal, search/select product(s) to map.
- Controls: Setup Steps, Add New Page, Related Products, Design Tips, Text Customization, Save, Publish
- Next: Build your layout using PDP elements (images, details, CTAs, Related Products). Use the editor to build conversion-focused product pages. PDP elements and global text settings still apply, so you can combine Custom PDP layouts with store components you already use. Design Tips
Full procedure:
1. Go to Sites → Stores → Select the Particular Store → Add New Page.
2. Turn on Custom Product Details Page. In the modal, search/select product(s) to map. When you create a new Custom PDP, it starts as a one-time copy of your Default Product Details Page (PDP), so you can edit an existing layout instead of starting from a blank page. The copied design includes, - Section structure and layout - Store elements (media, title, price, variants, CTA, etc.) - Styling (fonts, colors, spacing, borders, shadows) - Visibility rules (desktop/mobile) Note: This inheritance is a one-time copy. Changes to the Default PDP do not update existing Custom PDPs. Turn on Custom Product Details Page. In the modal, search/select product(s) to map. <- this image
3. Build your layout using PDP elements (images, details, CTAs, Related Products). Use the editor to build conversion-focused product pages. PDP elements and global text settings still apply, so you can combine Custom PDP layouts with store components you already use. Design Tips
4. Click Save and Publish. Sample Preview:
3. Build your layout using PDP elements (images, details, CTAs, **Related Products**).
Use the editor to build conversion-focused product pages. PDP elements and global text settings still apply, so you can combine Custom PDP layouts with store components you already use.
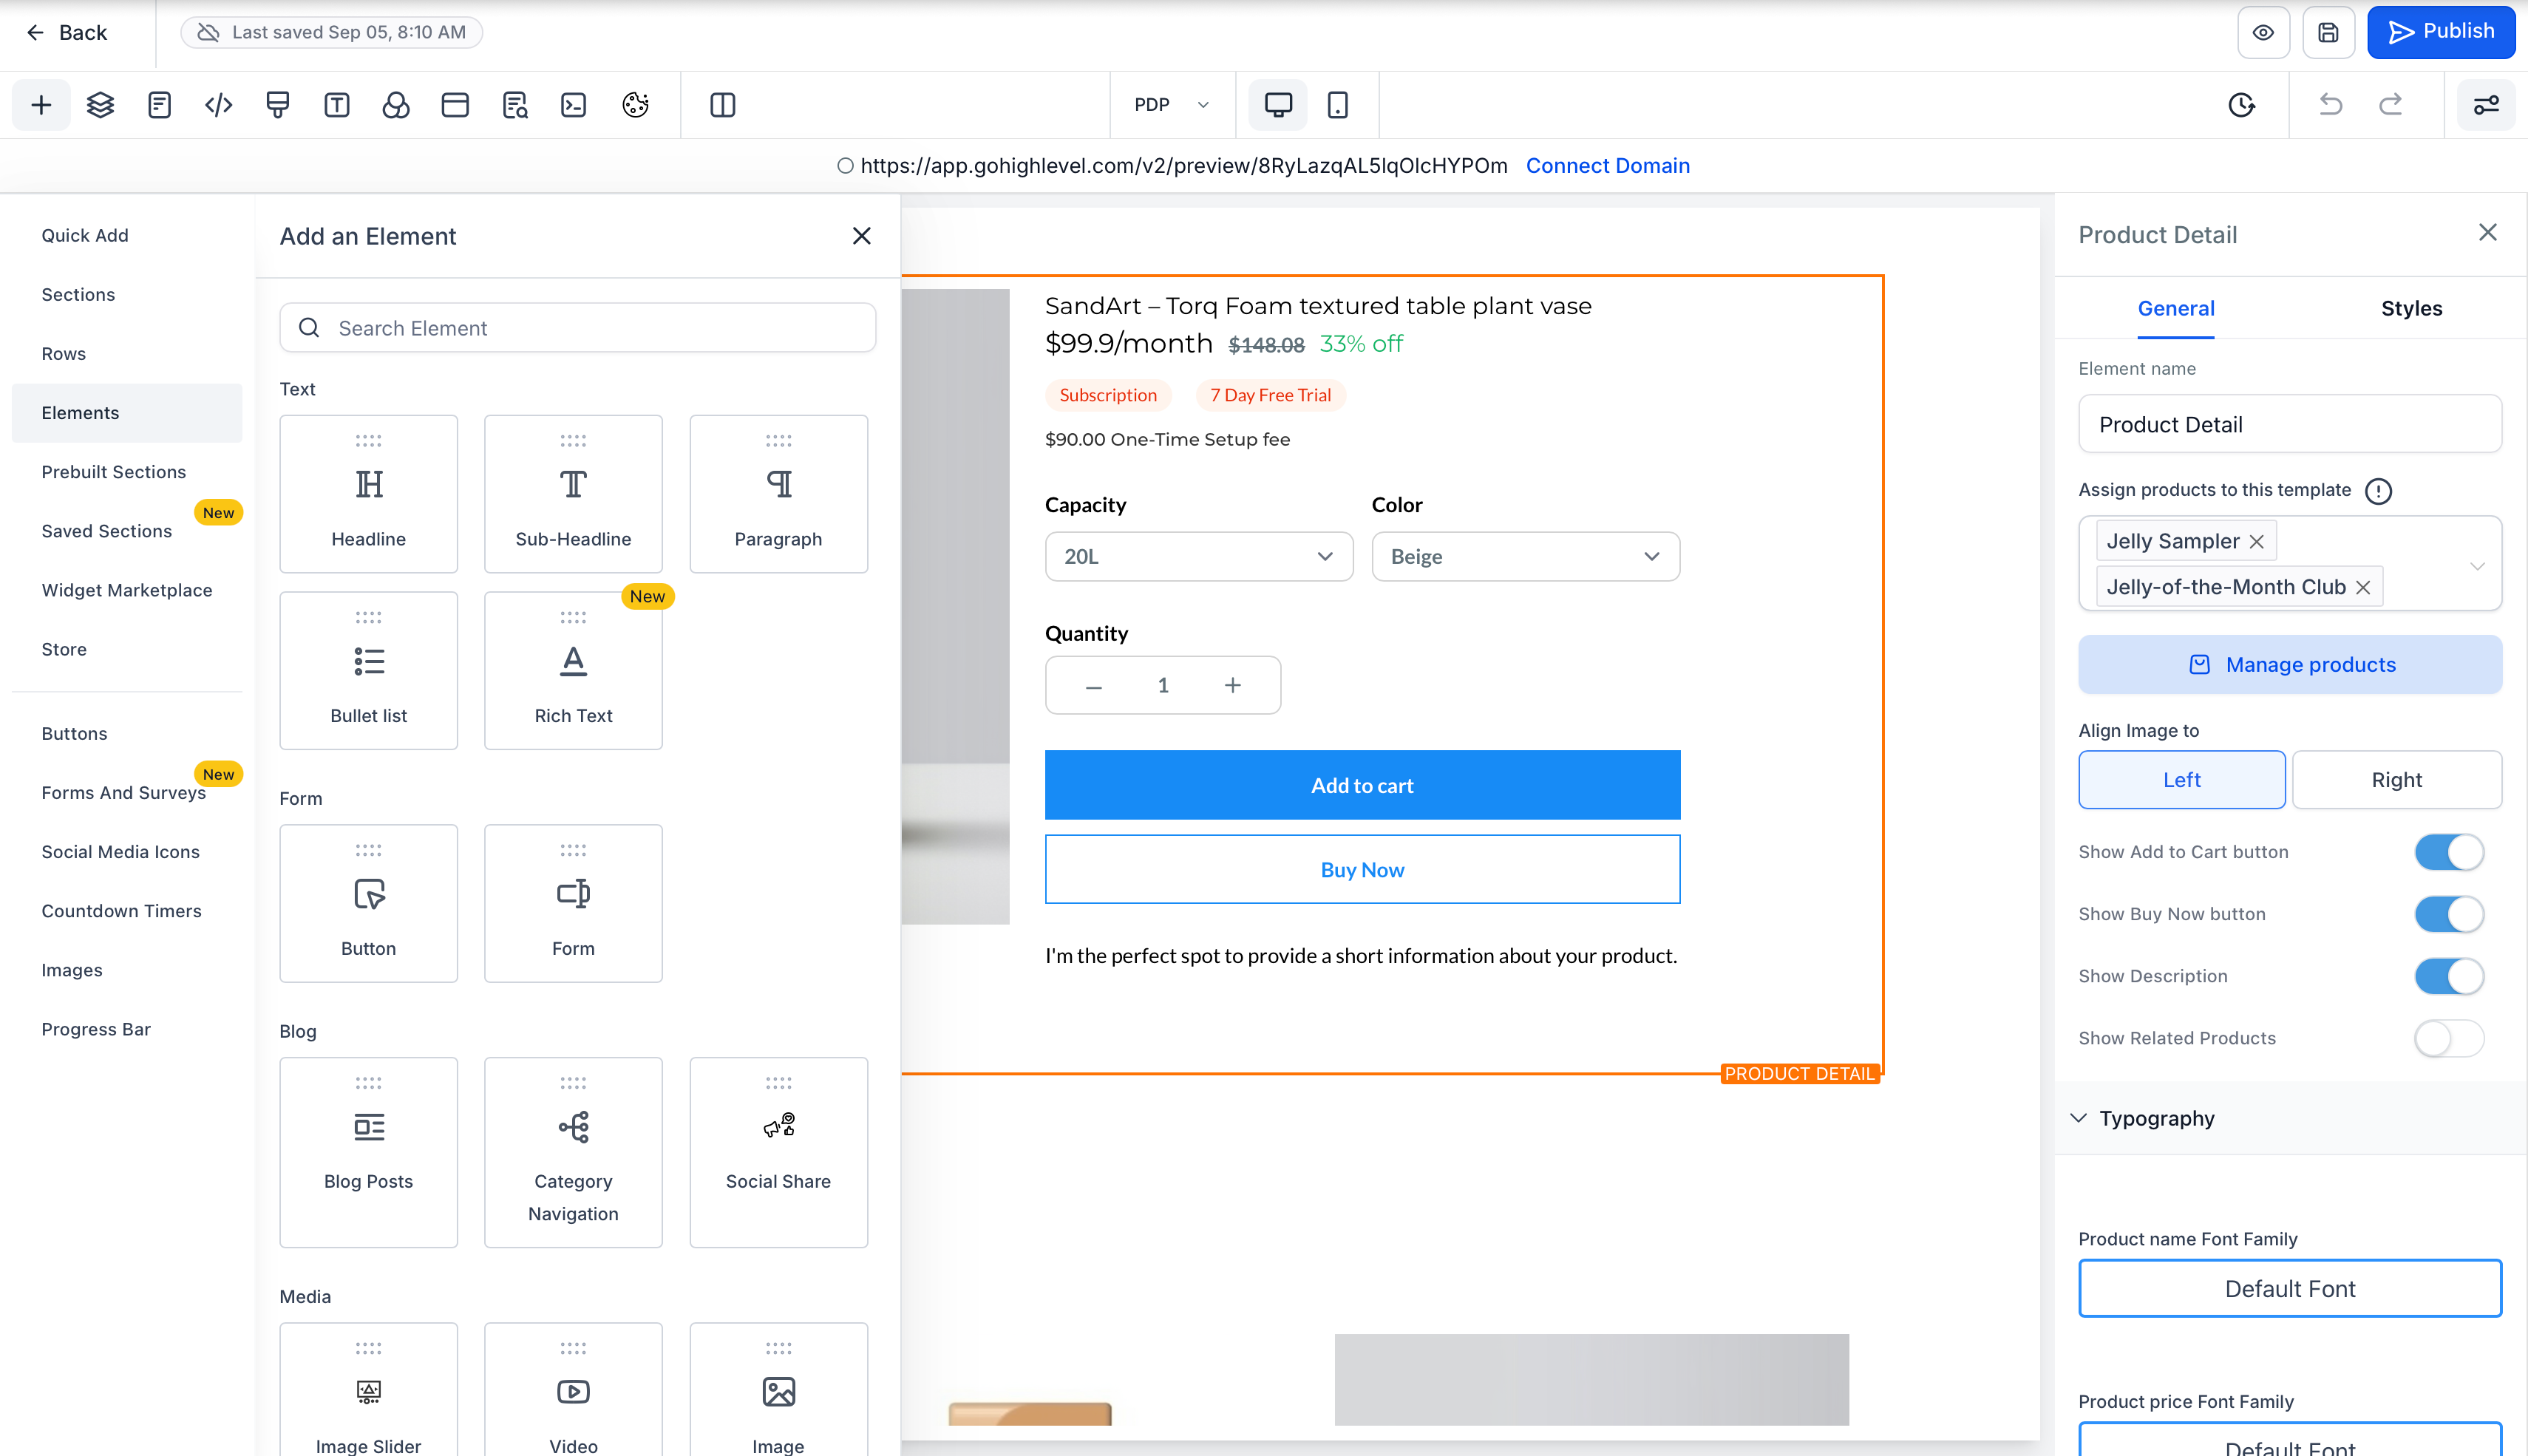
**Step 3 of 4: Build your layout using PDP elements (images, details, CTAs, Related…**
This screenshot accompanies step 3 of 4 in the "How To Setup Custom Product Details Page for E-commerce Stores" section of "Custom Product Details Page for E-commerce Stores". At this point in the walkthrough you build your layout using PDP elements (images, details, CTAs, Related Products). Use the editor to build conversion-focused product pages. PDP elements and global text settings still apply, so you can combine Custom PDP layouts with store components you already use. Design Tips. The next step is to click Save and Publish. Sample Preview.
- What this covers: Build your layout using PDP elements (images, details, CTAs, Related Products). Use the editor to build conversion-focused product pages. PDP elements and global text settings still apply, so you can combine Custom PDP layouts with store components you already use. Design Tips
- Controls: Related Products, Design Tips, Text Customization, Setup Steps, Add New Page, Save, Publish
- Next: Click Save and Publish. Sample Preview:
Full procedure:
1. Go to Sites → Stores → Select the Particular Store → Add New Page.
2. Turn on Custom Product Details Page. In the modal, search/select product(s) to map. When you create a new Custom PDP, it starts as a one-time copy of your Default Product Details Page (PDP), so you can edit an existing layout instead of starting from a blank page. The copied design includes, - Section structure and layout - Store elements (media, title, price, variants, CTA, etc.) - Styling (fonts, colors, spacing, borders, shadows) - Visibility rules (desktop/mobile) Note: This inheritance is a one-time copy. Changes to the Default PDP do not update existing Custom PDPs. Turn on Custom Product Details Page. In the modal, search/select product(s) to map.
3. Build your layout using PDP elements (images, details, CTAs, Related Products). Use the editor to build conversion-focused product pages. PDP elements and global text settings still apply, so you can combine Custom PDP layouts with store components you already use. Design Tips <- this image
4. Click Save and Publish. Sample Preview:
**Design Tips**
- Drag in PDP-friendly elements (images, video, features, reviews, **Related Products**, etc.).
- Use **Text Customization** to localize labels and messaging across PDP elements.
- Keep key actions (Add to Cart/Buy Now) above the fold; repeat CTAs on long pages.
- Reuse blocks/components across product pages to stay consistent.
4. Click **Save** and **Publish**.
Sample Preview:
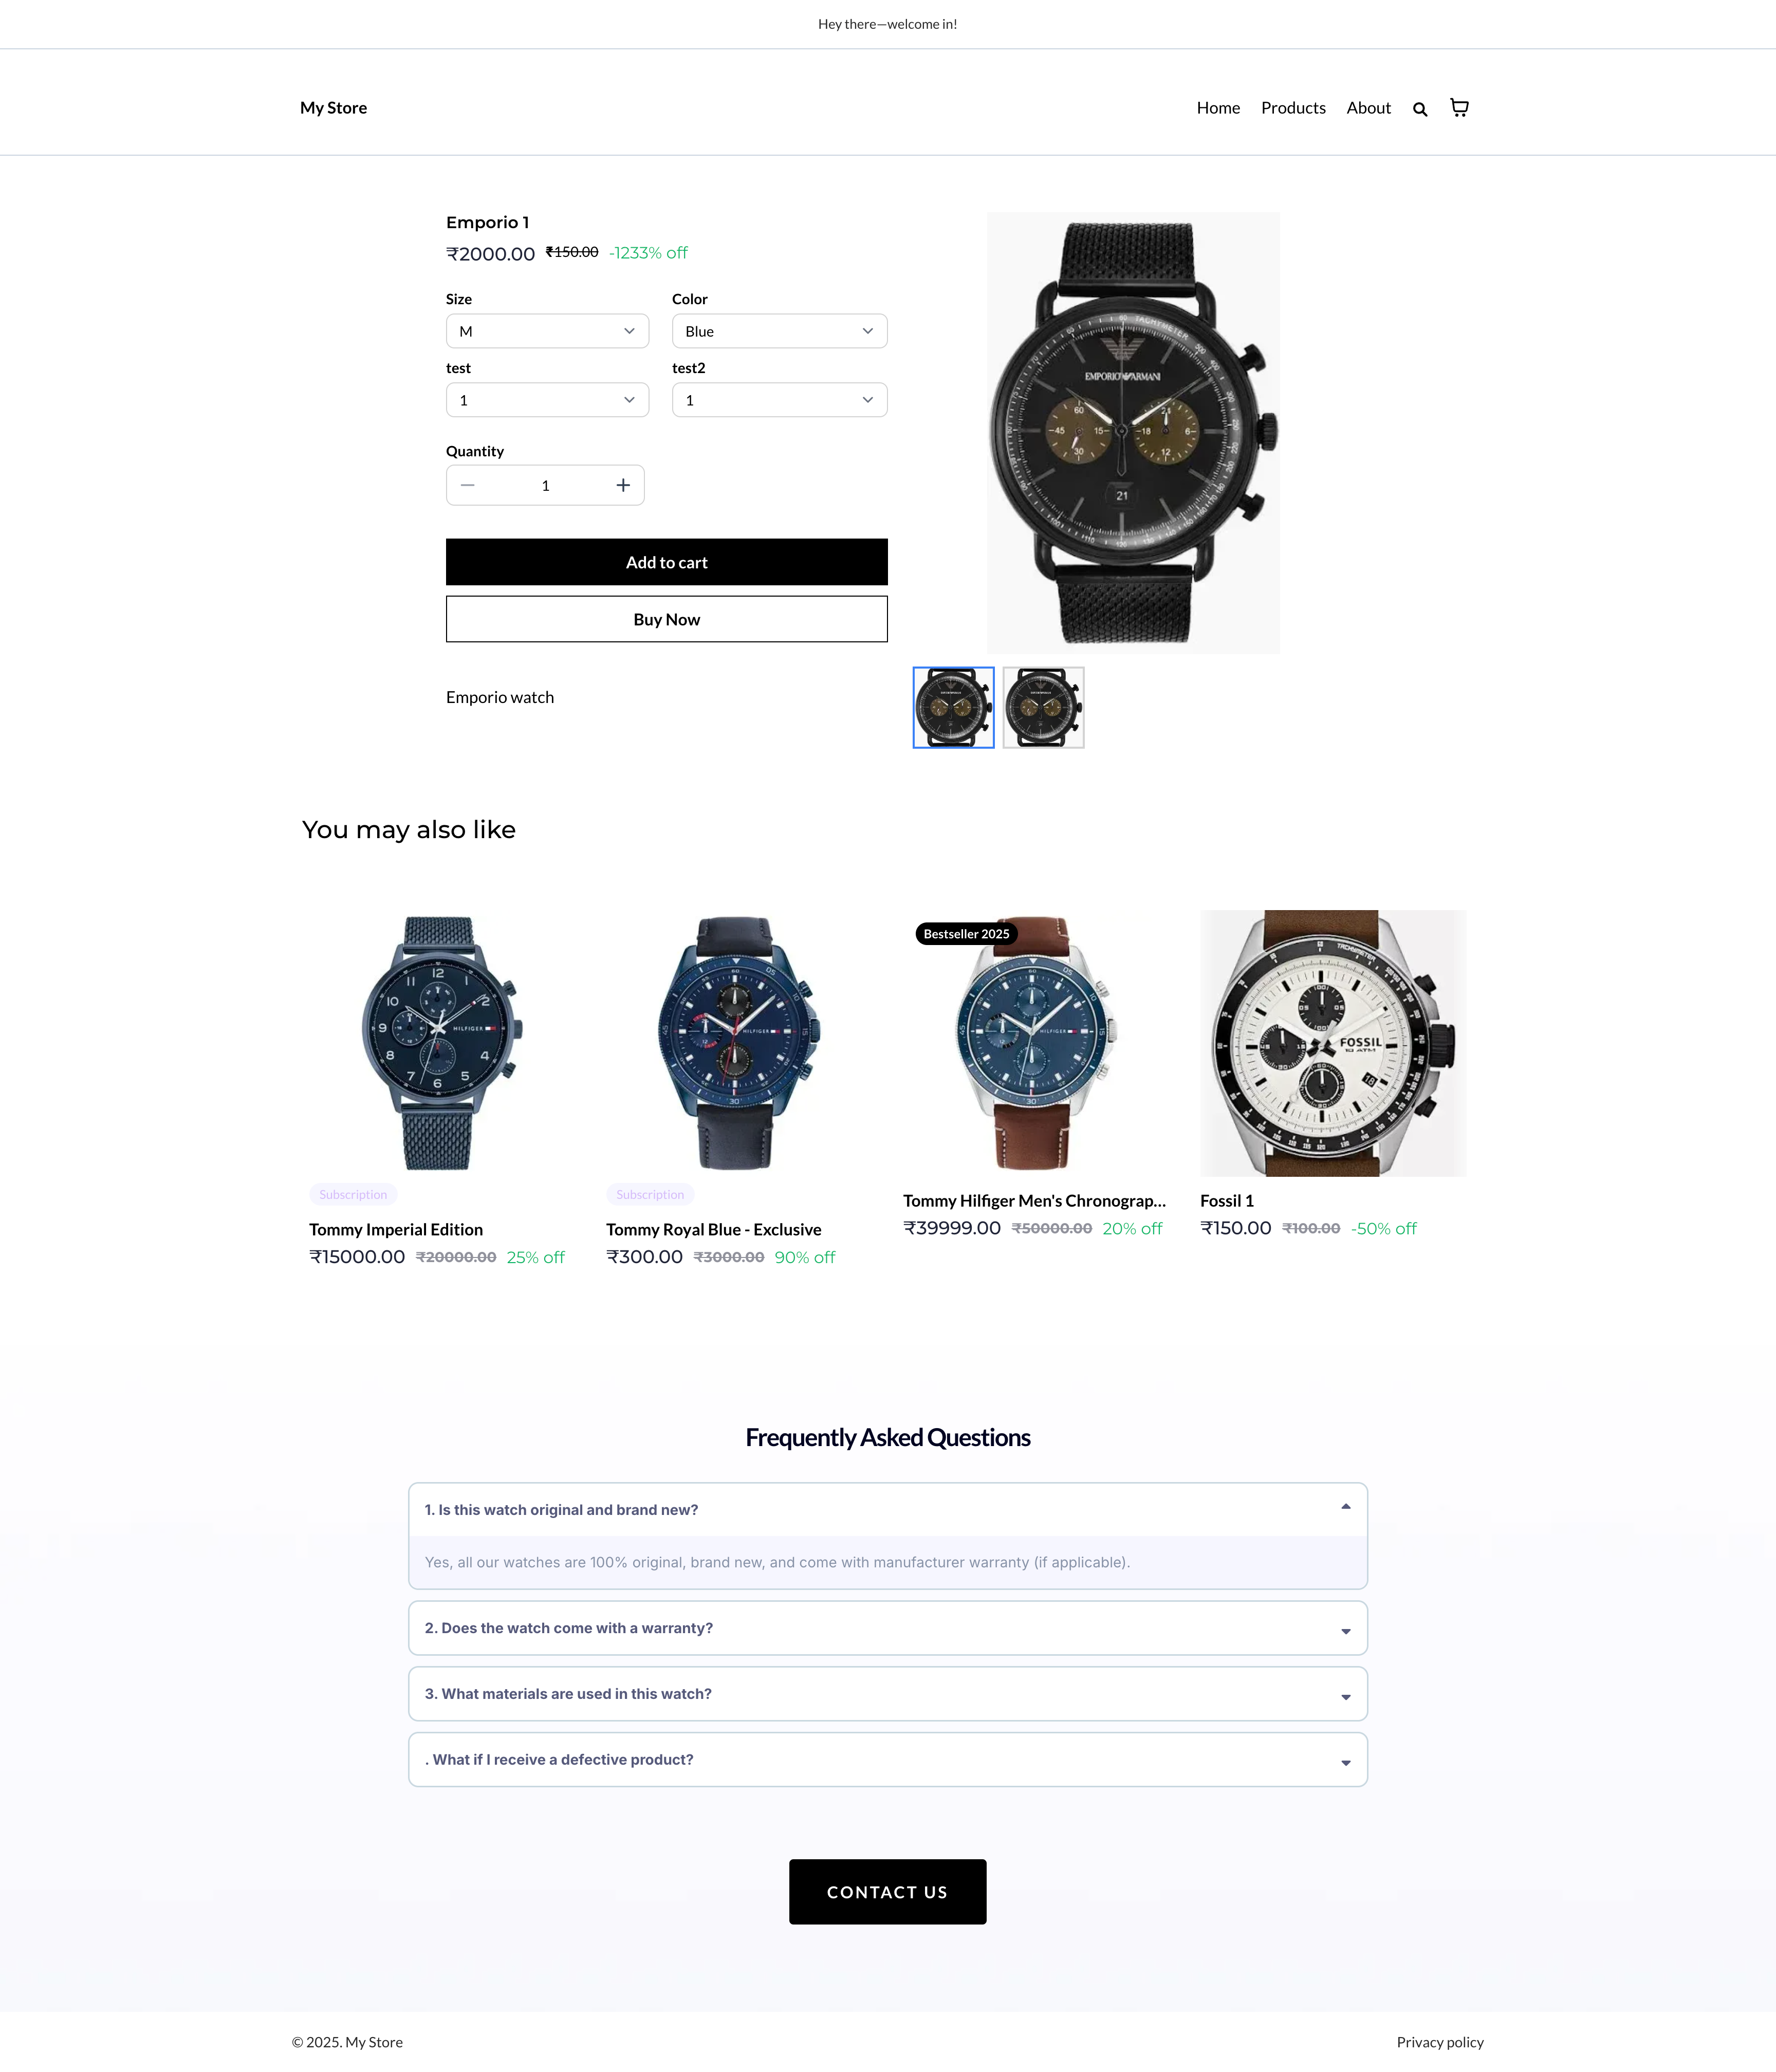
**Step 4 of 4: Click Save and Publish. Sample Preview**
This screenshot accompanies step 4 of 4 in the "How To Setup Custom Product Details Page for E-commerce Stores" section of "Custom Product Details Page for E-commerce Stores". At this point in the walkthrough you click Save and Publish. Sample Preview. For context, this section explains: Follow this end-to-end checklist to go from “idea” to published, tested PDPs. Proper setup prevents routing or visibility surprises.
- How to confirm: Click Save and Publish. Sample Preview:
- Controls: Save, Publish, Setup Steps, Add New Page, Related Products, Design Tips, Text Customization
Full procedure:
1. Go to Sites → Stores → Select the Particular Store → Add New Page.
2. Turn on Custom Product Details Page. In the modal, search/select product(s) to map. When you create a new Custom PDP, it starts as a one-time copy of your Default Product Details Page (PDP), so you can edit an existing layout instead of starting from a blank page. The copied design includes, - Section structure and layout - Store elements (media, title, price, variants, CTA, etc.) - Styling (fonts, colors, spacing, borders, shadows) - Visibility rules (desktop/mobile) Note: This inheritance is a one-time copy. Changes to the Default PDP do not update existing Custom PDPs. Turn on Custom Product Details Page. In the modal, search/select product(s) to map.
3. Build your layout using PDP elements (images, details, CTAs, Related Products). Use the editor to build conversion-focused product pages. PDP elements and global text settings still apply, so you can combine Custom PDP layouts with store components you already use. Design Tips
4. Click Save and Publish. Sample Preview: <- this image
---
## **Assigning, Reassigning & Managing Products**
Product-to-page mapping controls where shoppers land. Learn how to map initially, switch mappings later, and confirm which products are associated.
- **During page creation:** Use the assignment modal to map products to the new Custom PDP.
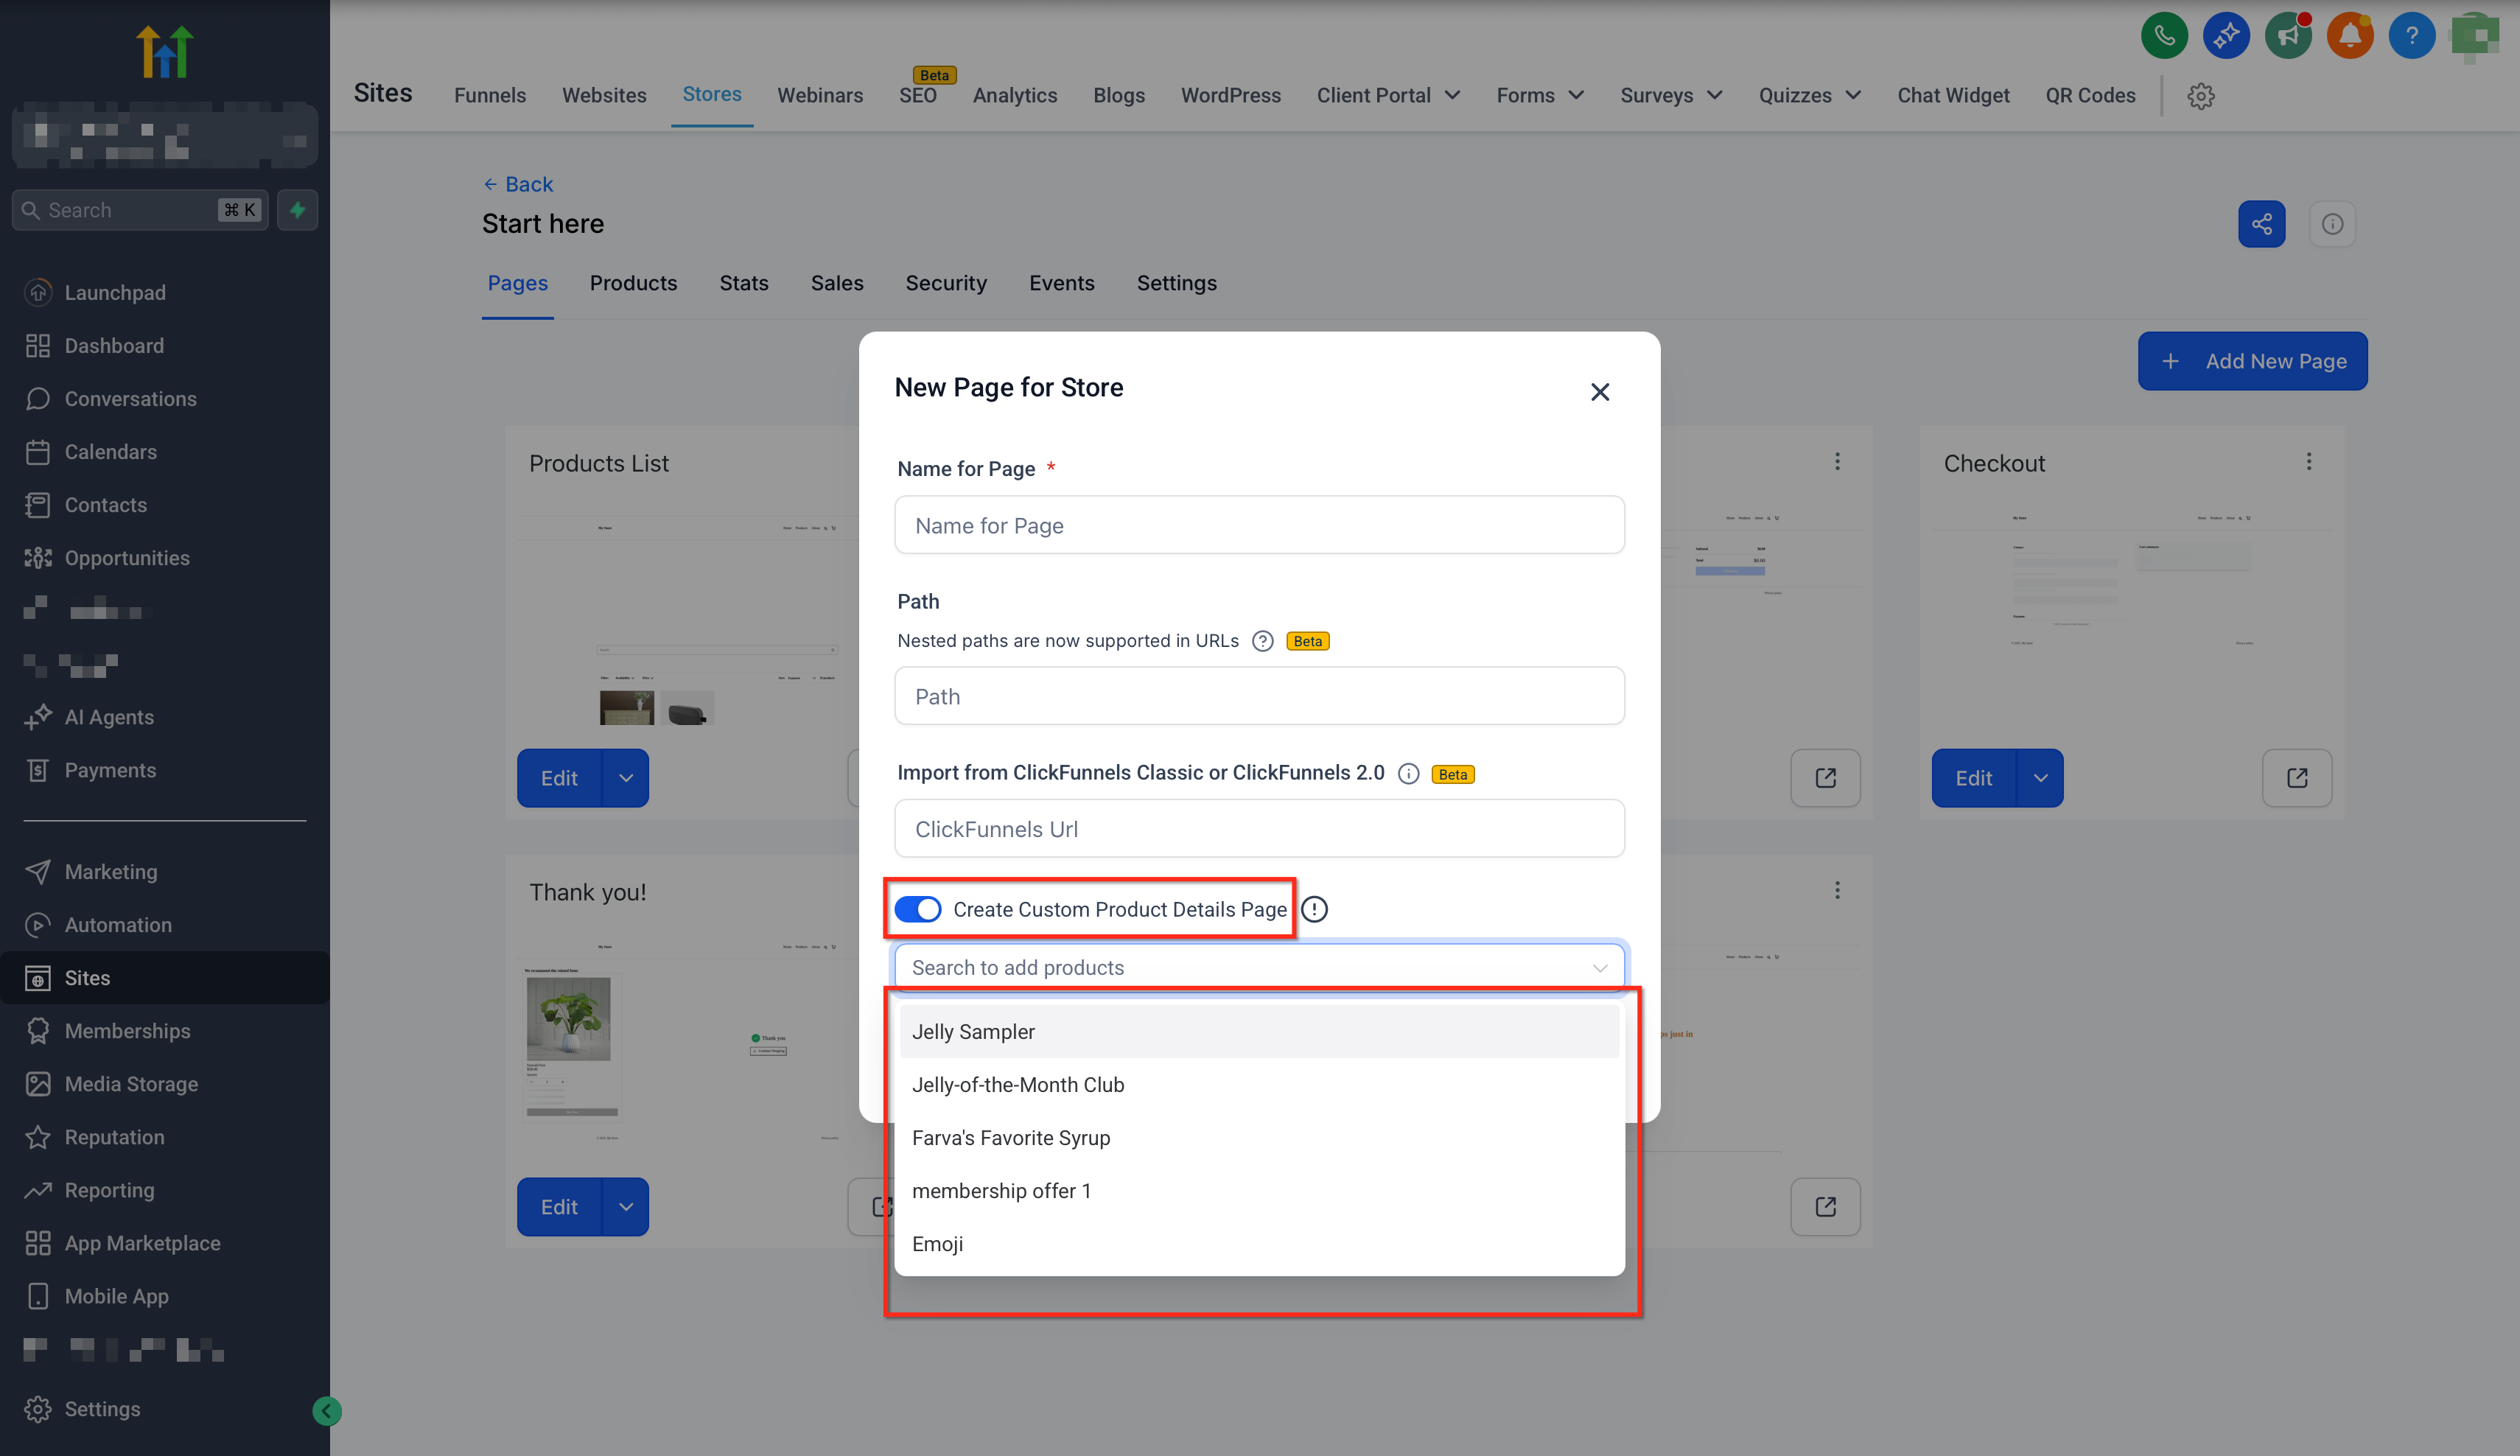
**Step 1 of 4: During page creation: Use the assignment modal to map products to the…**
This screenshot accompanies step 1 of 4 in the "Assigning, Reassigning & Managing Products" section of "Custom Product Details Page for E-commerce Stores". At this point in the walkthrough you during page creation: Use the assignment modal to map products to the new Custom PDP. The next step is to after creation (reassign): Open the Custom PDP in the builder, select the relevant product element or page settings, and use the Settings panel to update the product assignment.
- What this covers: During page creation: Use the assignment modal to map products to the new Custom PDP.
- Controls: Settings, product assignment
- Next: After creation (reassign): Open the Custom PDP in the builder, select the relevant product element or page settings, and use the Settings panel to update the product assignment.
Full procedure:
1. During page creation: Use the assignment modal to map products to the new Custom PDP. <- this image
2. After creation (reassign): Open the Custom PDP in the builder, select the relevant product element or page settings, and use the Settings panel to update the product assignment.
3. Single association rule: Assigning a product to a new Custom PDP automatically removes it from the previous one.
4. Navigation from Product Lists Page (PLP)or Featured Sections: Navigation from product lists or featured sections will always route to the correct PDP (custom or default).
- **After creation (reassign):** Open the Custom PDP in the builder, select the relevant product element or page settings, and use the **Settings** panel to update the **product assignment**.
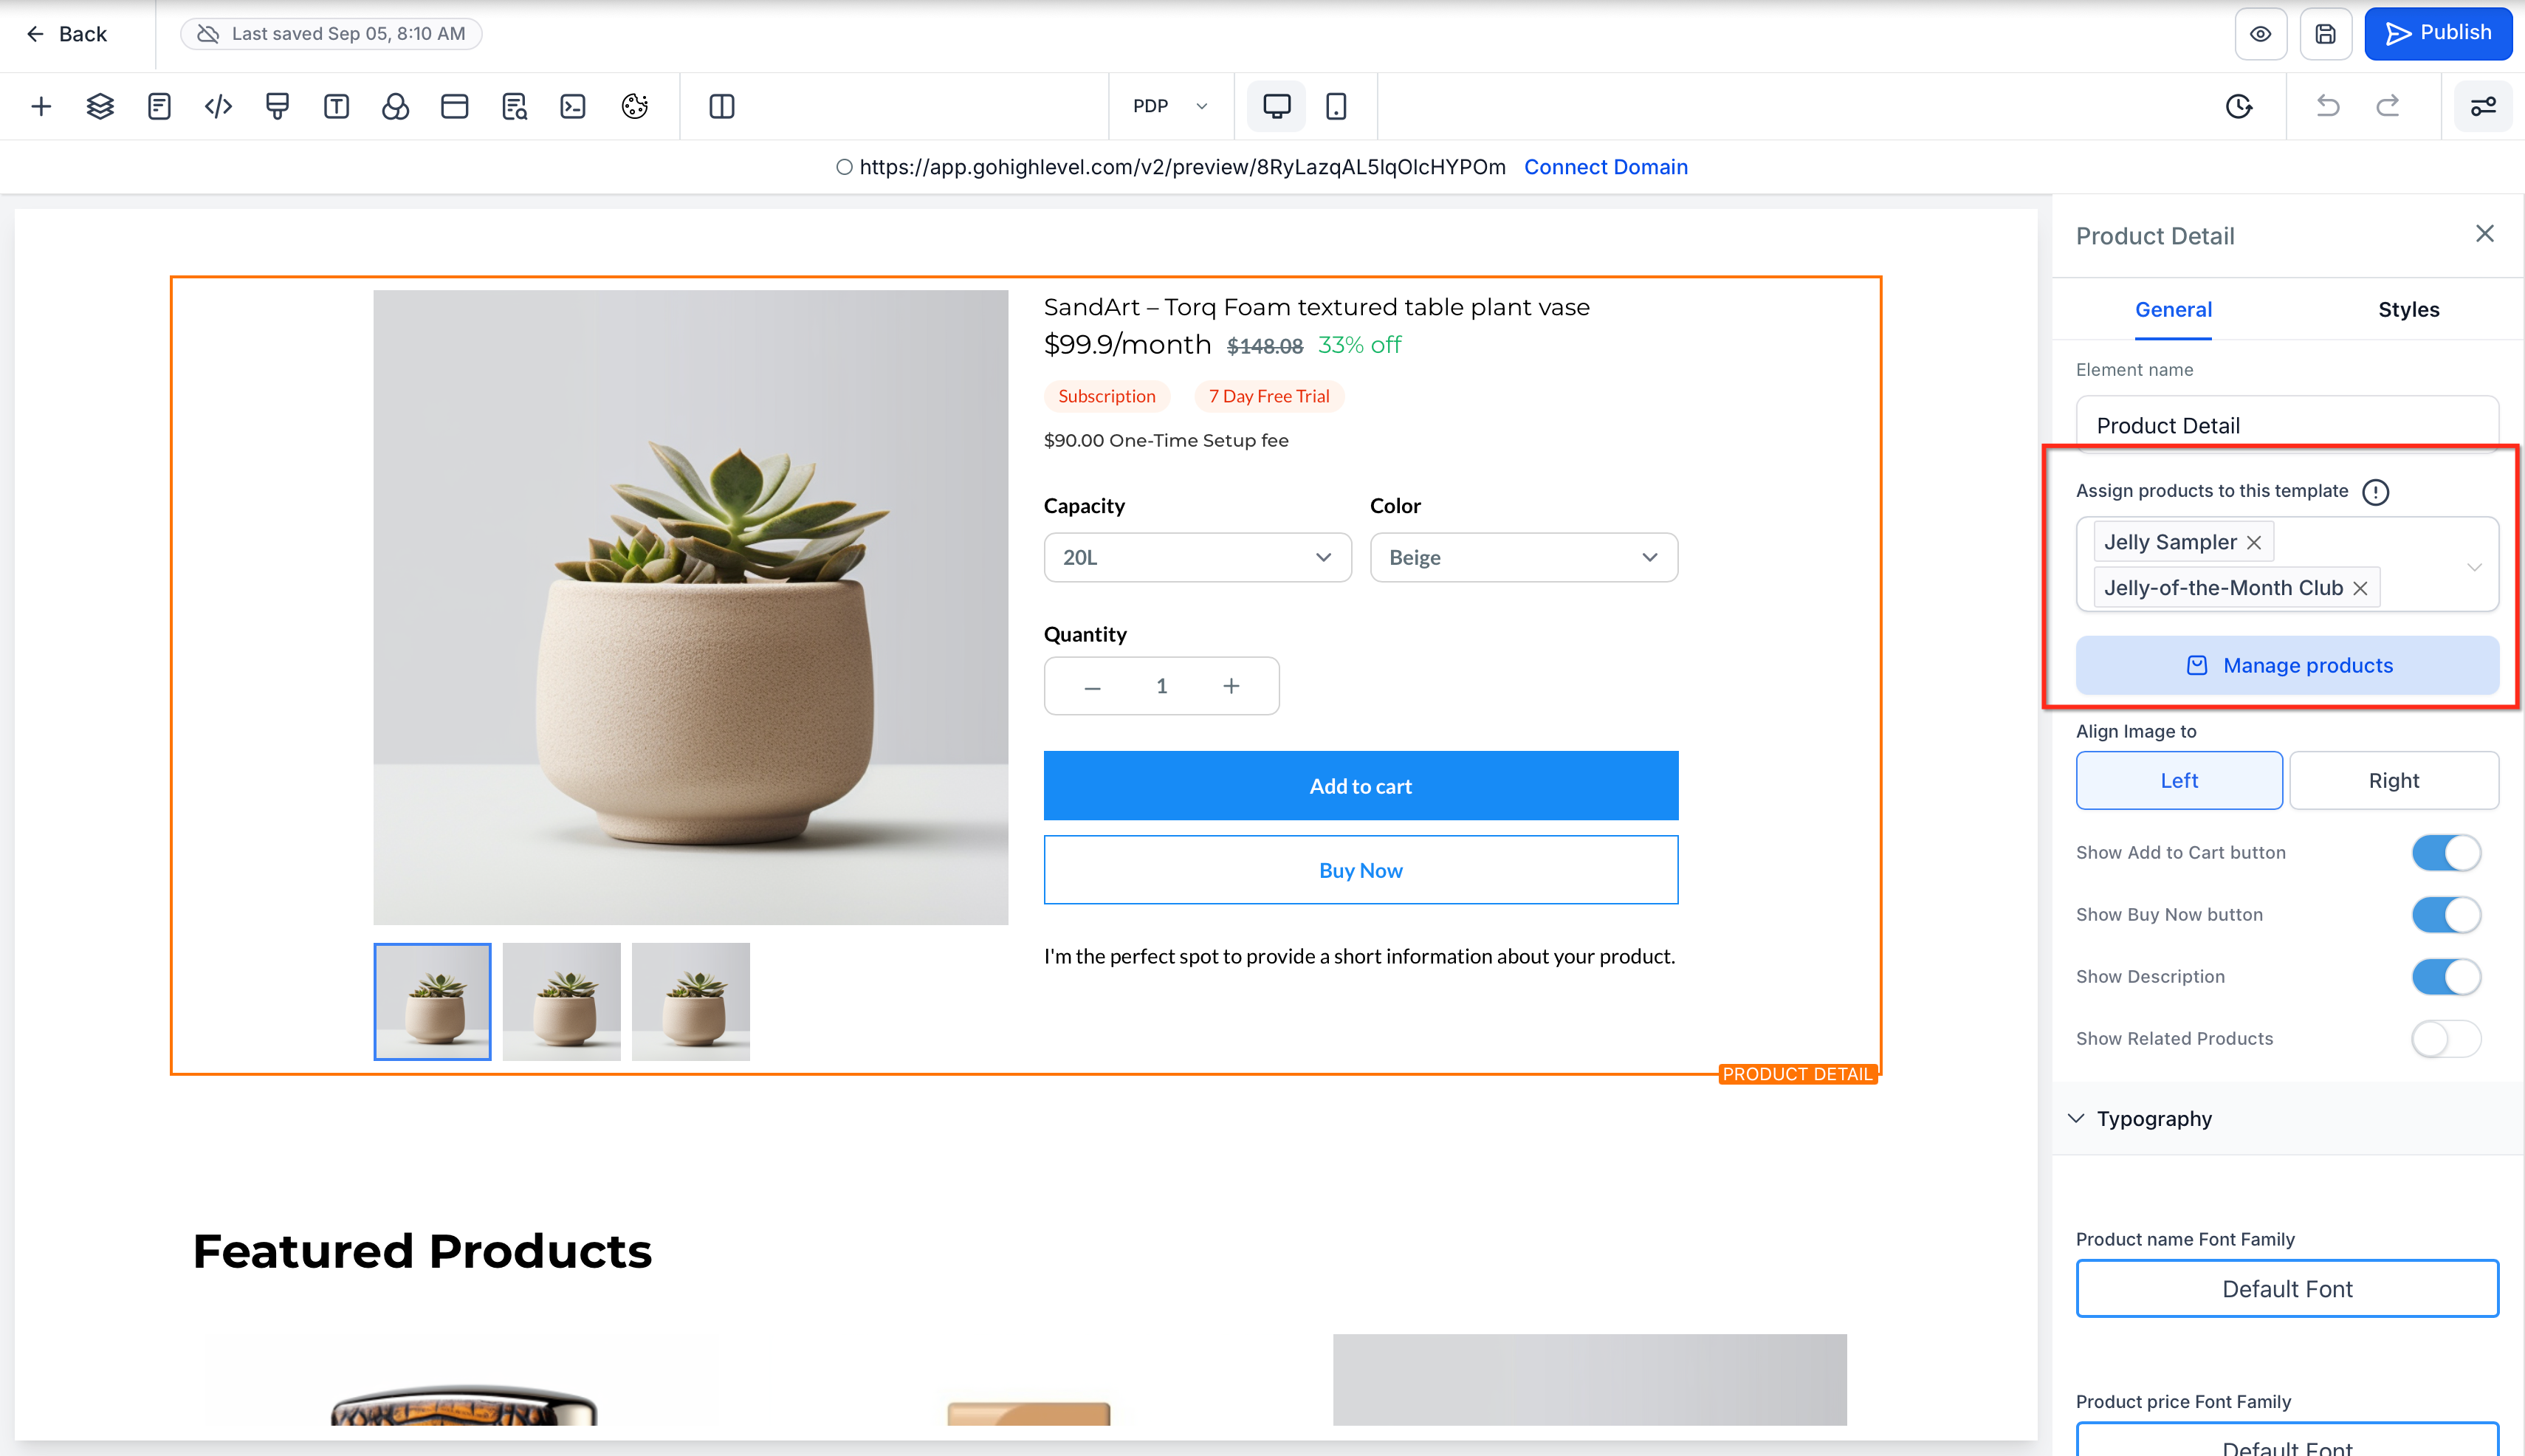
**Step 2 of 4: After creation (reassign): Open the Custom PDP in the builder, select…**
This screenshot accompanies step 2 of 4 in the "Assigning, Reassigning & Managing Products" section of "Custom Product Details Page for E-commerce Stores". At this point in the walkthrough you after creation (reassign): Open the Custom PDP in the builder, select the relevant product element or page settings, and use the Settings panel to update the product assignment. The next step is to single association rule: Assigning a product to a new Custom PDP automatically removes it from the previous one.
- What to choose: After creation (reassign): Open the Custom PDP in the builder, select the relevant product element or page settings, and use the Settings panel to update the product assignment.
- Controls: Settings, product assignment
- Next: Single association rule: Assigning a product to a new Custom PDP automatically removes it from the previous one.
Full procedure:
1. During page creation: Use the assignment modal to map products to the new Custom PDP.
2. After creation (reassign): Open the Custom PDP in the builder, select the relevant product element or page settings, and use the Settings panel to update the product assignment. <- this image
3. Single association rule: Assigning a product to a new Custom PDP automatically removes it from the previous one.
4. Navigation from Product Lists Page (PLP)or Featured Sections: Navigation from product lists or featured sections will always route to the correct PDP (custom or default).
- **Single association rule:** Assigning a product to a new Custom PDP automatically removes it from the previous one.
- **Navigation from Product Lists Page (PLP )or Featured Sections:** Navigation from product lists or featured sections will always route to the correct PDP (custom or default).
---
## **Desktop Media Customization in the Product Details Element**
The Product Details element includes desktop media controls that help you customize how product images and product information are arranged on the page. These controls make it easier to align the Product Details Page with your storefront design.
Within the Product Details element, you can customize:
- desktop Media width
- desktop Media position
- product media layout options
For detailed instructions on media layout settings, refer to Product Media Layouts for GHL Customer Care Product Pages.
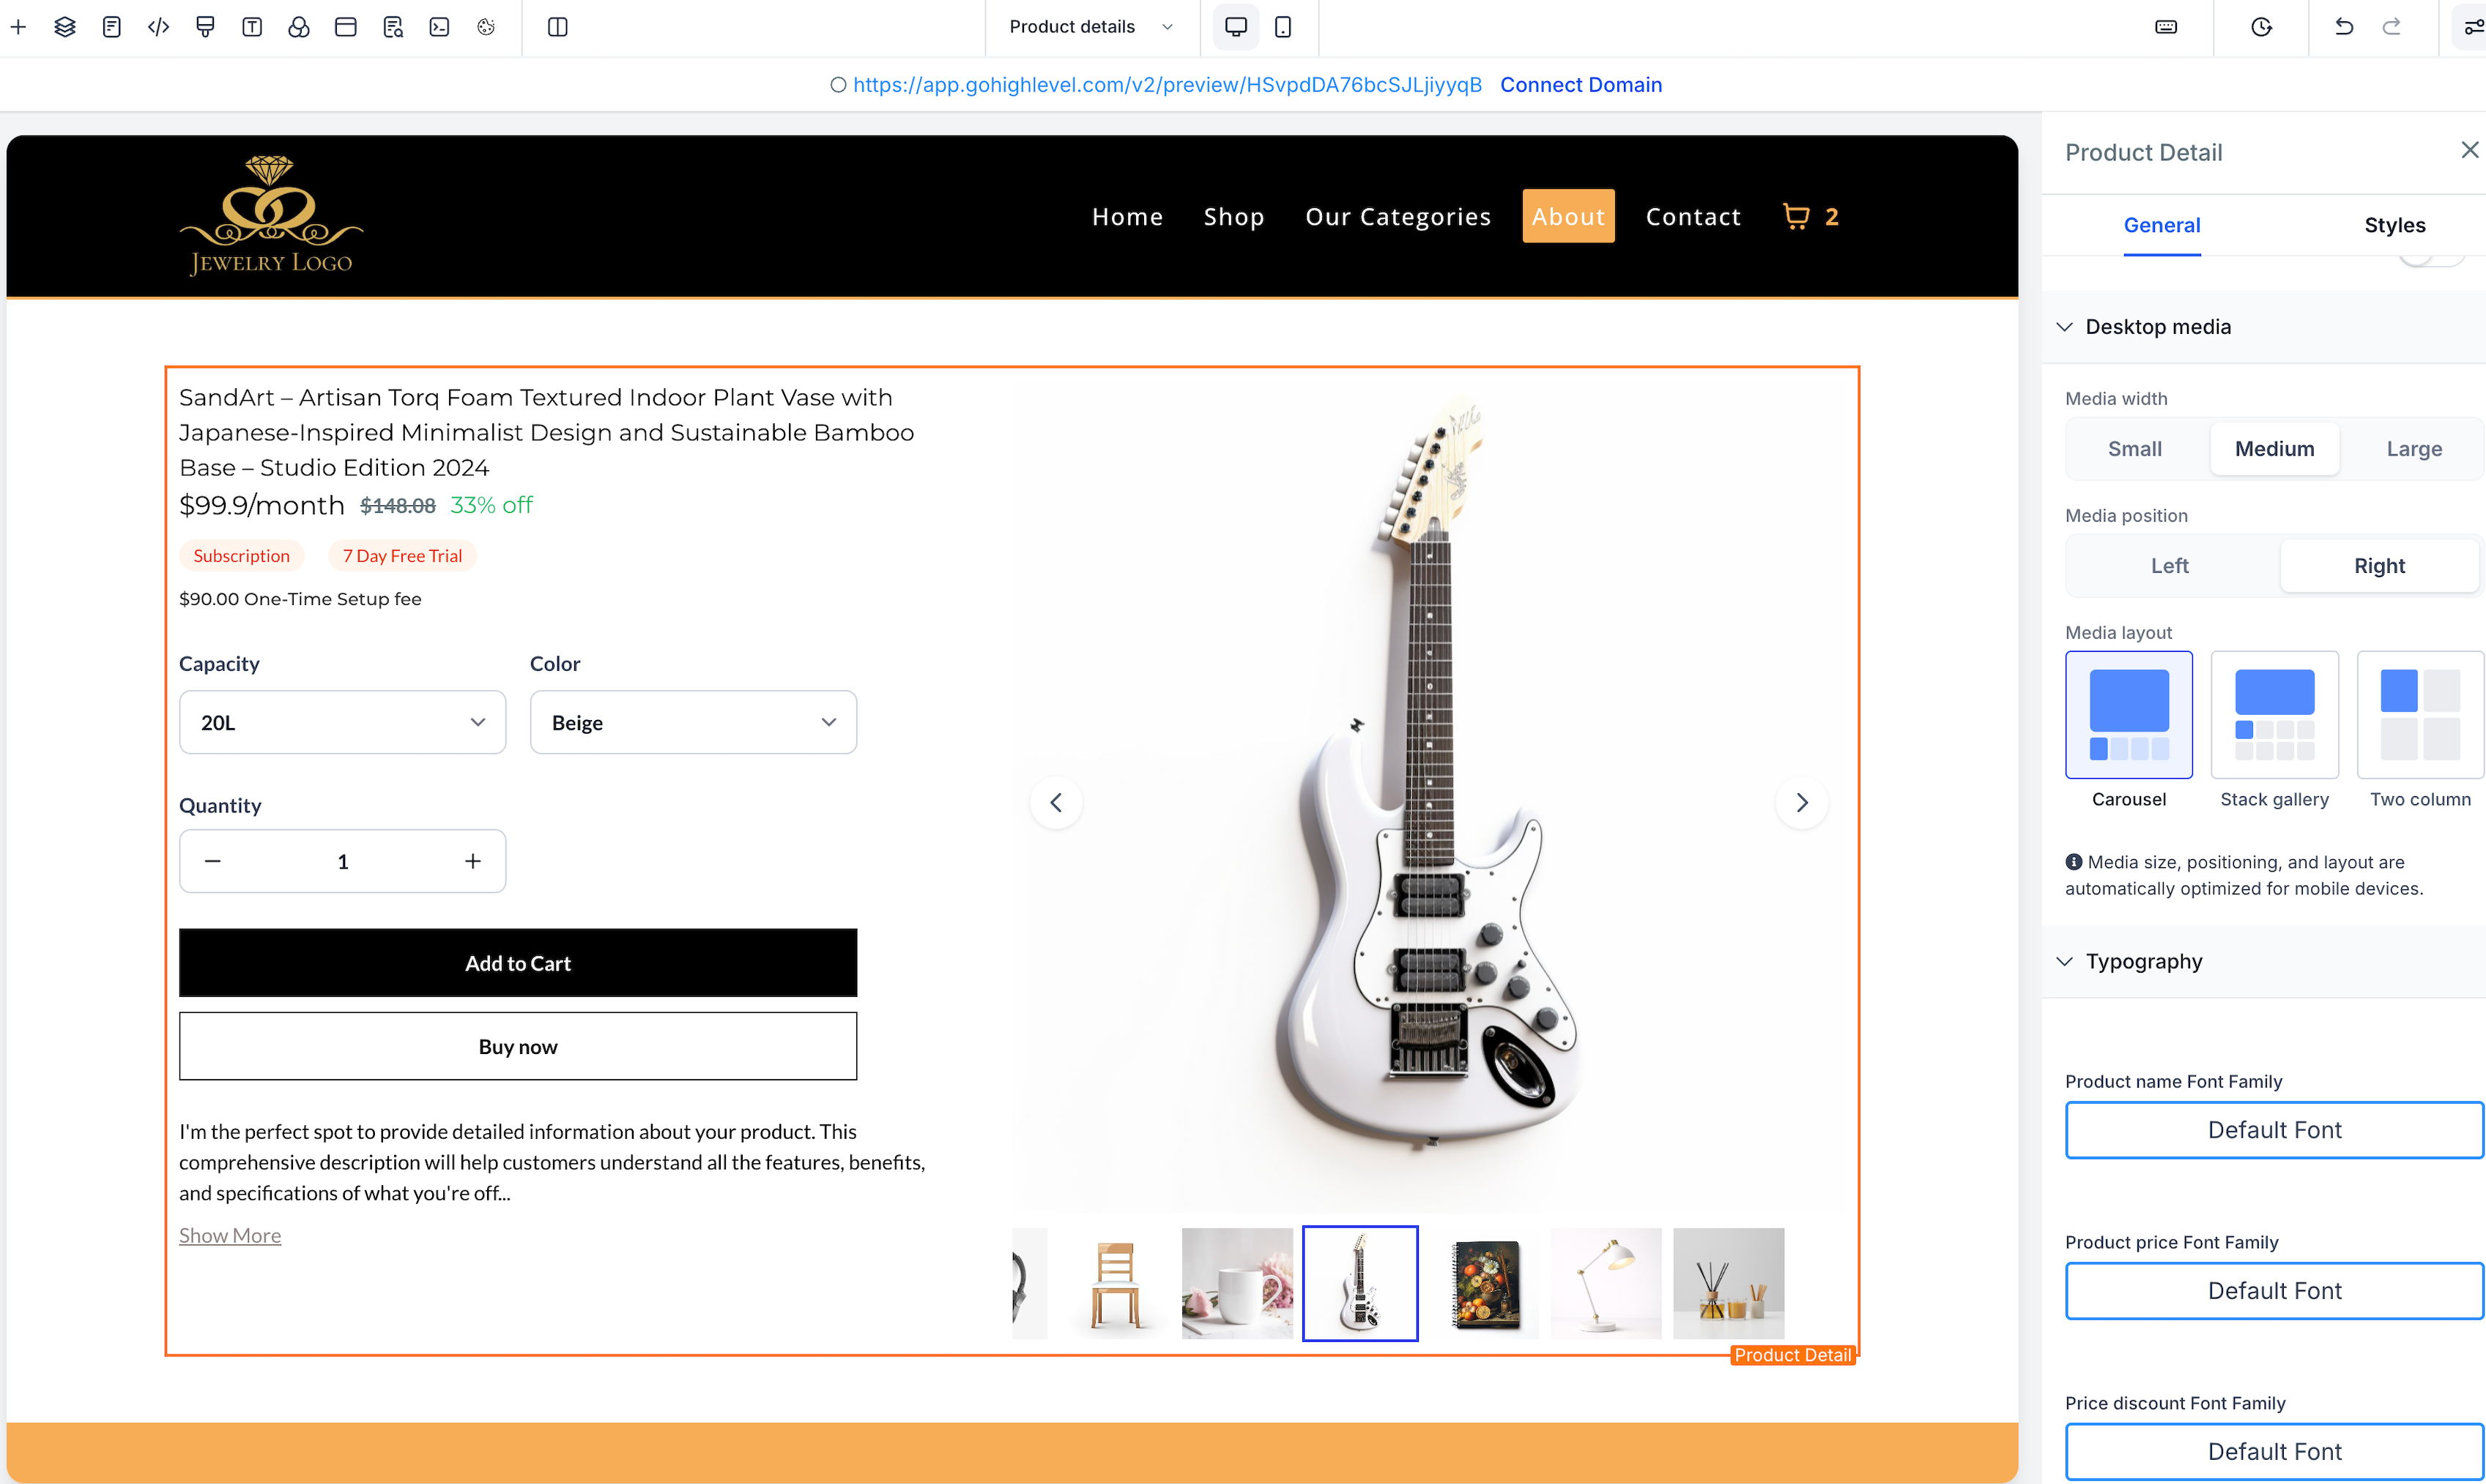
**Desktop Media Customization in the Product Details Element (image 7 of 7)**
This screenshot appears in the "Desktop Media Customization in the Product Details Element" section of "Custom Product Details Page for E-commerce Stores". The text alongside this image reads: For detailed instructions on media layout settings, refer to Product Media Layouts for GHL Customer Care Product Pages. This part of the guide covers 1 field, listed below. Immediately after, the guide continues: Q: Can a product be assigned to more than one Custom PDP? No. Each product can be linked to only one Custom PDP at a time. Assigning it to a new Custom PDP removes the previous association.
- What this covers: For detailed instructions on media layout settings, refer to Product Media Layouts for GHL Customer Care Product Pages.
- Fields: desktop Media width
- Next: Q: Can a product be assigned to more than one Custom PDP? No. Each product can be linked to only one Custom PDP at a time. Assigning it to a new Custom PDP removes the previous association.
Full procedure:
1. desktop Media width
2. desktop Media position
3. product media layout options
---
## **Frequently Asked Questions**
**Q: Can a product be assigned to more than one Custom PDP?**
No. Each product can be linked to only one Custom PDP at a time. Assigning it to a new Custom PDP removes the previous association.
**Q: What happens if I delete a Custom PDP?**
A: All associated products automatically revert to the default product detail page.
**Q: Do clicks from the PLP and featured sections respect Custom PDP mapping?**
A: Yes. Navigation routes to the Custom PDP when configured; otherwise, to the default PDP.
**Q: How do I switch a product to a different Custom PDP?**
A: Open the new PDP, assign the product via the modal or the page/editor **Settings**, Save, and Publish. The old association is removed automatically.
**Q: Does this change SEO or existing product links?**
A: The Custom PDP uses its own page URL/slug. When a product is mapped, shoppers reaching the product via PLP, featured sections, or links are routed to the Custom PDP.
**Q: Do PDP elements like “Related Products” work on a Custom PDP?**
A: Yes. PDP-compatible elements and **Text Customization** settings work on Custom PDP layouts.
**Q: Do new Custom PDPs start from a blank page?**
A: No. New Custom PDPs start as a copy of your current Default Product Details Page (PDP), so you begin with a fully built layout.
**Q: If I update the Default PDP later, will my Custom PDP update too?**
A: No. The Default-to-Custom inheritance happens once during creation. There is no live sync between the Default PDP and existing Custom PDPs.
**Q: Does creating a Custom PDP change my Default PDP?**
A: No. Creating a Custom PDP does not modify the Default PDP.
**Q: Are existing Custom PDPs affected by this change?**
A: No. Existing Custom PDPs keep their current design and settings.
**Q: Why don’t I see the “Create Custom Product Details Page” option in ClickFunnels flows?**
A: In ClickFunnels flows, the option is hidden to keep a simplified, funnel-first experience.
---
## **Related Articles**
- [How to Set Up an E-Commerce Online Store (Websites)](https://docs.ghlcustomercare.com/docs/e-commerce-store/e-commerce-store/how-to-set-up-an-e-commerce-online-store-websites)
- [How to Sort and Filter Products in GHL Customer Care Ecommerce Site Builder](https://docs.ghlcustomercare.com/docs/e-commerce-store/e-commerce-store/how-to-sort-and-filter-products-in-ghl-customer-care-ecommerce-site-builder)
- [Manual Product Sorting on Product List Page in Ecommerce Stores](https://docs.ghlcustomercare.com/docs/e-commerce-store/e-commerce-store/manual-product-sorting-on-product-list-page-in-ecommerce-stores)
- [Related Product element for Ecommerce stores](https://docs.ghlcustomercare.com/docs/e-commerce-store/e-commerce-store/related-product-element-for-ecommerce-stores)
- [How to Suggest Related Product(s) in Your Product Details Page](https://docs.ghlcustomercare.com/docs/e-commerce-store/e-commerce-store/how-to-suggest-related-product-s-in-your-product-details-page)
- [Text Customization in Ecommerce Stores](https://docs.ghlcustomercare.com/docs/e-commerce-store/e-commerce-store/text-customization-in-ecommerce-stores)
---
Documentation for GHL Customer Care. Support: support@ghlcustomercare.com