# Canonical URLs Explained: Boost Your GHL Customer Care Blog SEO
> Learn how to set canonical URLs in GHL Customer Care to avoid duplicate content, consolidate link equity, and enhance your blog’s SEO performance effortlessly.
- Source: https://docs.ghlcustomercare.com/docs/sites/blog/canonical-urls-explained-boost-your-ghl-customer-care-blog-seo
- Section: Sites / Blog
- Reading time: 4 min
- Images: 5, each explained below
- Modified on Thu, 29 May, 2025 at 7:13 AM
---
This guide covers both the why and how of implementing canonical URLs in GHL Customer Care, combining insights from official documentation and hands-on tutorials.
---
**TABLE OF CONTENTS**
- [What Are Canonical URLs?](#what-are-canonical-urls)
- [Why Canonical Tags Matter in SEO](#why-canonical-tags-matter-in-seo)
- [How to Set Canonical URLs in GHL Customer Care](#how-to-set-canonical-urls-in-ghl-customer-care)
- [How to Update Canonical Links for Published Blog Posts](#how-to-update-canonical-links-for-published-blog-posts)
- [How to Verify Canonical Link Implementation](#how-to-verify-canonical-link-implementation)
- [Best Practices](#best-practices)
- [Frequently Asked Questions](#frequently-asked-questions)
- [Related Articles](#related-articles)
---
---
## **What Are Canonical URLs?**
Canonical URLs are a way to declare which version of a webpage is the authoritative one when duplicate or near-duplicate content exists. Canonical URLs play a critical role in SEO by telling search engines which version of a webpage is the "master" copy. If your content appears in multiple places on your site, or across multiple sites, using canonical tags prevents confusion and helps maintain your search engine rankings.
This helps search engines:
- Understand where content originally resides.
- Prevent duplicate content penalties.
- Consolidate SEO value (link equity) across multiple instances of the same content.
#### **Example Scenario:**
Suppose you publish a blog post titled **"Top Marketing Automation Trends in 2024"**. That post may appear on:
- The blog’s main page.
- A homepage with recent posts.
- A category archive.
- An author bio page.
To avoid penalization due to content duplication, you set the **main blog post URL** as canonical so that search engines know which version to index.
---
## **Why Canonical Tags Matter in SEO**
Canonical tags are a foundational element of modern SEO strategy. They help search engines identify which version of a webpage should be prioritized when duplicate or similar content exists across multiple URLs. Without them, search engines may split ranking power between pages or index the wrong version, negatively impacting your site's visibility. Implementing canonical tags ensures that your chosen "main" content gets the credit it deserves and that all duplicate signals are consolidated to strengthen your rankings.
- **Prevent SEO Penalties**: Duplicate content may dilute your rankings.
- **Consolidate Link Equity**: Backlinks pointing to multiple versions count toward a single source.
- **Guide Search Engines**: They ensure that search bots prioritize the correct page.
---
## **How to Set Canonical URLs in GHL Customer Care**
GHL Customer Care makes it easy to configure canonical URLs across your blog platform, whether for your entire blog site, specific categories, author pages, or individual blog posts. Implementing these settings ensures search engines understand which version of your content to prioritize, reducing the risk of SEO dilution due to duplicate content. Here’s how to do it effectively:
### **1\. For the Entire Blog, Category, and Author Pages**
Setting canonical URLs at the blog level ensures your main blog, category, and author pages are recognized as the original sources. Steps:
1. Navigate to **Sites > Blogs**.
2. Select your blog and click continue to get the blog settings.
3. Choose **Canonical Links**.
4. Fill in the fields for:
- **URL Slug**: The primary blog domain (e.g., `https://myblog.com`).
- **Category URL**: Where category content resides.
- **Author URL**: The main author bio page.
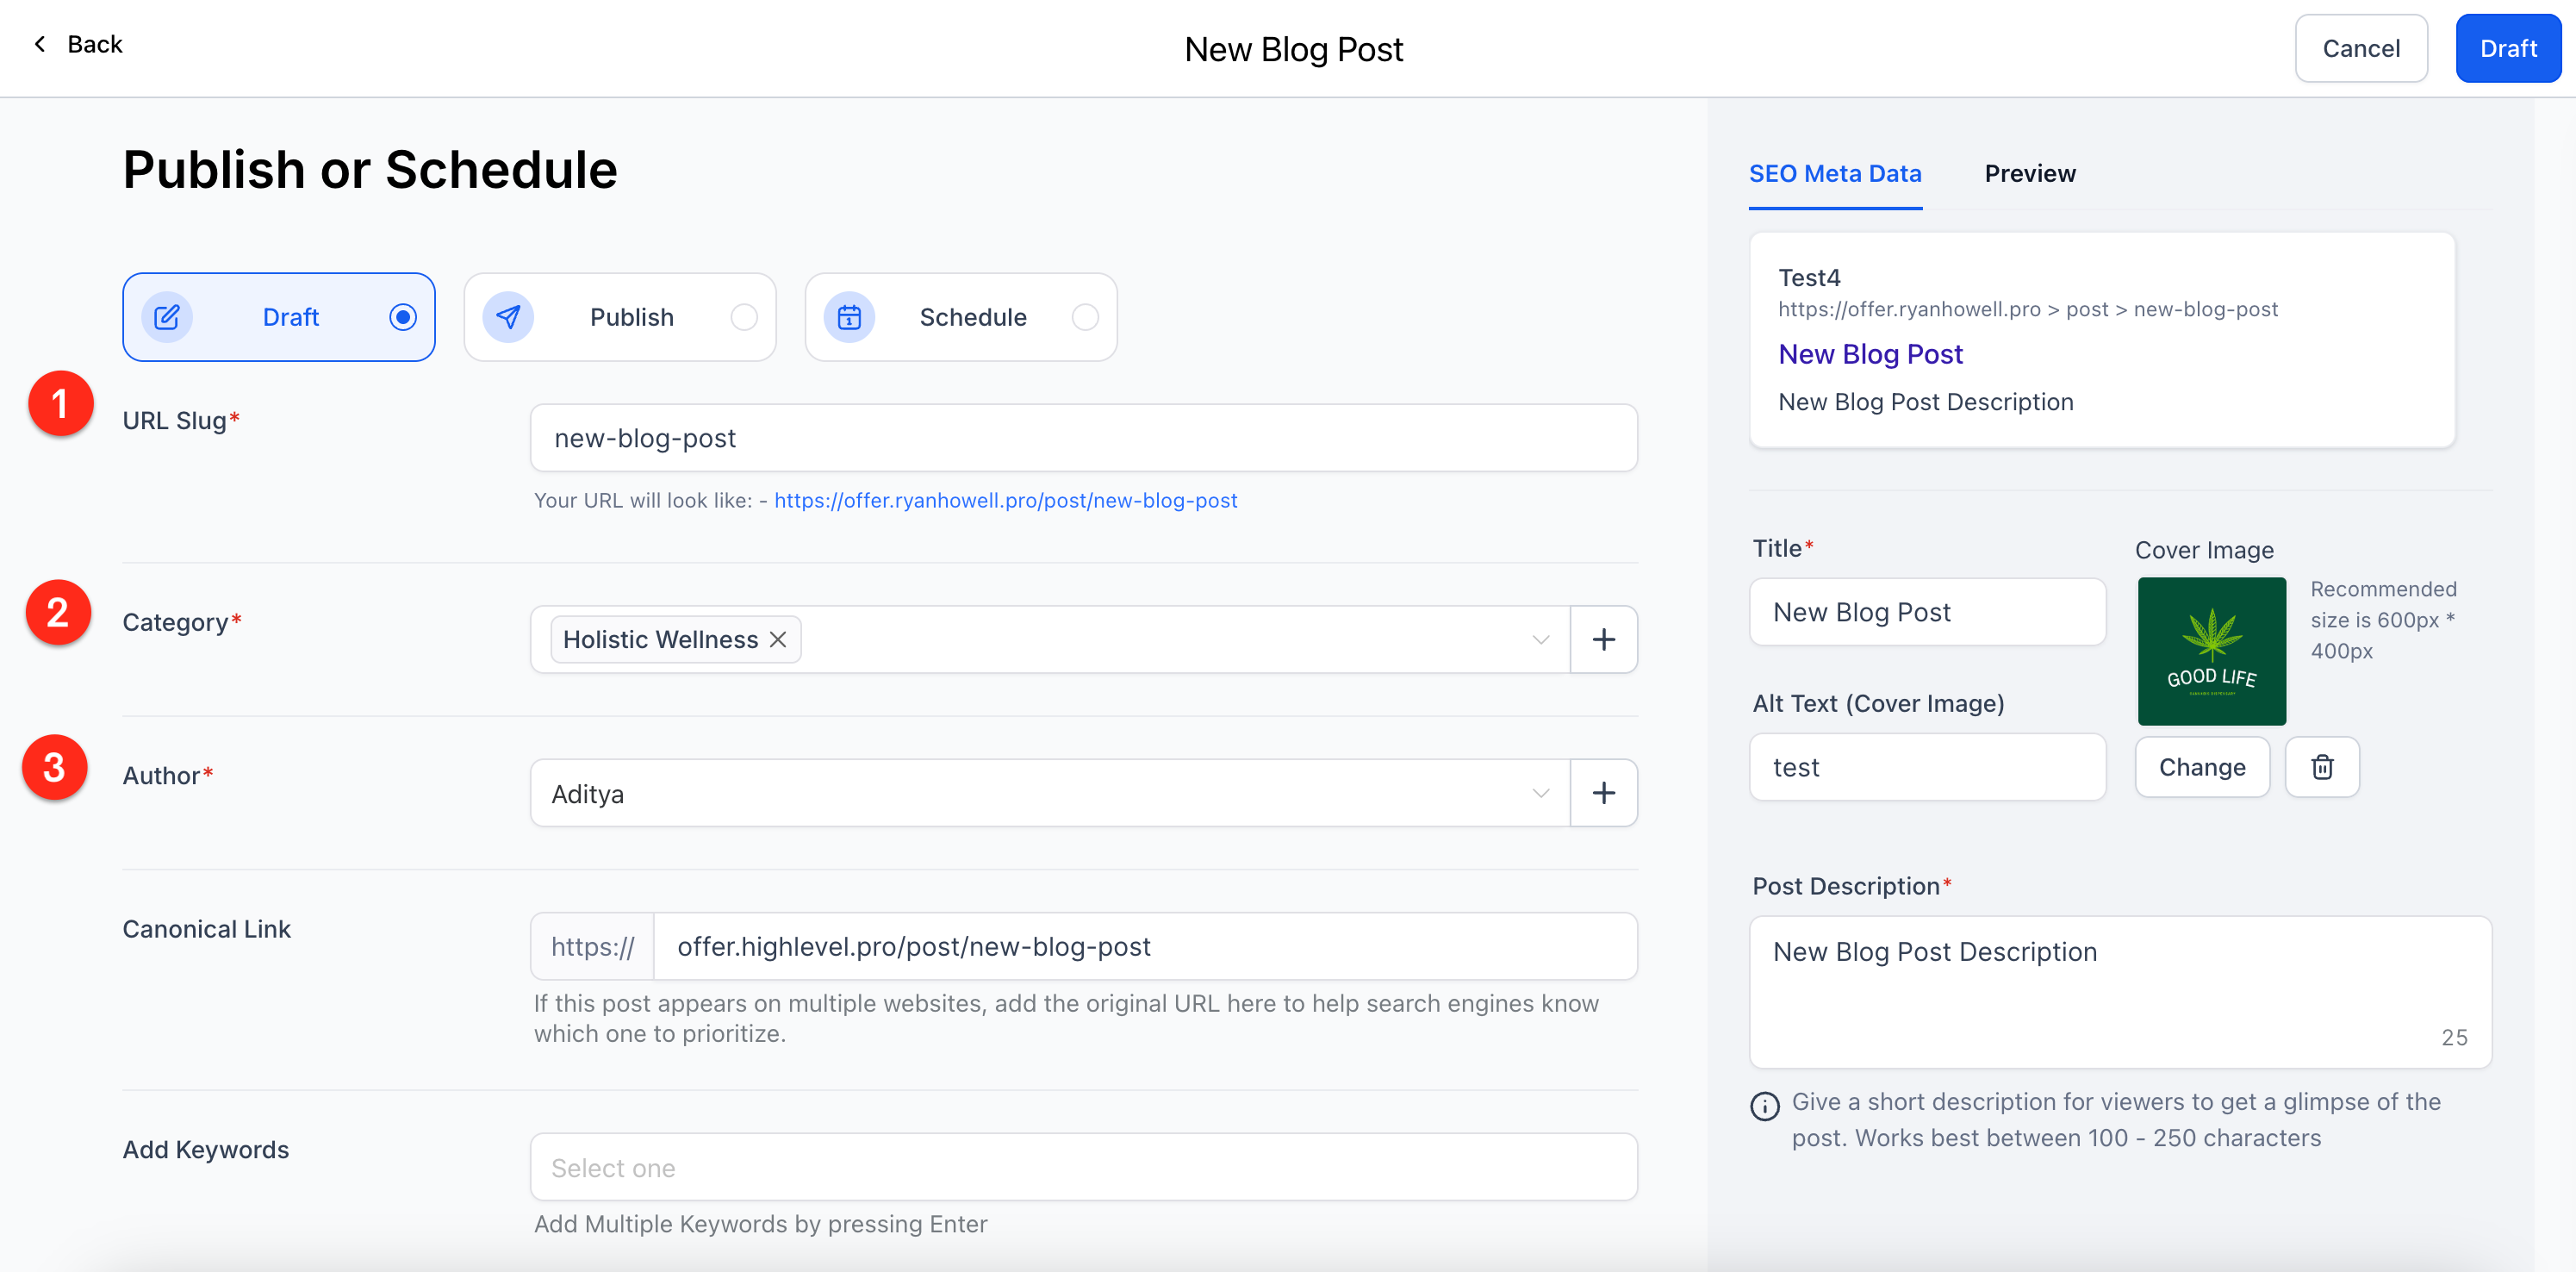
**1. For the Entire Blog, Category, and Author Pages (image 1 of 5)**
This screenshot appears in the "1. For the Entire Blog, Category, and Author Pages" section of "Canonical URLs Explained: Boost Your GHL Customer Care Blog SEO". The text alongside this image reads: Navigate to Sites > Blogs. Select your blog and click continue to get the blog settings. Choose Canonical Links. Fill in the fields for. The navigation path used here is Sites > Blogs. Immediately after, the guide continues: Note: This helps avoid duplication if excerpts appear on multiple pages (like author bios embedded in posts).
- Path: Sites > Blogs
- Where to go: Navigate to Sites > Blogs. Select your blog and click continue to get the blog settings. Choose Canonical Links. Fill in the fields for:
- Controls: Sites > Blogs, Canonical Links, URL Slug, Category URL, Author URL, Note
- Next: Note: This helps avoid duplication if excerpts appear on multiple pages (like author bios embedded in posts).
Full procedure:
1. Navigate to Sites > Blogs.
2. Select your blog and click continue to get the blog settings.
3. Choose Canonical Links.
4. Fill in the fields for:
**Note**: This helps avoid duplication if excerpts appear on multiple pages (like author bios embedded in posts).
### **2\. For Individual Blog Posts**
Sometimes, different blog posts cover similar topics, or your content is syndicated across multiple domains. Set a canonical URL to direct SEO value to the intended source. Steps:
1. In **Sites > Blogs**, either create a new blog post or edit an existing one.
2. Add your content and metadata.
3. Click **Continue** to move to the final step.
4. Locate the **Canonical Link** field.
5. Paste the URL of the original (preferred) version of the content.
6. Click **Save**, **Schedule**, or **Publish**.
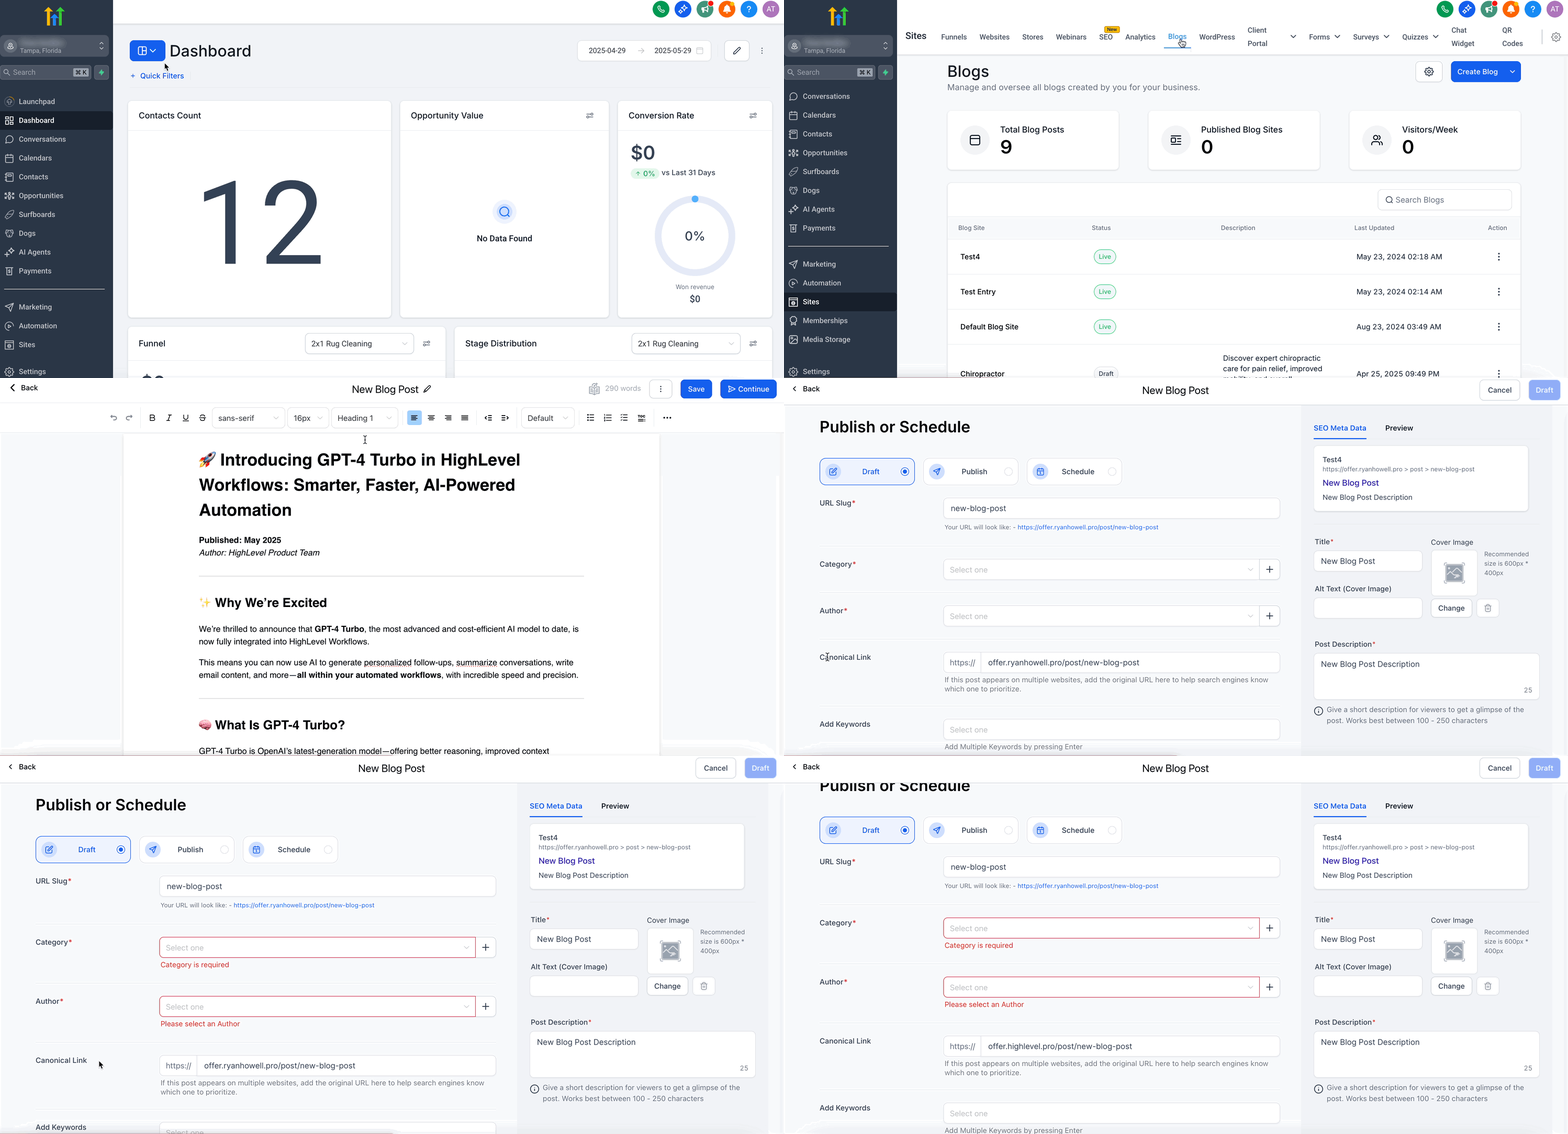
**2. For Individual Blog Posts (image 2 of 5)**
This animation appears in the "2. For Individual Blog Posts" section of "Canonical URLs Explained: Boost Your GHL Customer Care Blog SEO". The text alongside this image reads: In Sites > Blogs, either create a new blog post or edit an existing one. Add your content and metadata. Click Continue to move to the final step. Locate the Canonical Link field. Paste the URL of the original (preferred) version of the content. Click Save, Schedule, or Publish. The navigation path used here is In Sites > Blogs. Immediately after, the guide continues: Note: You can update canonical URLs on existing blog posts by clicking "Edit" and using the same process.
- Path: In Sites > Blogs
- How to confirm: In Sites > Blogs, either create a new blog post or edit an existing one. Add your content and metadata. Click Continue to move to the final step. Locate the Canonical Link field. Paste the URL of the original (preferred) version of the content. Click Save, Schedule, or Publish.
- Controls: Sites > Blogs, Continue, Canonical Link, Save, Schedule, Publish, Note
- Next: Note: You can update canonical URLs on existing blog posts by clicking "Edit" and using the same process.
Full procedure:
1. In Sites > Blogs, either create a new blog post or edit an existing one.
2. Add your content and metadata.
3. Click Continue to move to the final step.
4. Locate the Canonical Link field.
5. Paste the URL of the original (preferred) version of the content.
6. Click Save, Schedule, or Publish.
**Note**: You can update canonical URLs on existing blog posts by clicking "Edit" and using the same process.
---
## **How to Update Canonical Links for Published Blog Posts**
If your Blog Posts are already published and you wish to update them, follow these steps,
1\. Locate the Blog Post for which you wish to update the Canonical Link
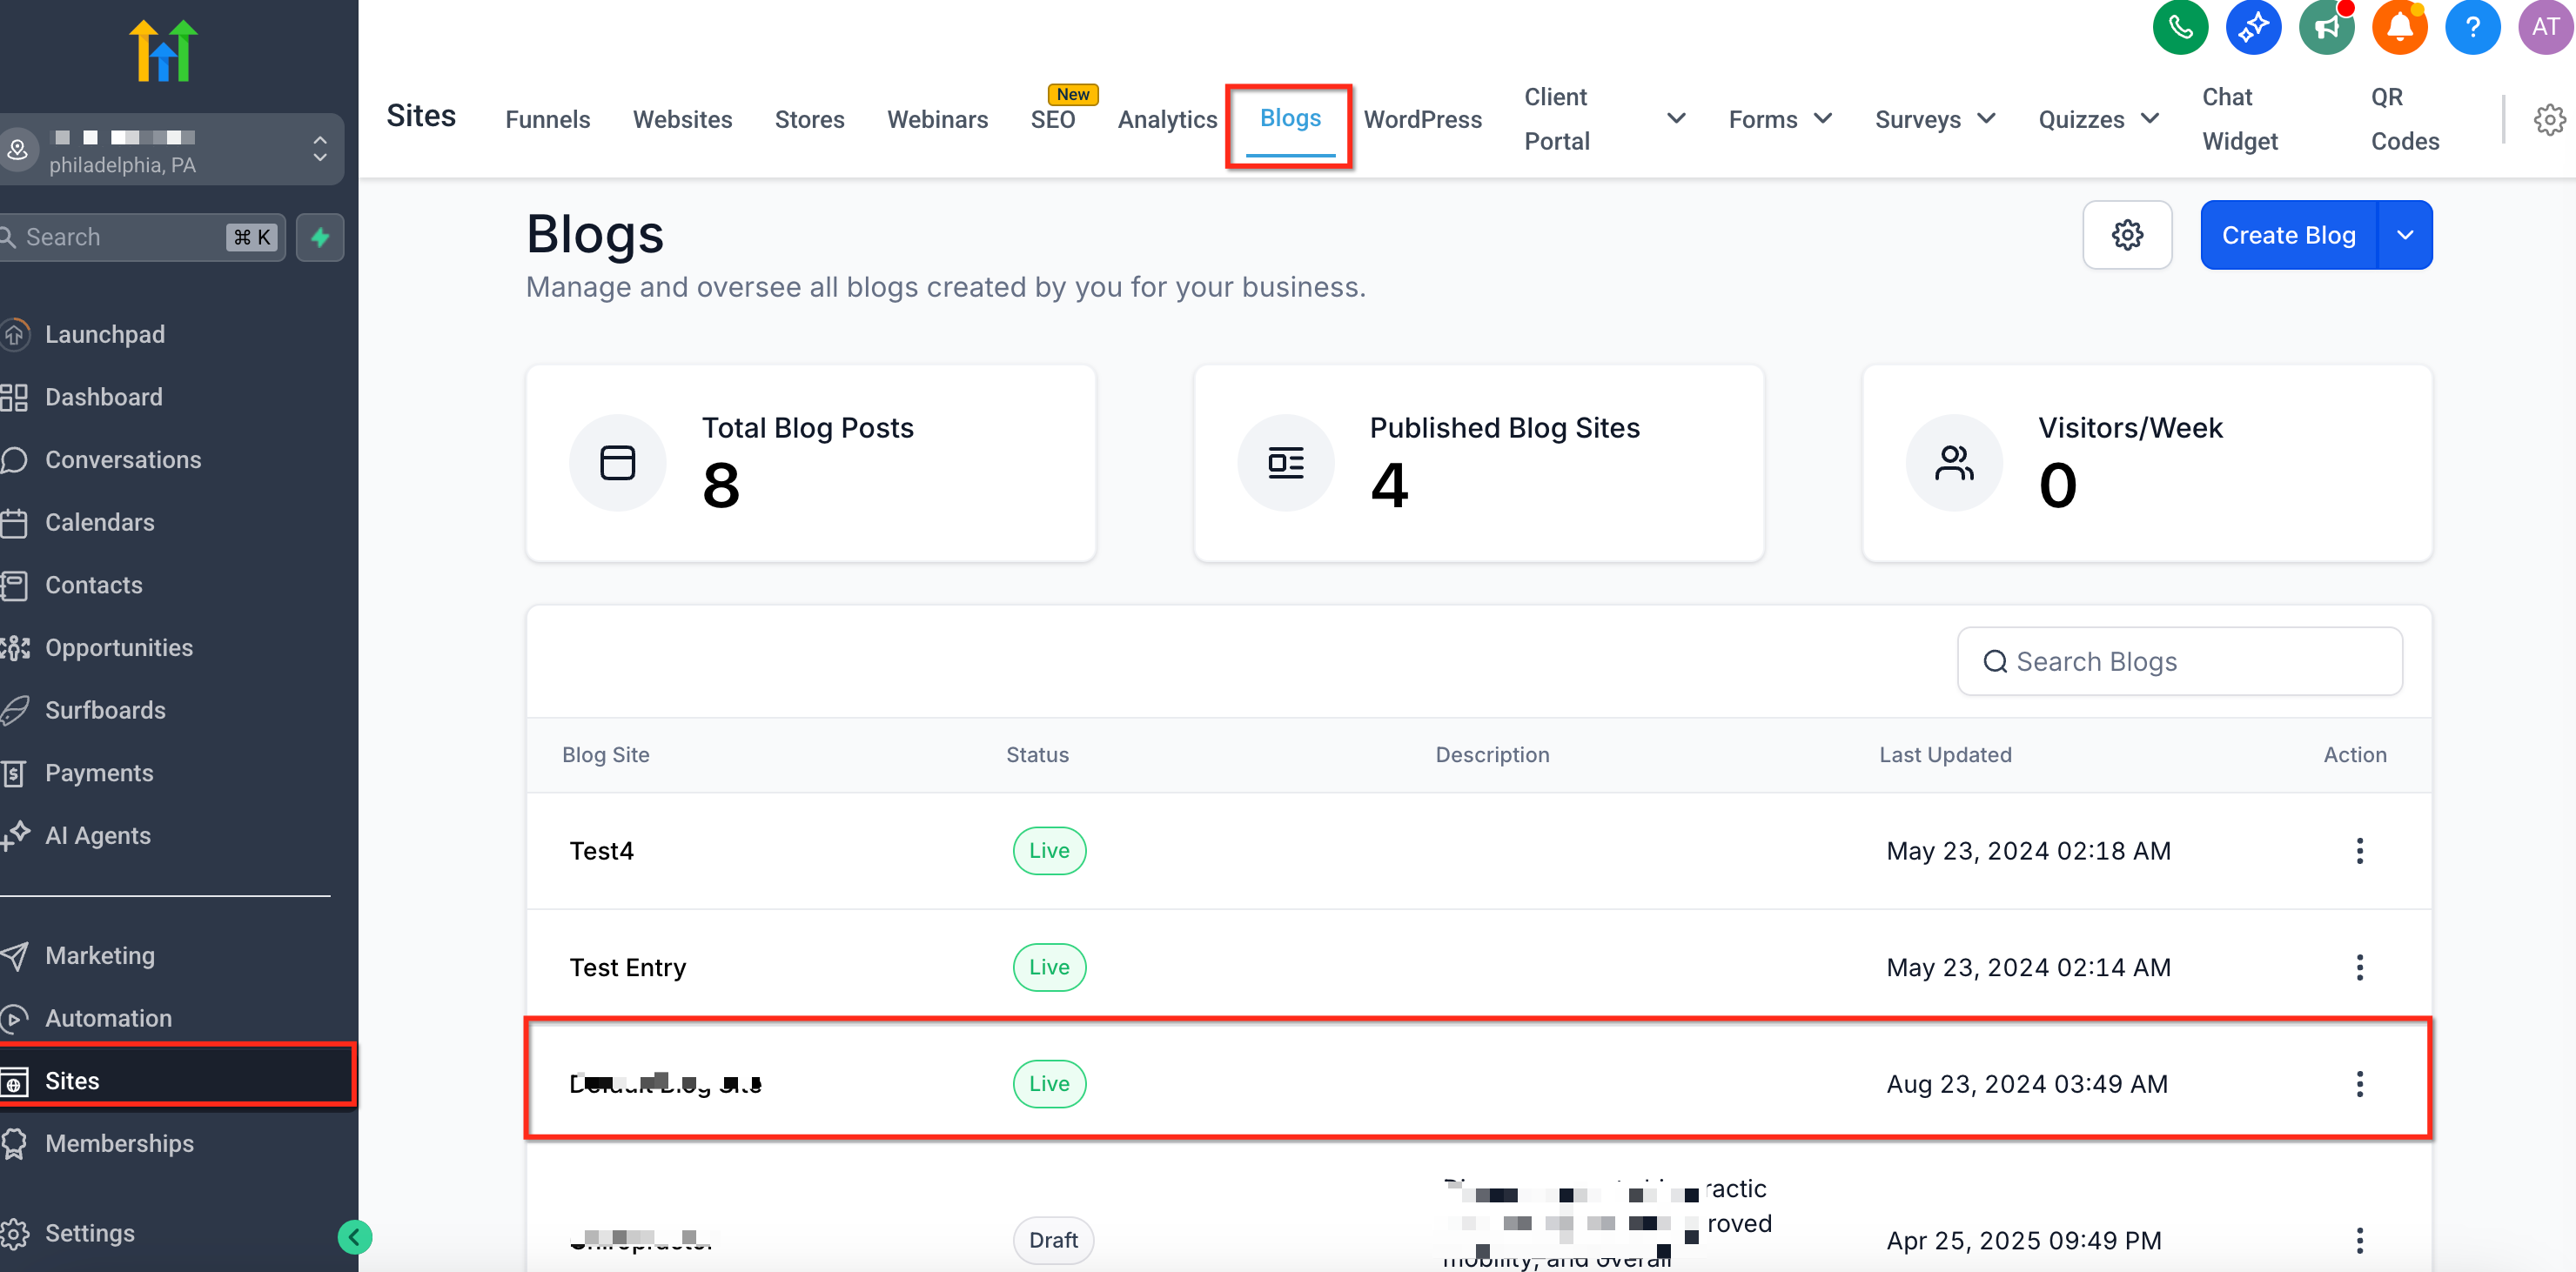
**How to Update Canonical Links for Published Blog Posts (image 3 of 5)**
This screenshot appears in the "How to Update Canonical Links for Published Blog Posts" section of "Canonical URLs Explained: Boost Your GHL Customer Care Blog SEO". The text alongside this image reads: 1. Locate the Blog Post for which you wish to update the Canonical Link. Immediately after, the guide continues: 2. Click on Update Settings to add the updated Canonical Link.
- What this covers: 1. Locate the Blog Post for which you wish to update the Canonical Link
- Next: 2. Click on Update Settings to add the updated Canonical Link
2\. Click on Update Settings to add the updated Canonical Link
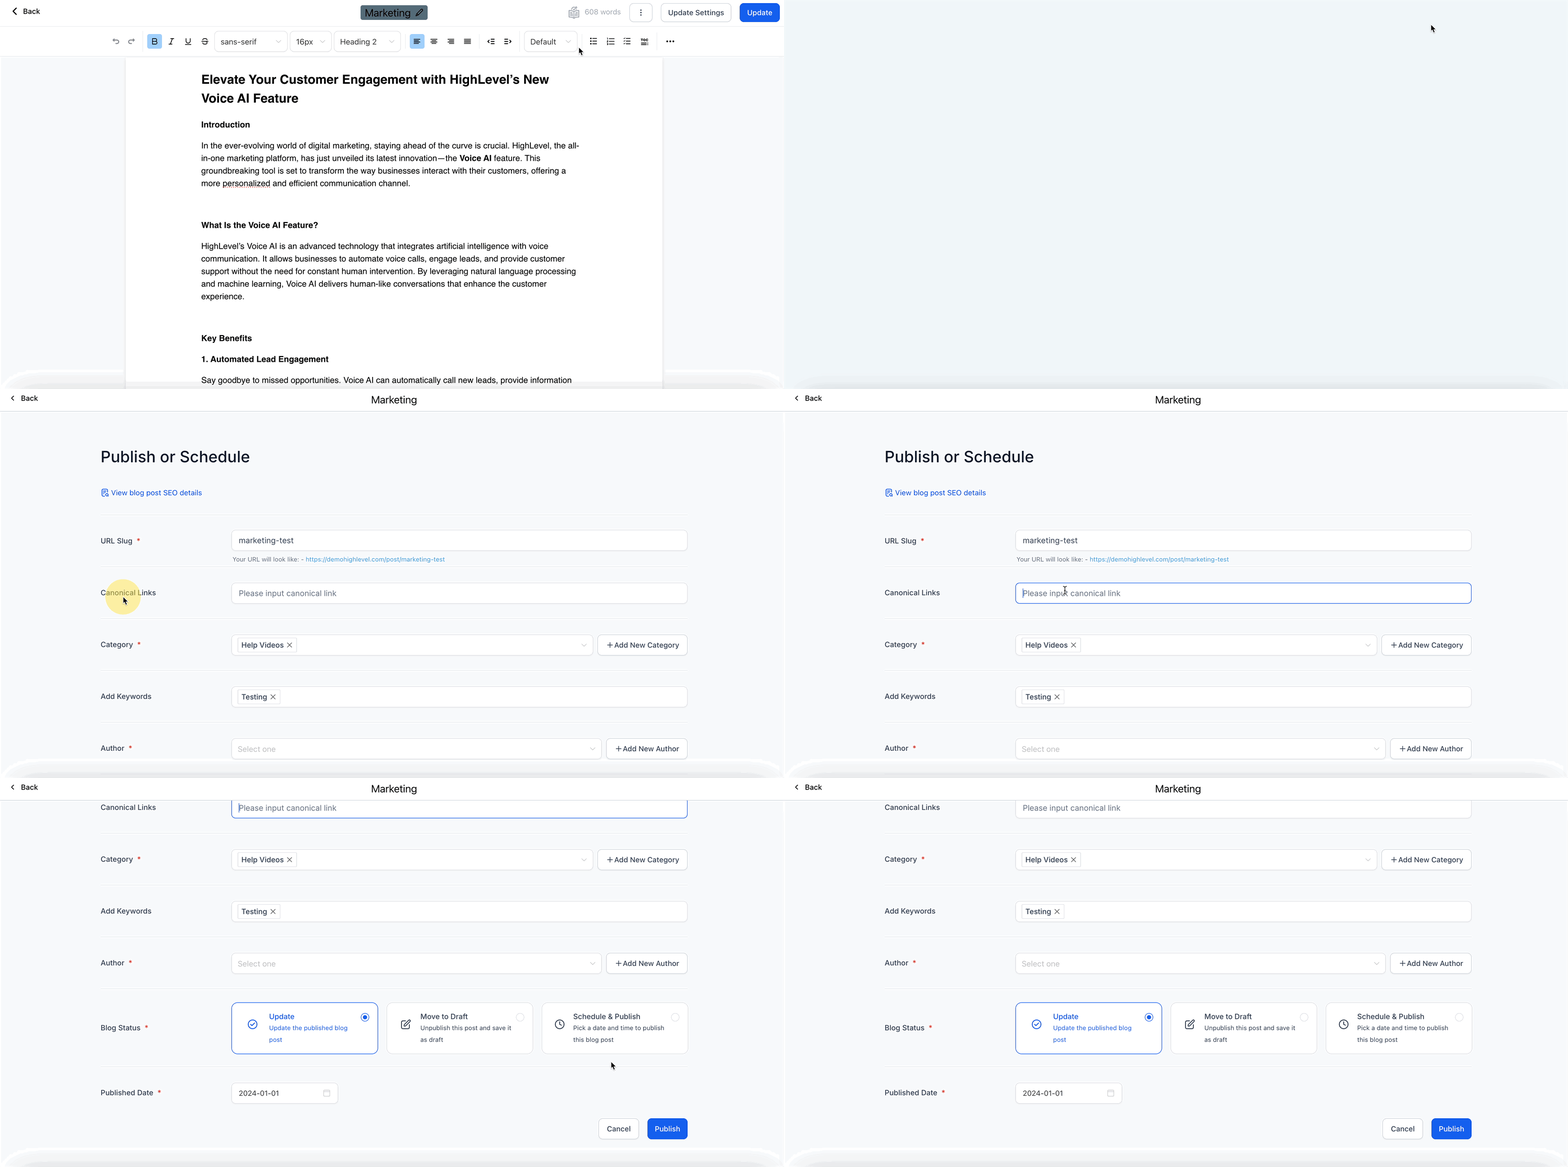
**How to Update Canonical Links for Published Blog Posts (image 4 of 5)**
This animation appears in the "How to Update Canonical Links for Published Blog Posts" section of "Canonical URLs Explained: Boost Your GHL Customer Care Blog SEO". The text alongside this image reads: 2. Click on Update Settings to add the updated Canonical Link. Immediately after, the guide continues: To confirm the implementation of canonical links, follow these simple steps.
- What to click: 2. Click on Update Settings to add the updated Canonical Link
- Next: To confirm the implementation of canonical links, follow these simple steps:
---
## **How to Verify Canonical Link Implementation**
To confirm the implementation of canonical links, follow these simple steps:
1. **Right-click** on the published blog page.
2. Select **“View Page Source”** from the context menu.
3. In the source code, look for a tag that looks like this:
```
```
4. Ensure the `**href**` value correctly points to the intended canonical URL.
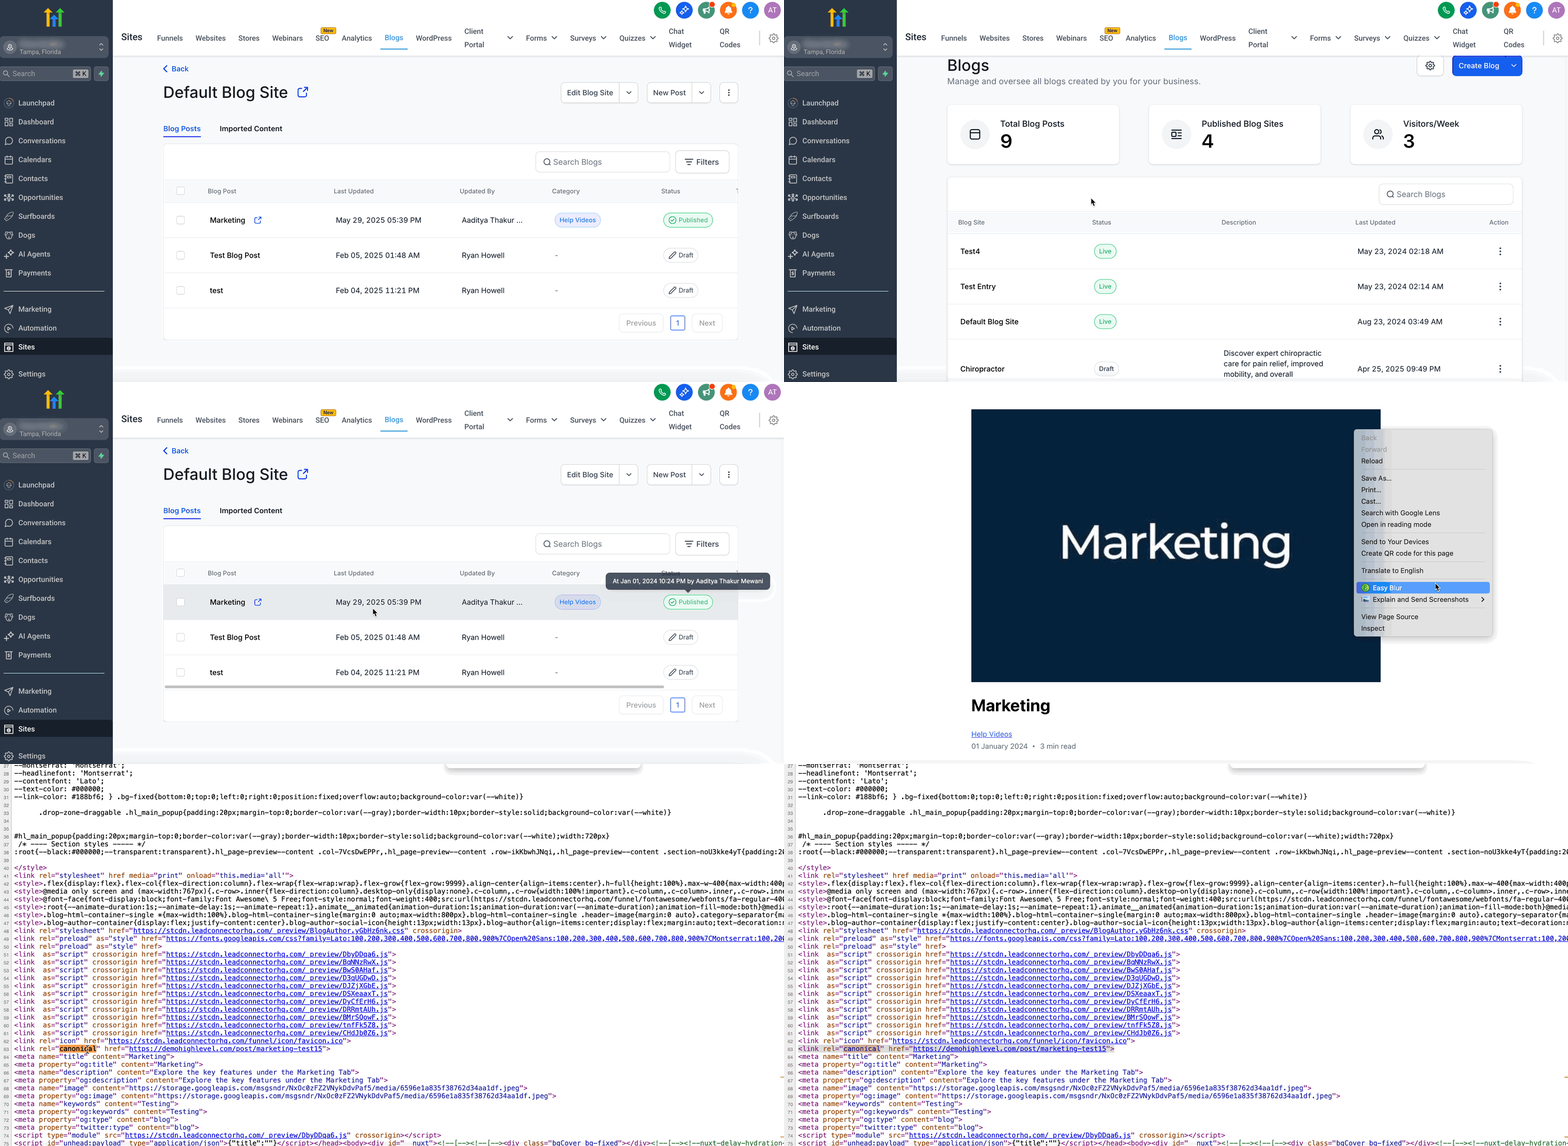
**How to Verify Canonical Link Implementation (image 5 of 5)**
This animation appears in the "How to Verify Canonical Link Implementation" section of "Canonical URLs Explained: Boost Your GHL Customer Care Blog SEO". The text alongside this image reads: Right-click on the published blog page. Select “View Page Source” from the context menu. In the source code, look for a tag that looks like this: Ensure the href value correctly points to the intended canonical URL. Immediately after, the guide continues: Note: You can also use SEO tools like Screaming Frog or browser extensions like SEO Meta in 1 Click to visually inspect canonical tags.
- What to choose: Right-click on the published blog page. Select “View Page Source” from the context menu. In the source code, look for a tag that looks like this: Ensure the href value correctly points to the intended canonical URL.
- Controls: Right-click, “View Page Source”, href, Note
- Next: Note: You can also use SEO tools like Screaming Frog or browser extensions like SEO Meta in 1 Click to visually inspect canonical tags.
Full procedure:
1. Right-click on the published blog page.
2. Select “View Page Source” from the context menu.
3. In the source code, look for a tag that looks like this:
4. Ensure the href value correctly points to the intended canonical URL.
**Note**: You can also use SEO tools like Screaming Frog or browser extensions like SEO Meta in 1 Click to visually inspect canonical tags.
---
## **Best Practices**
To ensure canonical tags are working effectively, it's important to follow some key guidelines. These best practices help maximize SEO benefits and avoid unintended issues with search engine indexing.
- Always use **absolute URLs** (full URL with domain).
- Make sure the canonical URL actually exists and is accessible.
- Avoid pointing all pages to the homepage — be specific and intentional.
- Keep content on the canonical and alternate pages as close to identical as possible.
---
## **Frequently Asked Questions**
**Q. What happens if I don’t use canonical tags?**
Without canonical tags, search engines might treat similar or duplicate pages as separate, which can split ranking power and result in lower visibility.
**Q. Can I use canonical tags across domains?**
Yes, cross-domain canonical tags are valid. Just ensure you own the content on both domains.
**Q. Should I use canonical tags for every blog post?**
Only when there's potential for duplication. If each post is unique and doesn't appear elsewhere, it’s not necessary.
**Q. Will canonical tags improve my rankings?**
They won’t directly improve rankings, but will help consolidate link equity and avoid SEO issues due to duplicate content.
---
## **Related Articles**
- [How to create Blog Post?](https://docs.ghlcustomercare.com/docs/sites/blog/create-blog-posts)
- [How to move from Old Blog to New Blog?](https://docs.ghlcustomercare.com/docs/sites/blog/how-to-move-from-old-blog-to-new-blog)
- [Add Blog Post Element in Funnel(s) step or Website(s) page](https://docs.ghlcustomercare.com/docs/sites/blog/add-blog-post-element-in-funnel-step-or-website-page)
---
Documentation for GHL Customer Care. Support: support@ghlcustomercare.com