# Add and Track Product Cost Price & Margin
> Product Cost Price & Margin provide a structured and accurate view of each products profitability, cost and margin directly inside the Products module.
- Source: https://docs.ghlcustomercare.com/docs/payments/products-taxes-and-coupons/add-and-track-product-cost-price-margin
- Section: Payments / Products, Taxes & Coupons
- Reading time: 7 min
- Images: 12, each explained below
- Modified on Wed, 27 May at 4:54 PM
---
Track your product profitability by adding cost price and margin details to any product price or variant. This gives you a built-in way to understand what you earn on every sale, without needing external spreadsheets or manual calculations.
---
**TABLE OF CONTENTS**
- [What is Cost Price & Margin Tracking?](#what-is-cost-price-and-margin-tracking)
- [Key Benefits of Tracking Cost Price and Margin](#key-benefits-of-tracking-cost-price-and-margin)
- [Prerequisites](#prerequisites)
- [How to Enable Margin Tracking for Products](#how-to-enable-margin-tracking-for-products)
- [How to Enable Margin Tracking for Product Variants](#how-to-enable-margin-tracking-for-product-variants)
- [How Cost Price & Margin Sync](#how-cost-price-and-margin-sync)
- [How Cost Price Appears in Invoices & Calendars](#how-cost-price-appears-in-invoices-and-calendars)
- [Transactions CSV: Line Item Cost Price](#transactions-csv-line-item-cost-price)
- [Frequently Asked Questions](#frequently-asked-questions)
- [Related Articles](#related-articles)
---
# **What is Cost Price & Margin Tracking?**
Product Cost Price & Margin are optional fields you can enable for any product or variant in GHL Customer Care. Once enabled, they provide a structured and accurate view of each products profitability directly inside the Products module. When cost price is defined, it also flows into the Transactions CSV export as a dedicated **Line Item Cost Price** column, allowing profitability analysis at the transaction level.
Knowing these terms will help keep your team aligned when tracking product cost price and margin:
- **Cost Price:** What the product costs your business to deliver or acquire (always ≥ 0).
- **Margin (Amount):** The difference between your selling price and cost price (Selling Price − Cost Price). Margin amount can be positive or negative.
- **Margin (Percentage):** Expresses that difference as a percentage of cost price ((Selling Price − Cost Price) ÷ Cost Price × 100). If cost price is 0, margin percentage is treated as 100%.
---
## **Key Benefits of Tracking Cost Price and Margin**
- **Platform-Native Profitability Tracking:** Know your margin per product at a glance, without leaving the platform.
- **Automatic Calculations:** Enter either cost price or margin (Amount or Percentage) and the other calculates automatically.
- **Flexible:** Works for one-time and recurring products, across prices and variants.
- **Consistent Costs:** Cost price stays accurate even when invoice or calendar prices are manually overridden.
- **Export-Ready Data:** Export transaction-level cost data in CSV for finance and reconciliation workflows.
---
## **Prerequisites**
- Access to **Payments** → **Products** in your account.
- At least one product created (new or existing).
- **Permissions:** Users need product create/edit permissions to configure cost price and margin.
---
## **How to Enable Margin Tracking for Products**
Cost Price and Margin are configured at the price level (for standard products) or variant level (for products with variants). The fields appear inside the Pricing section when creating or editing a product.
To track product cost price and margin, follow the steps below.
#### **Step 1:** Navigate to Products
In the left menu, click **Payments**. Then in the top ribbon, click **Products** to open the Products page.
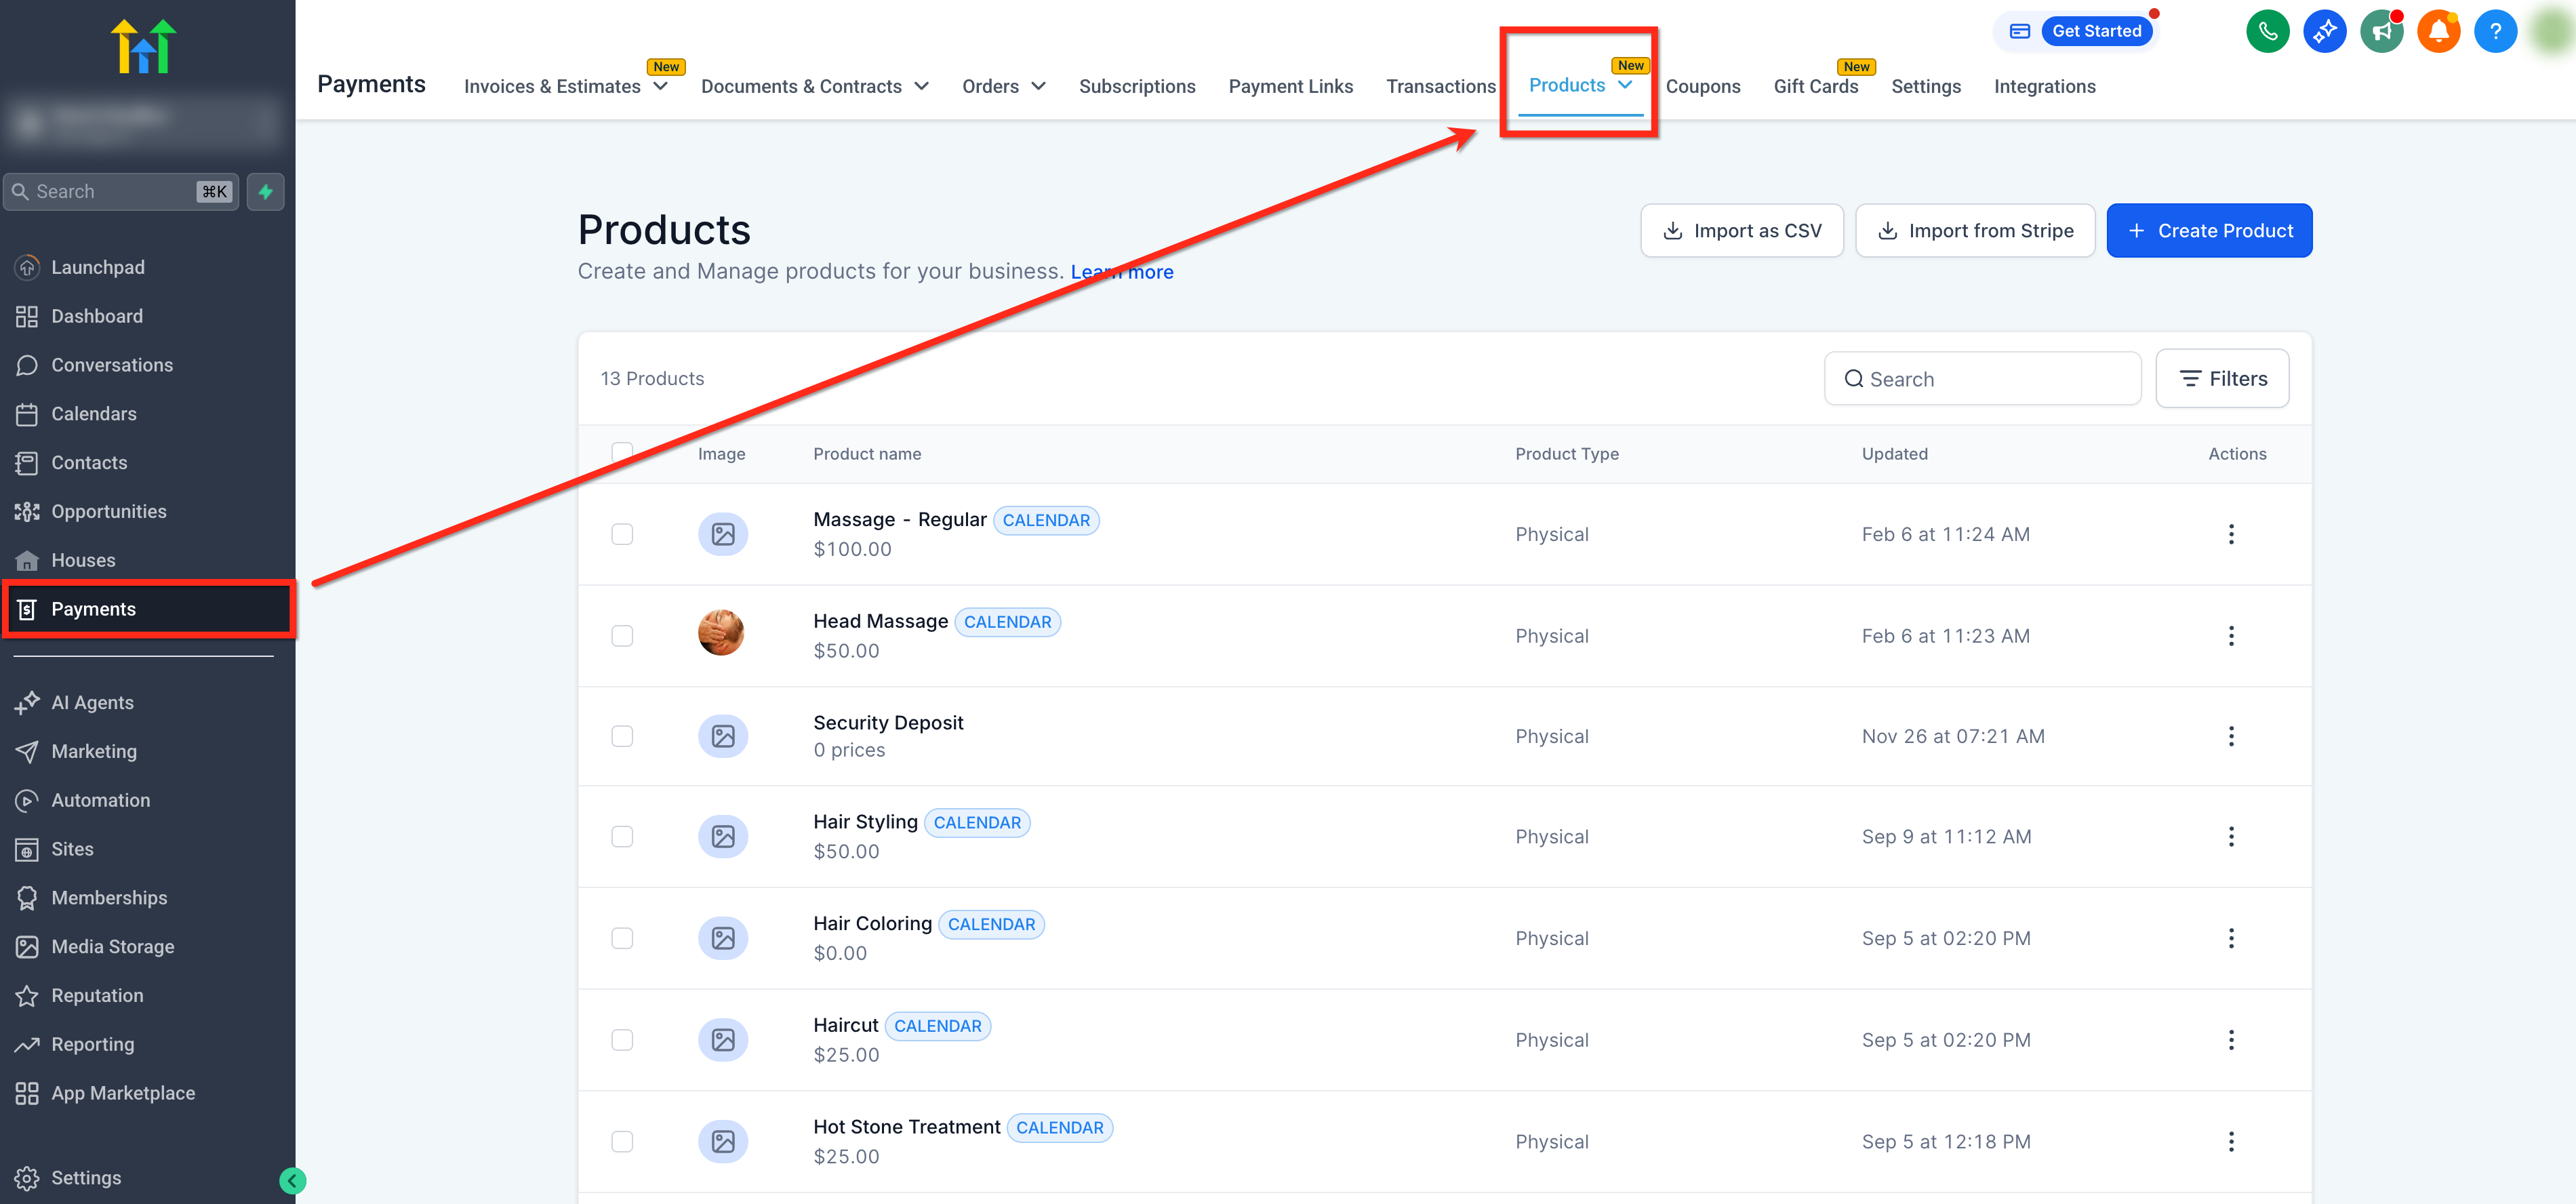
**Step 1: Navigate to Products (image 1 of 12)**
This screenshot appears in the "Step 1: Navigate to Products" section of "Add and Track Product Cost Price & Margin". The text alongside this image reads: In the left menu, click Payments. Then in the top ribbon, click Products to open the Products page. Immediately after, the guide continues: Click the + Create Product button to create a new product, or click on an existing product to edit it.
- What to click: In the left menu, click Payments. Then in the top ribbon, click Products to open the Products page.
- Controls: Payments, Products
- Next: Click the + Create Product button to create a new product, or click on an existing product to edit it.
#### **Step 2:** Create a Product
Click the **\+ Create Product** button to create a new product, or click on an existing product to edit it.
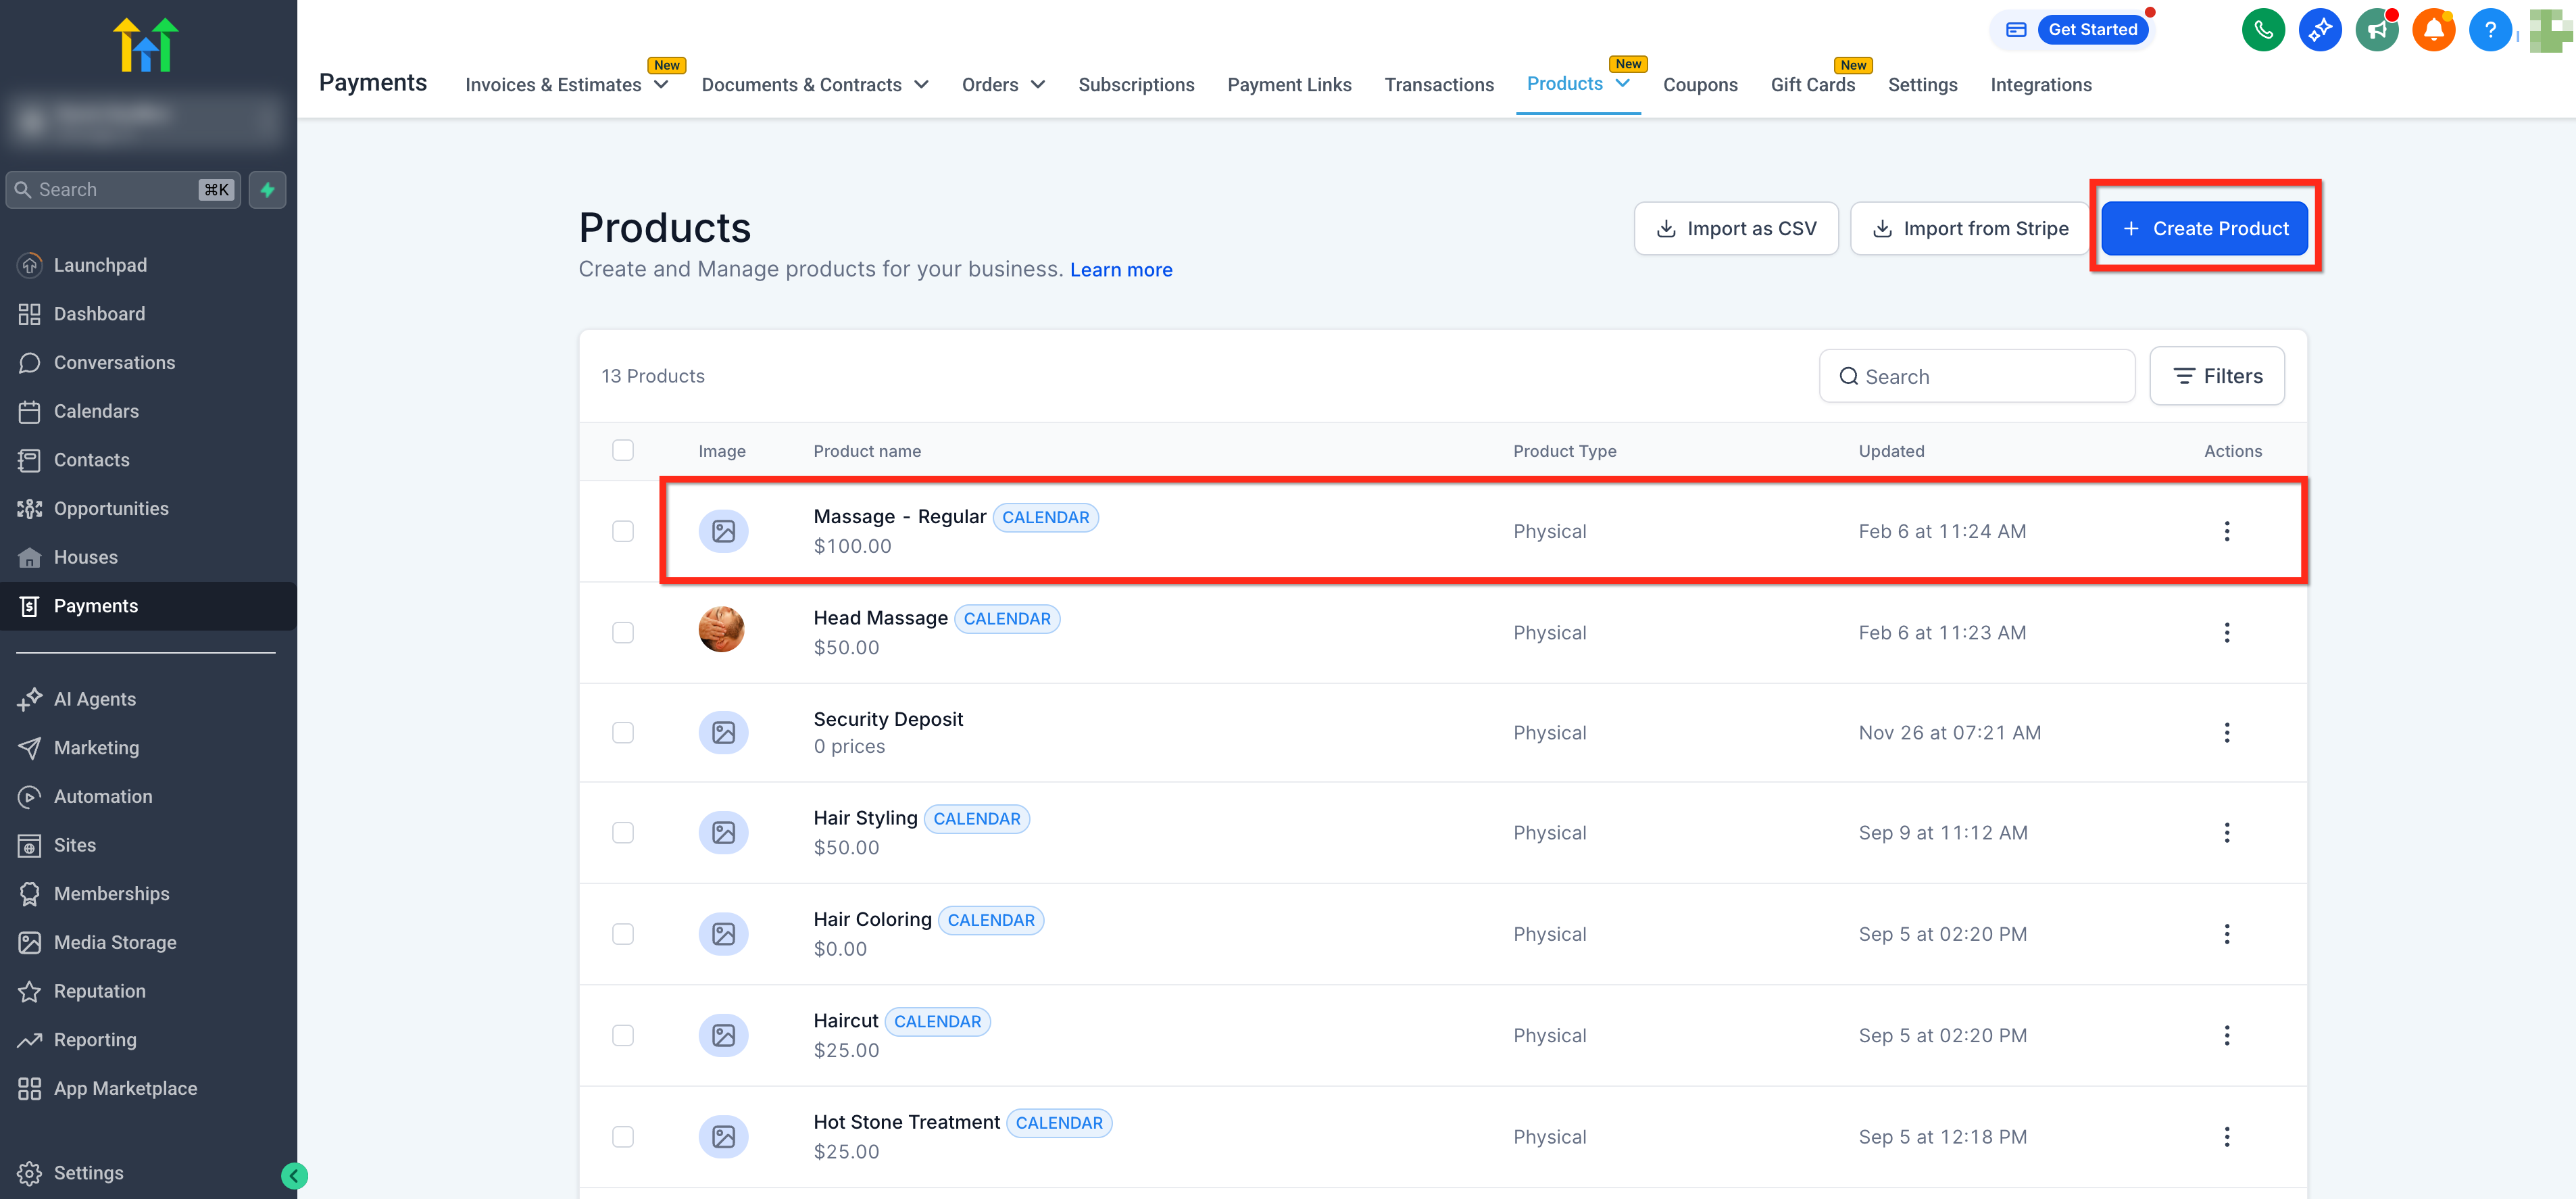
**Step 2: Create a Product (image 2 of 12)**
This screenshot appears in the "Step 2: Create a Product" section of "Add and Track Product Cost Price & Margin". The text alongside this image reads: Click the + Create Product button to create a new product, or click on an existing product to edit it. Immediately after, the guide continues: In the product creation or edit flow, scroll to the Pricing section. For existing products, click Edit next to the price you want to configure.
- What to click: Click the + Create Product button to create a new product, or click on an existing product to edit it.
- Controls: + Create Product
- Next: In the product creation or edit flow, scroll to the Pricing section. For existing products, click Edit next to the price you want to configure.
#### **Step 3:** Go to the Pricing Section
In the product creation or edit flow, scroll to the **Pricing** section. For existing products, click **Edit** next to the price you want to configure.
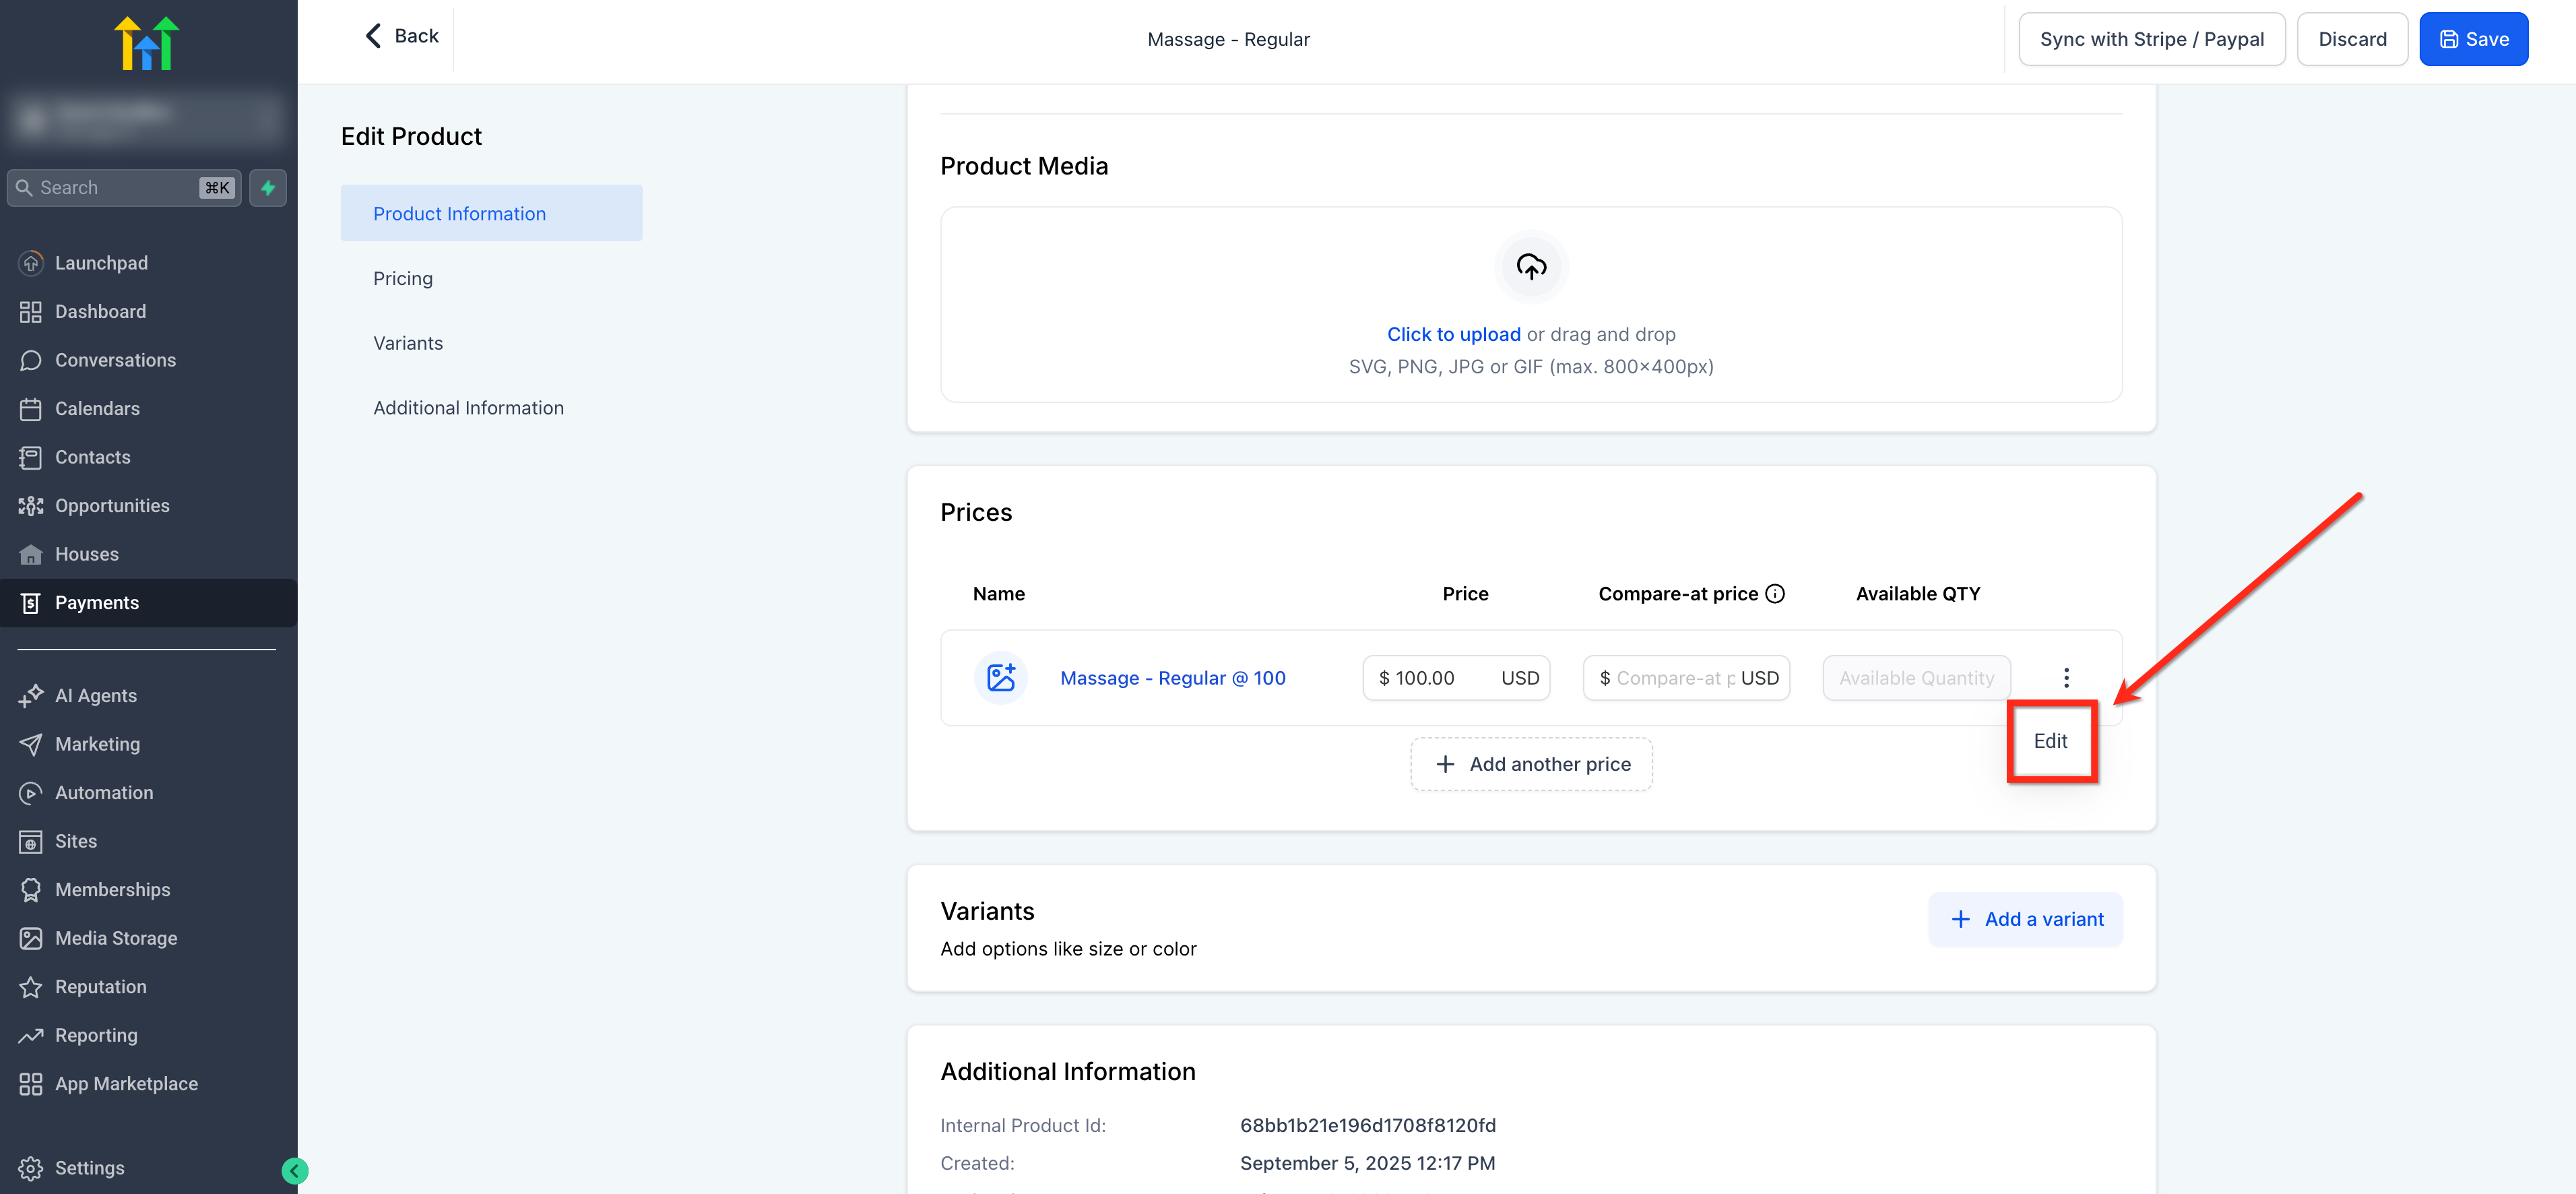
**Step 3: Go to the Pricing Section (image 3 of 12)**
This screenshot appears in the "Step 3: Go to the Pricing Section" section of "Add and Track Product Cost Price & Margin". The text alongside this image reads: In the product creation or edit flow, scroll to the Pricing section. For existing products, click Edit next to the price you want to configure. Immediately after, the guide continues: Inside the Pricing section, check the Add Margin checkbox. This reveals the Cost Price and Margin fields. The checkbox is unchecked by default, enabling it does not affect existing transactions.
- What to click: In the product creation or edit flow, scroll to the Pricing section. For existing products, click Edit next to the price you want to configure.
- Controls: Pricing, Edit
- Next: Inside the Pricing section, check the Add Margin checkbox. This reveals the Cost Price and Margin fields. The checkbox is unchecked by default, enabling it does not affect existing transactions.
#### **Step 4:** Enable the Add Margin Checkbox
Inside the Pricing section, check the **Add Margin** checkbox. This reveals the Cost Price and Margin fields. The checkbox is unchecked by default, enabling it does not affect existing transactions.
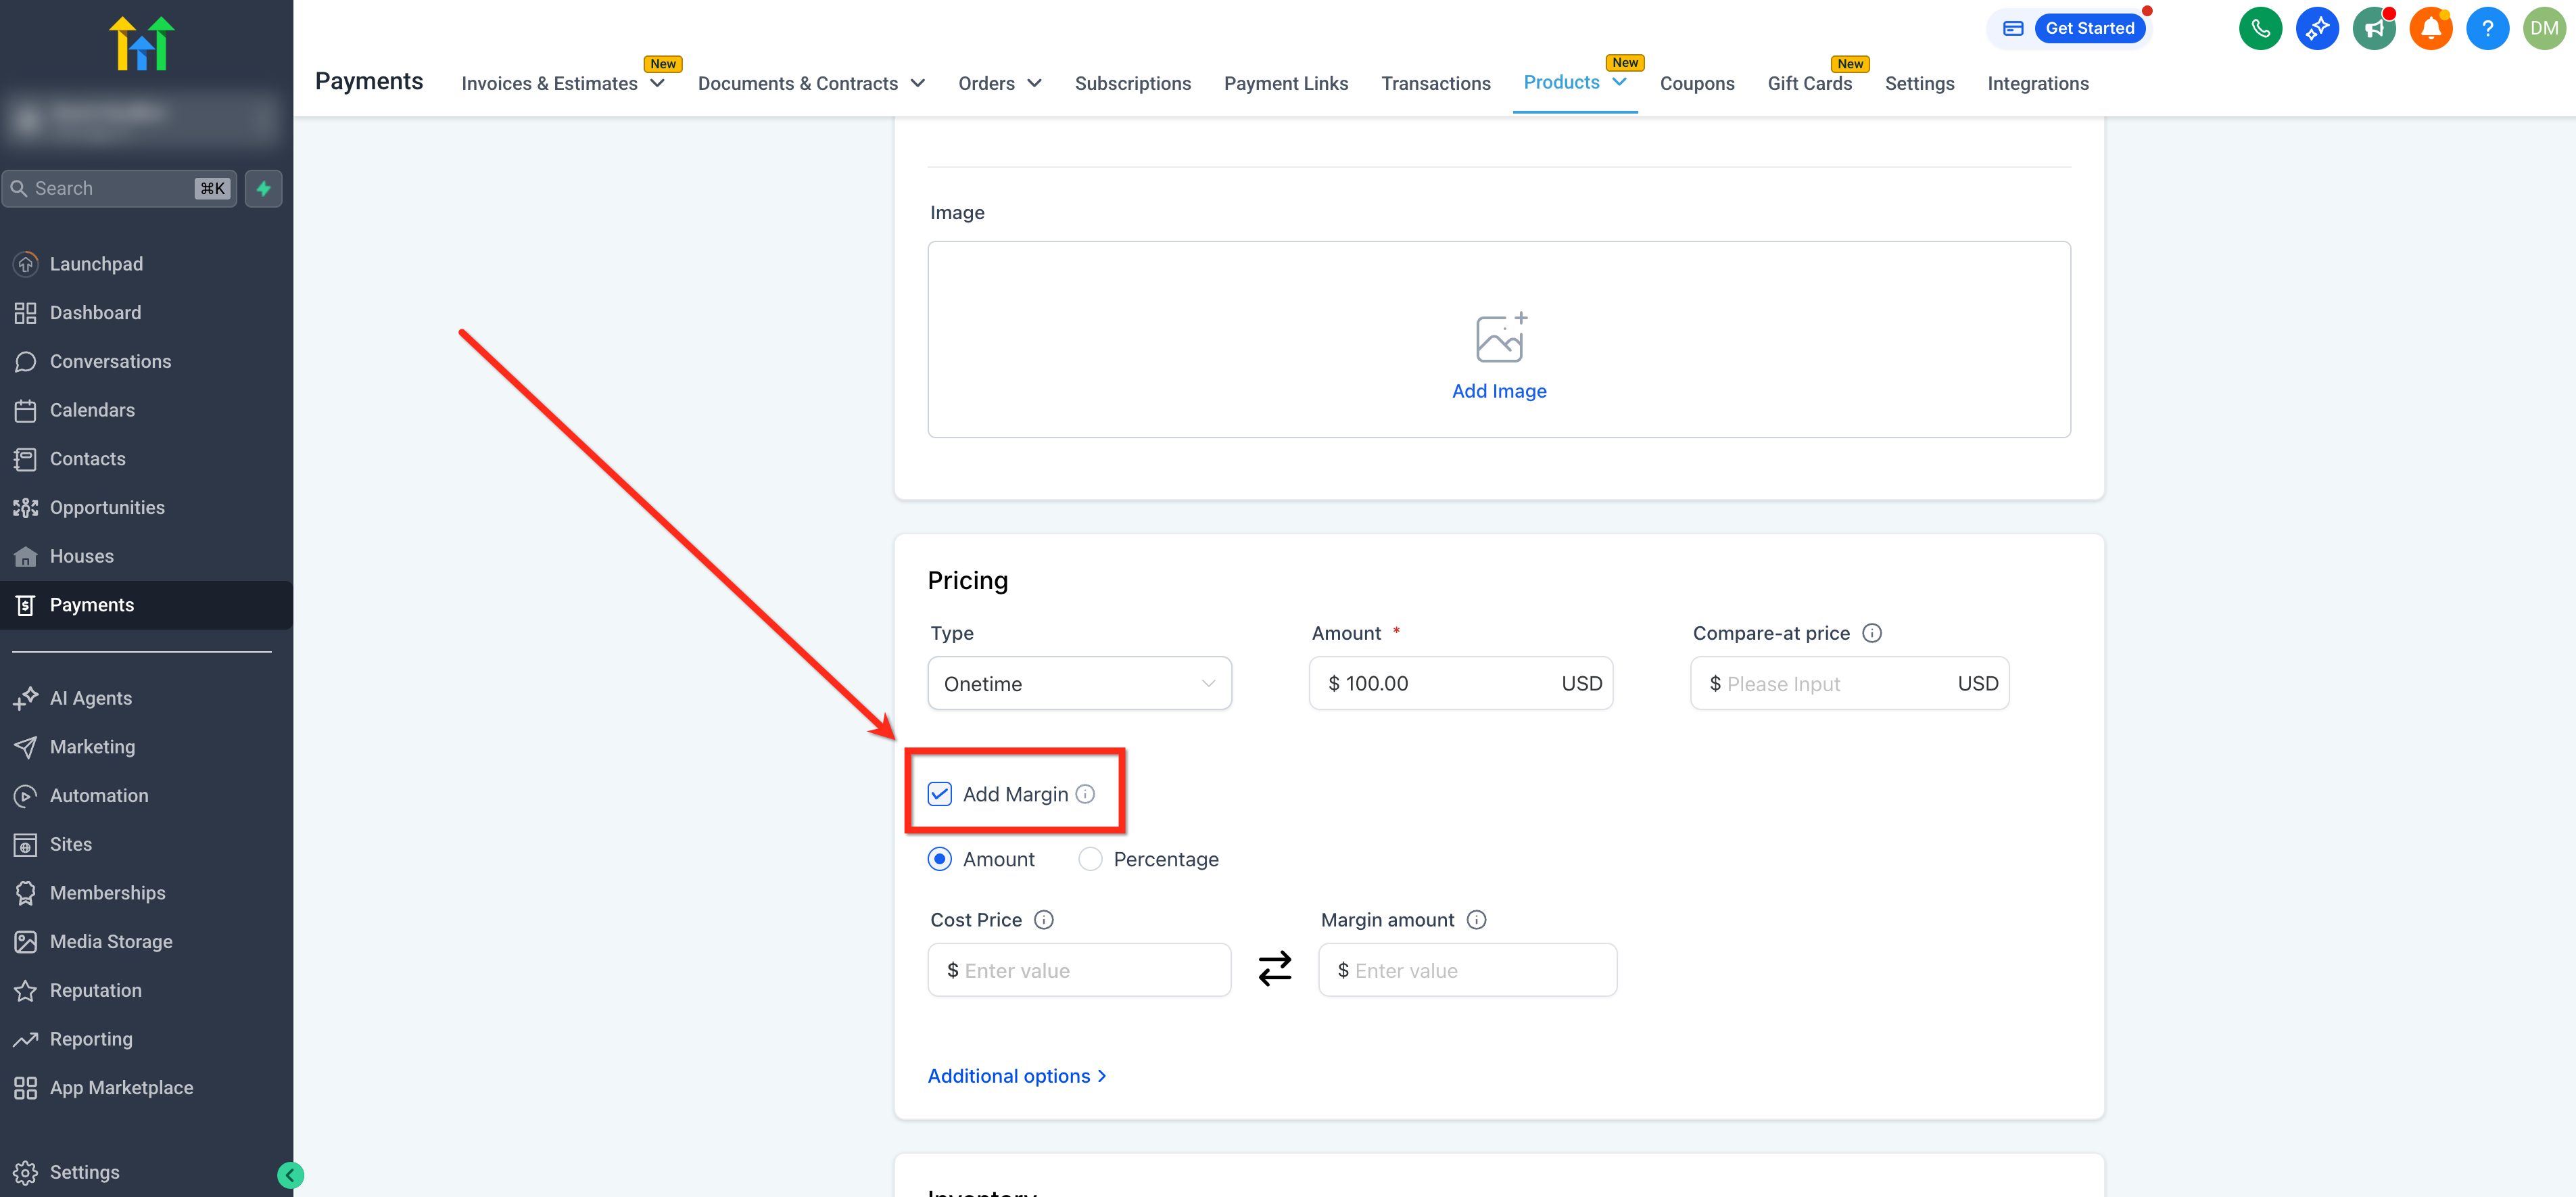
**Step 4: Enable the Add Margin Checkbox (image 4 of 12)**
This screenshot appears in the "Step 4: Enable the Add Margin Checkbox" section of "Add and Track Product Cost Price & Margin". The text alongside this image reads: Inside the Pricing section, check the Add Margin checkbox. This reveals the Cost Price and Margin fields. The checkbox is unchecked by default, enabling it does not affect existing transactions. Immediately after, the guide continues: Select either amount or percentage based on what you would like the margin to be represented as. Then enter either value and the other calculates automatically based on your selling price.
- What this covers: Inside the Pricing section, check the Add Margin checkbox. This reveals the Cost Price and Margin fields. The checkbox is unchecked by default, enabling it does not affect existing transactions.
- Controls: Add Margin
- Next: Select either amount or percentage based on what you would like the margin to be represented as. Then enter either value and the other calculates automatically based on your selling price:
#### **Step 5:** Enter Cost Price or Margin
Select either amount or percentage based on what you would like the margin to be represented as. Then enter either value and the other calculates automatically based on your selling price:
- **Cost Price:** The amount it costs your business to deliver this product. Cannot be a negative number.
- **Margin:** The profit above cost. Toggle between Amount and Percentage mode using the toggle next to the field.
**Note:** If you check 'Add Margin' but leave both fields empty, the system treats Cost Price as equal to Selling Price and exports accordingly keeping the margin at 0.
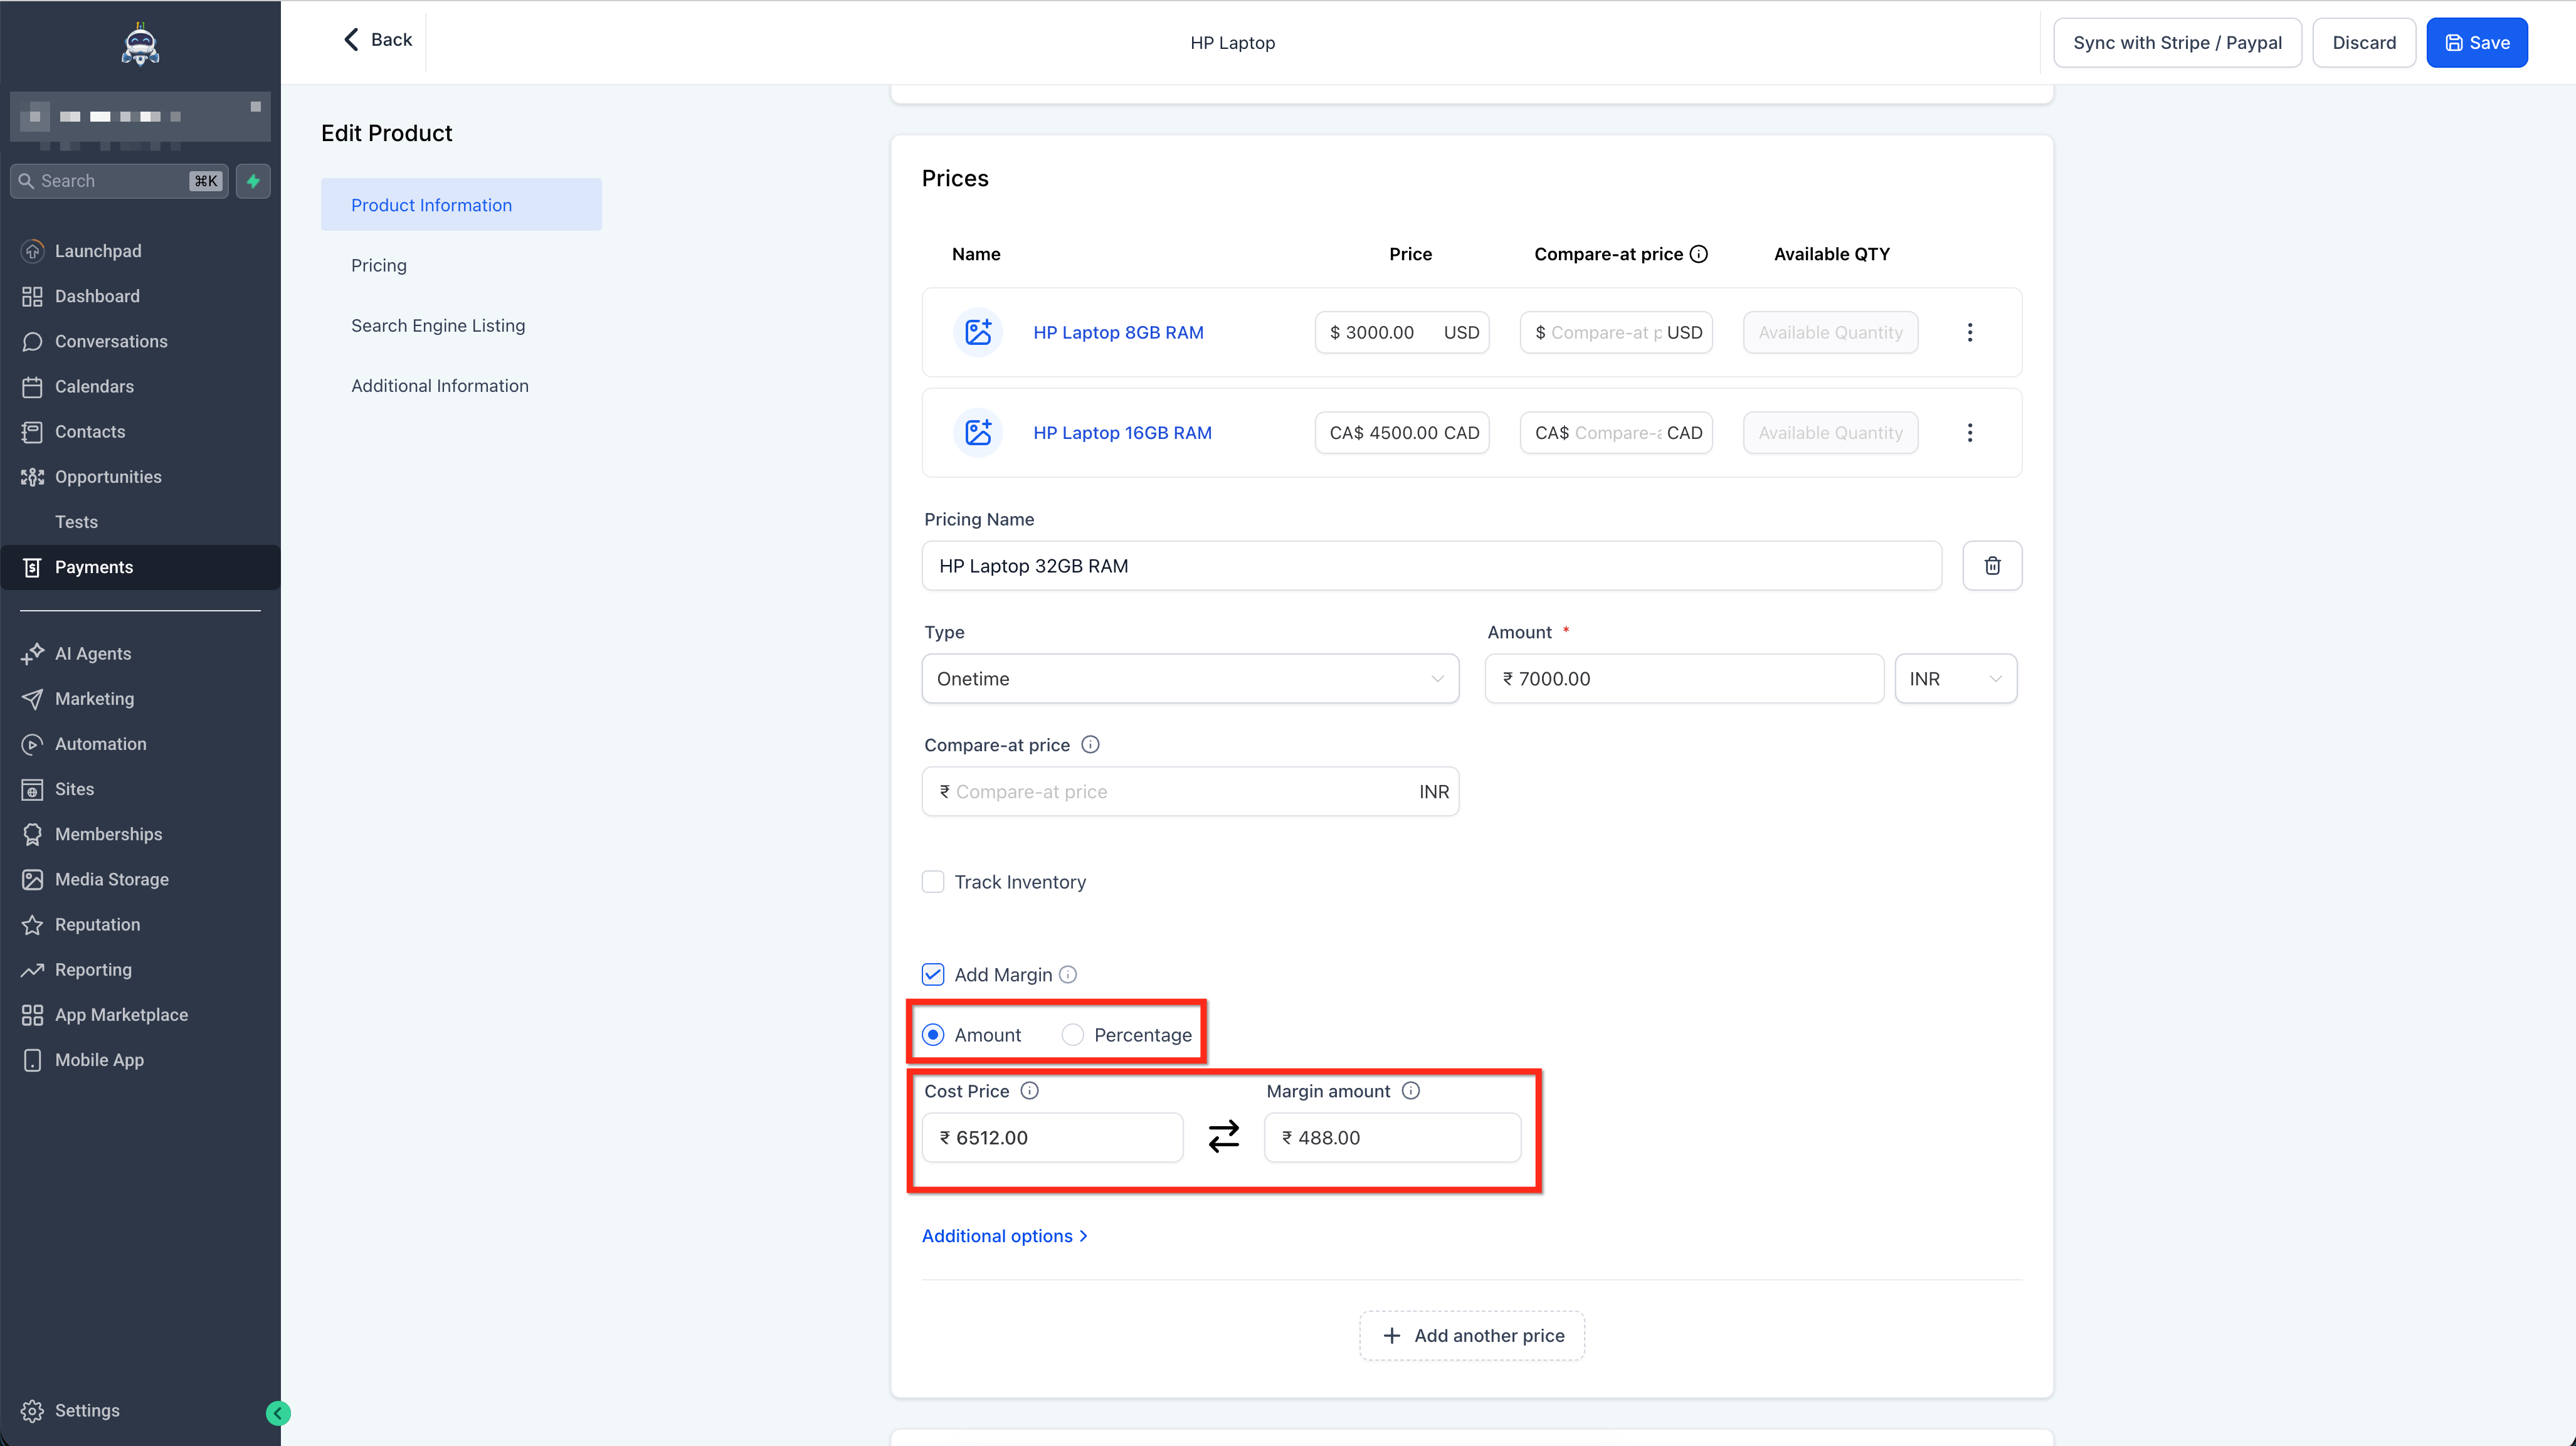
**Step 5: Enter Cost Price or Margin (image 5 of 12)**
This screenshot appears in the "Step 5: Enter Cost Price or Margin" section of "Add and Track Product Cost Price & Margin". The text alongside this image reads: Note: If you check 'Add Margin' but leave both fields empty, the system treats Cost Price as equal to Selling Price and exports accordingly keeping the margin at 0. Immediately after, the guide continues: Click Save. Cost price and margin are now stored at the price level for this product and will be reflected in exports going forward.
- What this covers: Note: If you check 'Add Margin' but leave both fields empty, the system treats Cost Price as equal to Selling Price and exports accordingly keeping the margin at 0.
- Next: Click Save. Cost price and margin are now stored at the price level for this product and will be reflected in exports going forward.
Full procedure:
1. Cost Price: The amount it costs your business to deliver this product. Cannot be a negative number.
2. Margin: The profit above cost. Toggle between Amount and Percentage mode using the toggle next to the field.
#### **Step 6:** Save the Product
Click **Save**. Cost price and margin are now stored at the price level for this product and will be reflected in exports going forward.
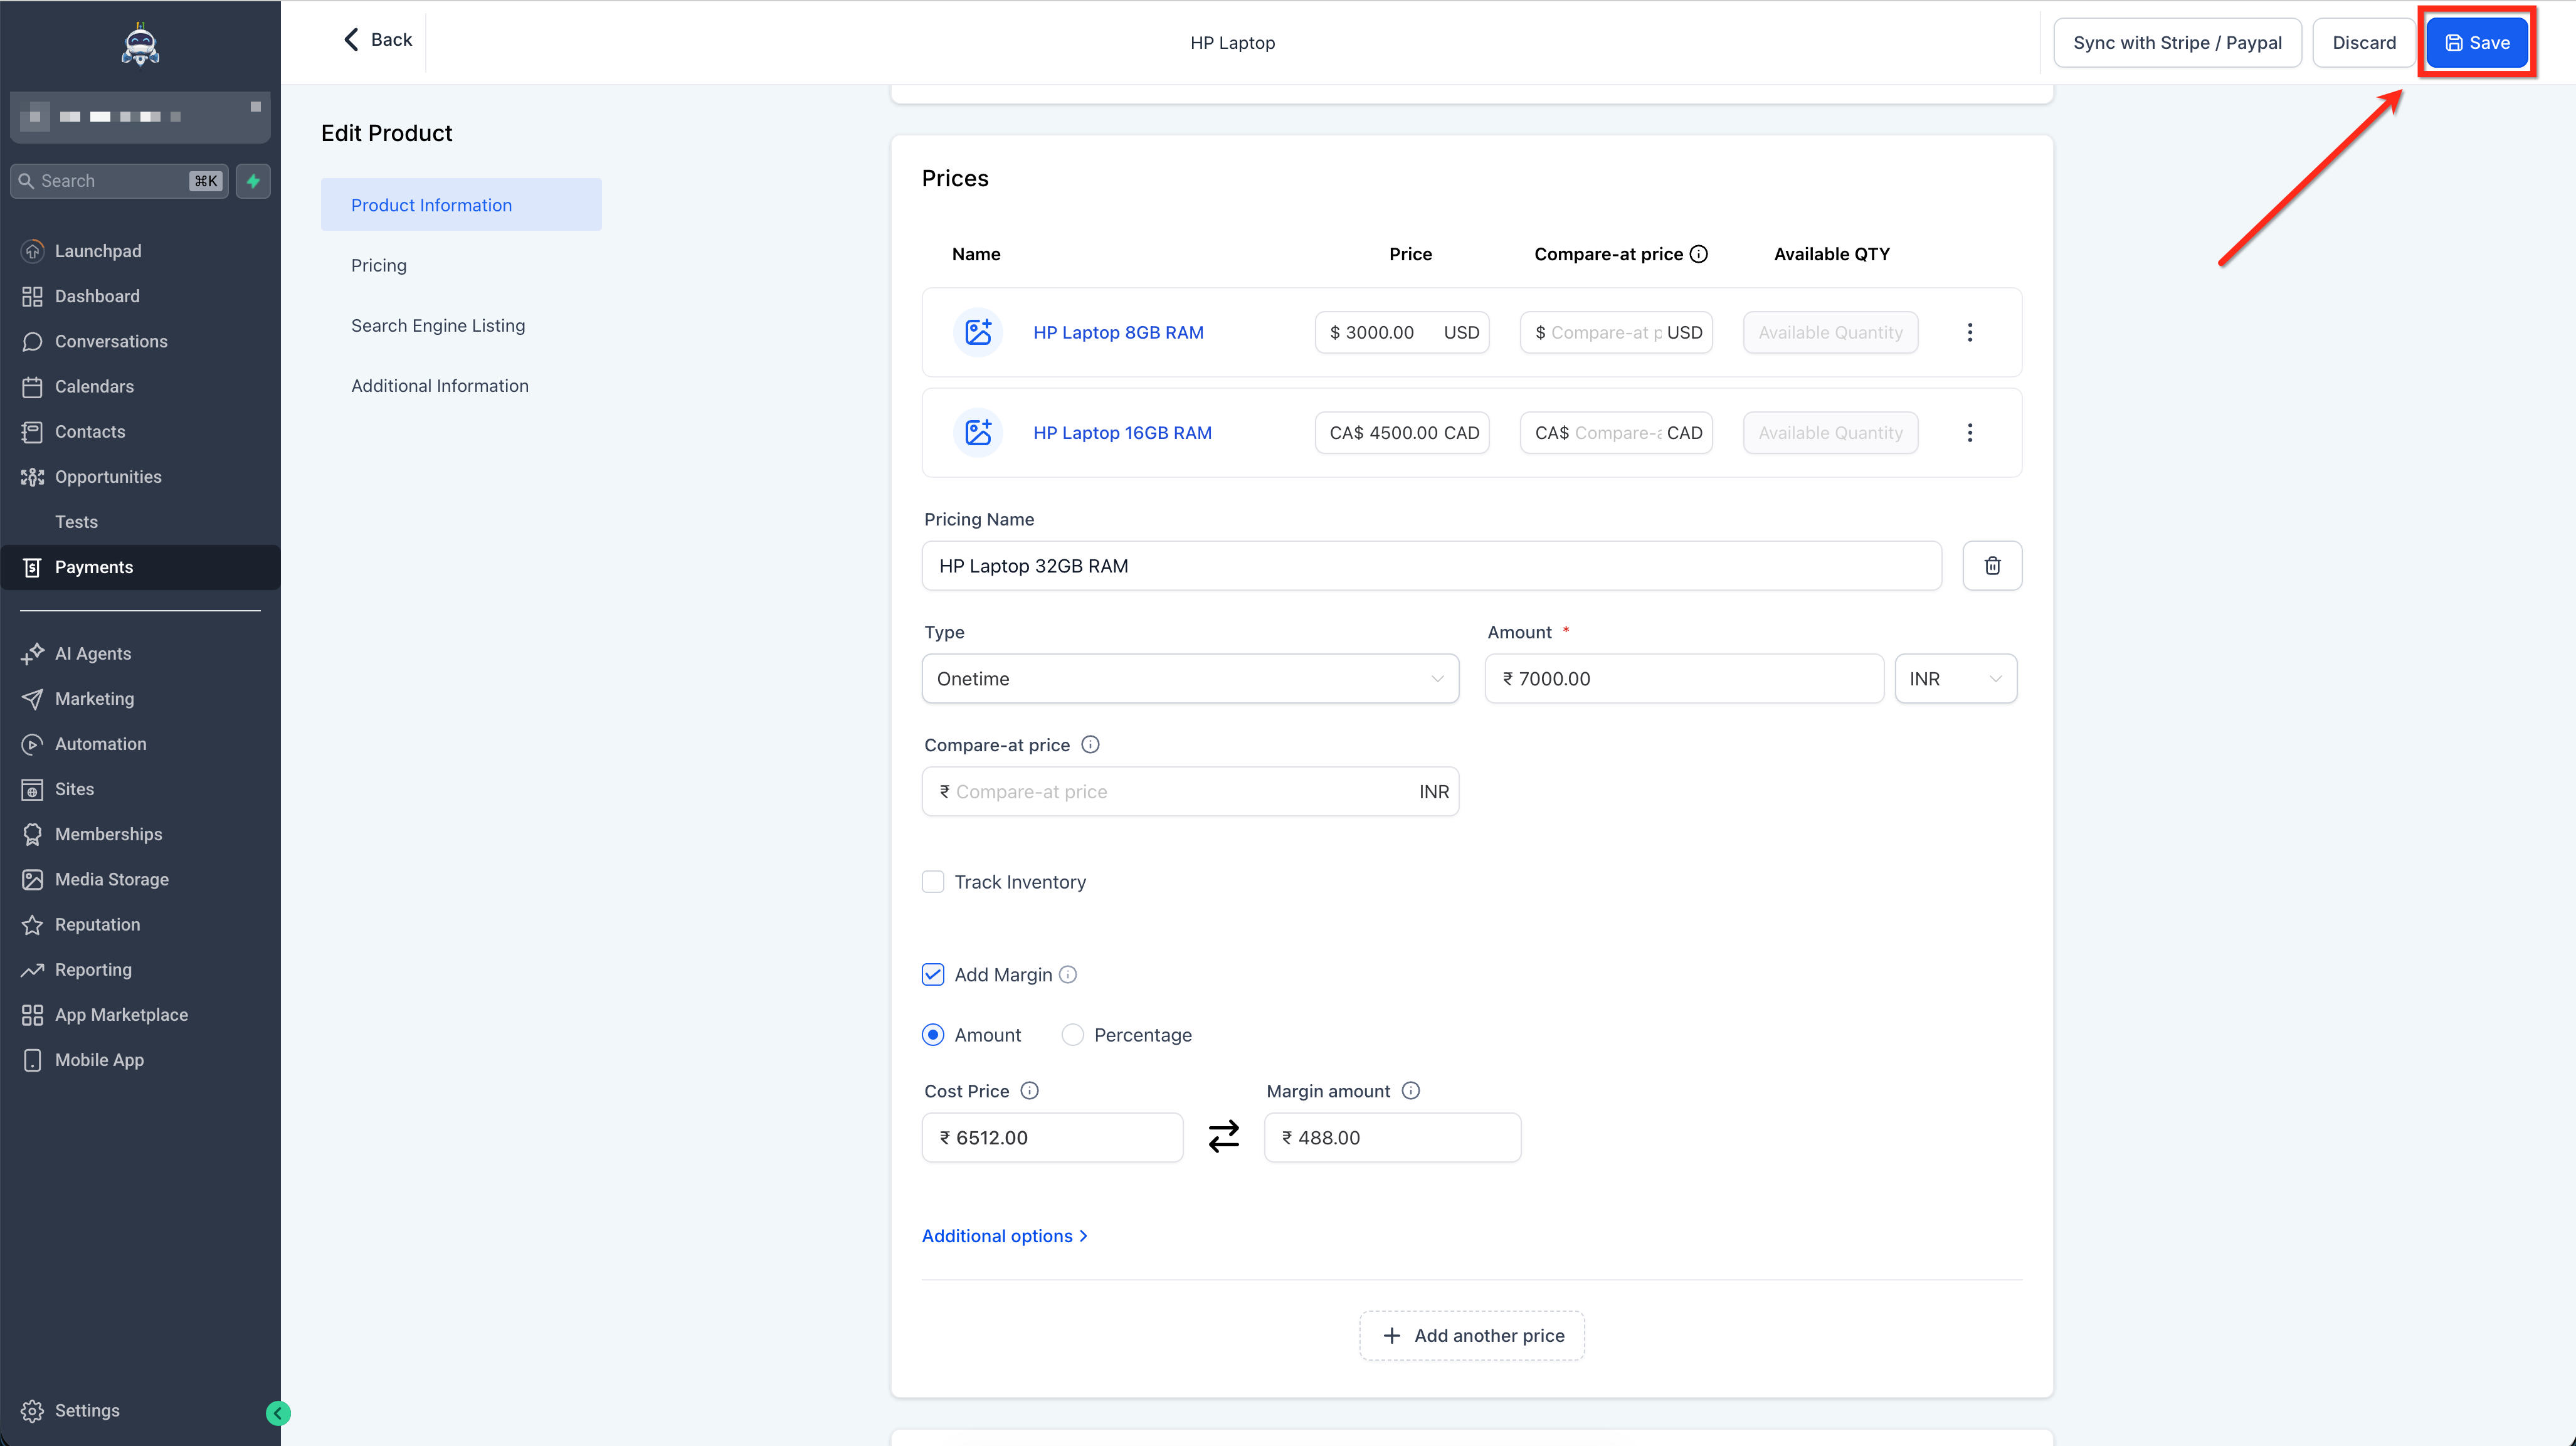
**Step 6: Save the Product (image 6 of 12)**
This screenshot appears in the "Step 6: Save the Product" section of "Add and Track Product Cost Price & Margin". The text alongside this image reads: Click Save. Cost price and margin are now stored at the price level for this product and will be reflected in exports going forward. Immediately after, the guide continues: Cost Price and Margin are configured at the variant level for products with variants. To track product variant cost price and margin, follow the steps below.
- How to confirm: Click Save. Cost price and margin are now stored at the price level for this product and will be reflected in exports going forward.
- Controls: Save
- Next: Cost Price and Margin are configured at the variant level for products with variants. To track product variant cost price and margin, follow the steps below.
---
## **How to Enable Margin Tracking for Product Variants**
Cost Price and Margin are configured at the variant level for products with variants. To track product variant cost price and margin, follow the steps below.
**Tip:** You must create variants for the product before enabling margin tracking.
#### **Step 1:** Go to Variants
In the product edit flow, go to the **Variants** section.
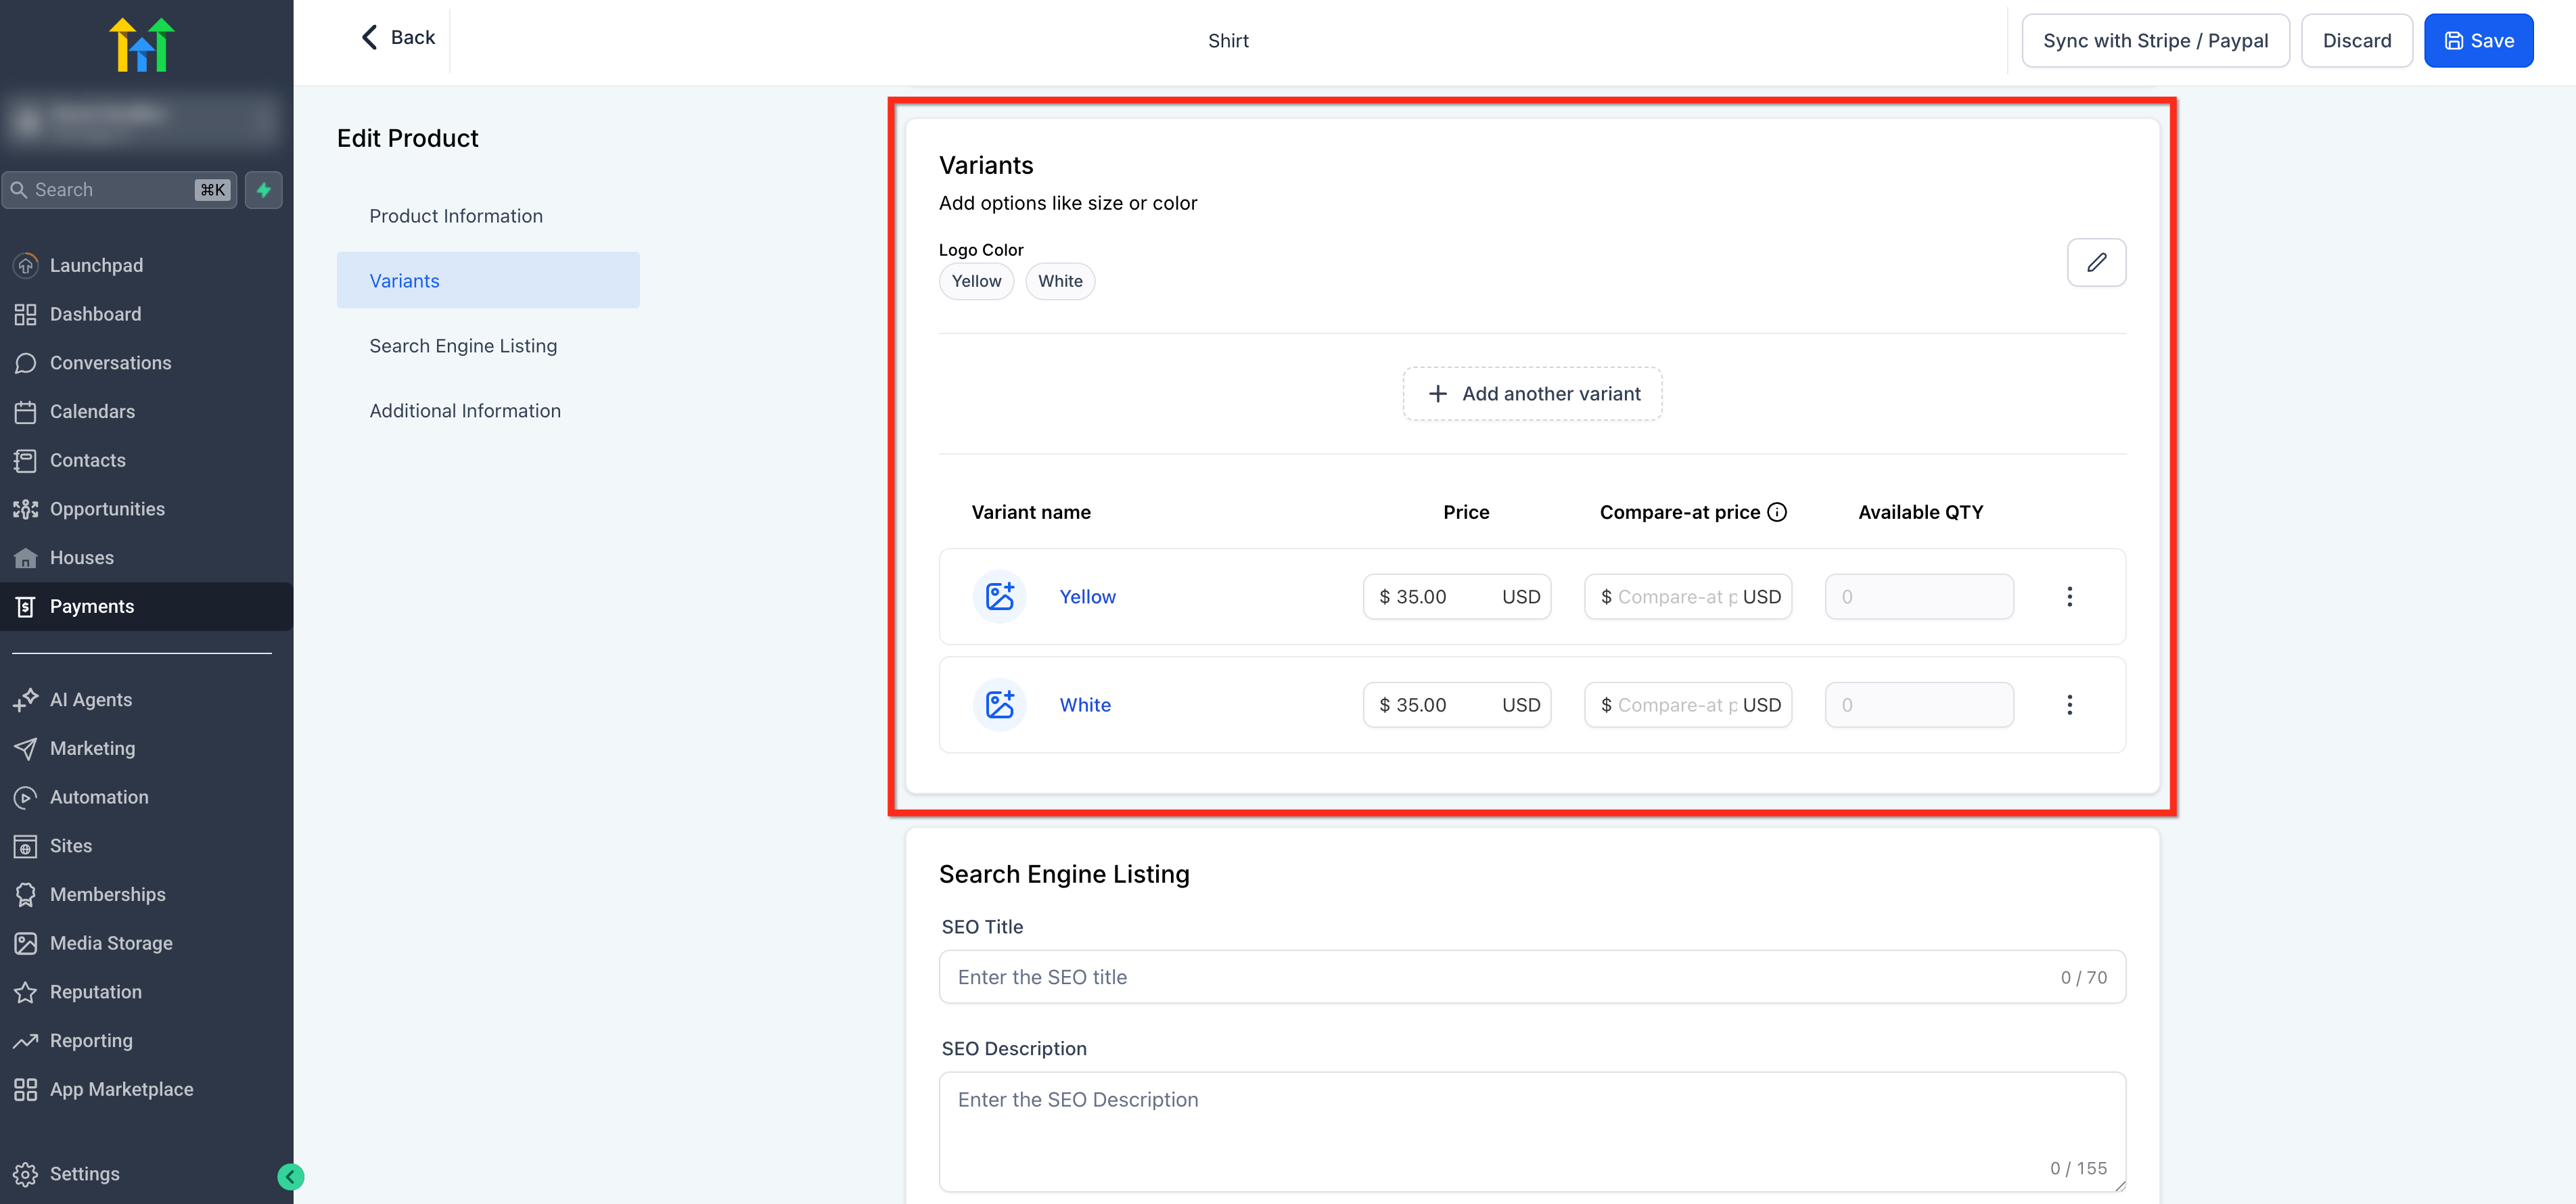
**Step 1: Go to Variants (image 7 of 12)**
This screenshot appears in the "Step 1: Go to Variants" section of "Add and Track Product Cost Price & Margin". The text alongside this image reads: In the product edit flow, go to the Variants section. Immediately after, the guide continues: Click Edit on the variant you want to configure.
- What this covers: In the product edit flow, go to the Variants section.
- Controls: Variants
- Next: Click Edit on the variant you want to configure.
#### **Step 2:** Edit Variant
Click **Edit** on the variant you want to configure.
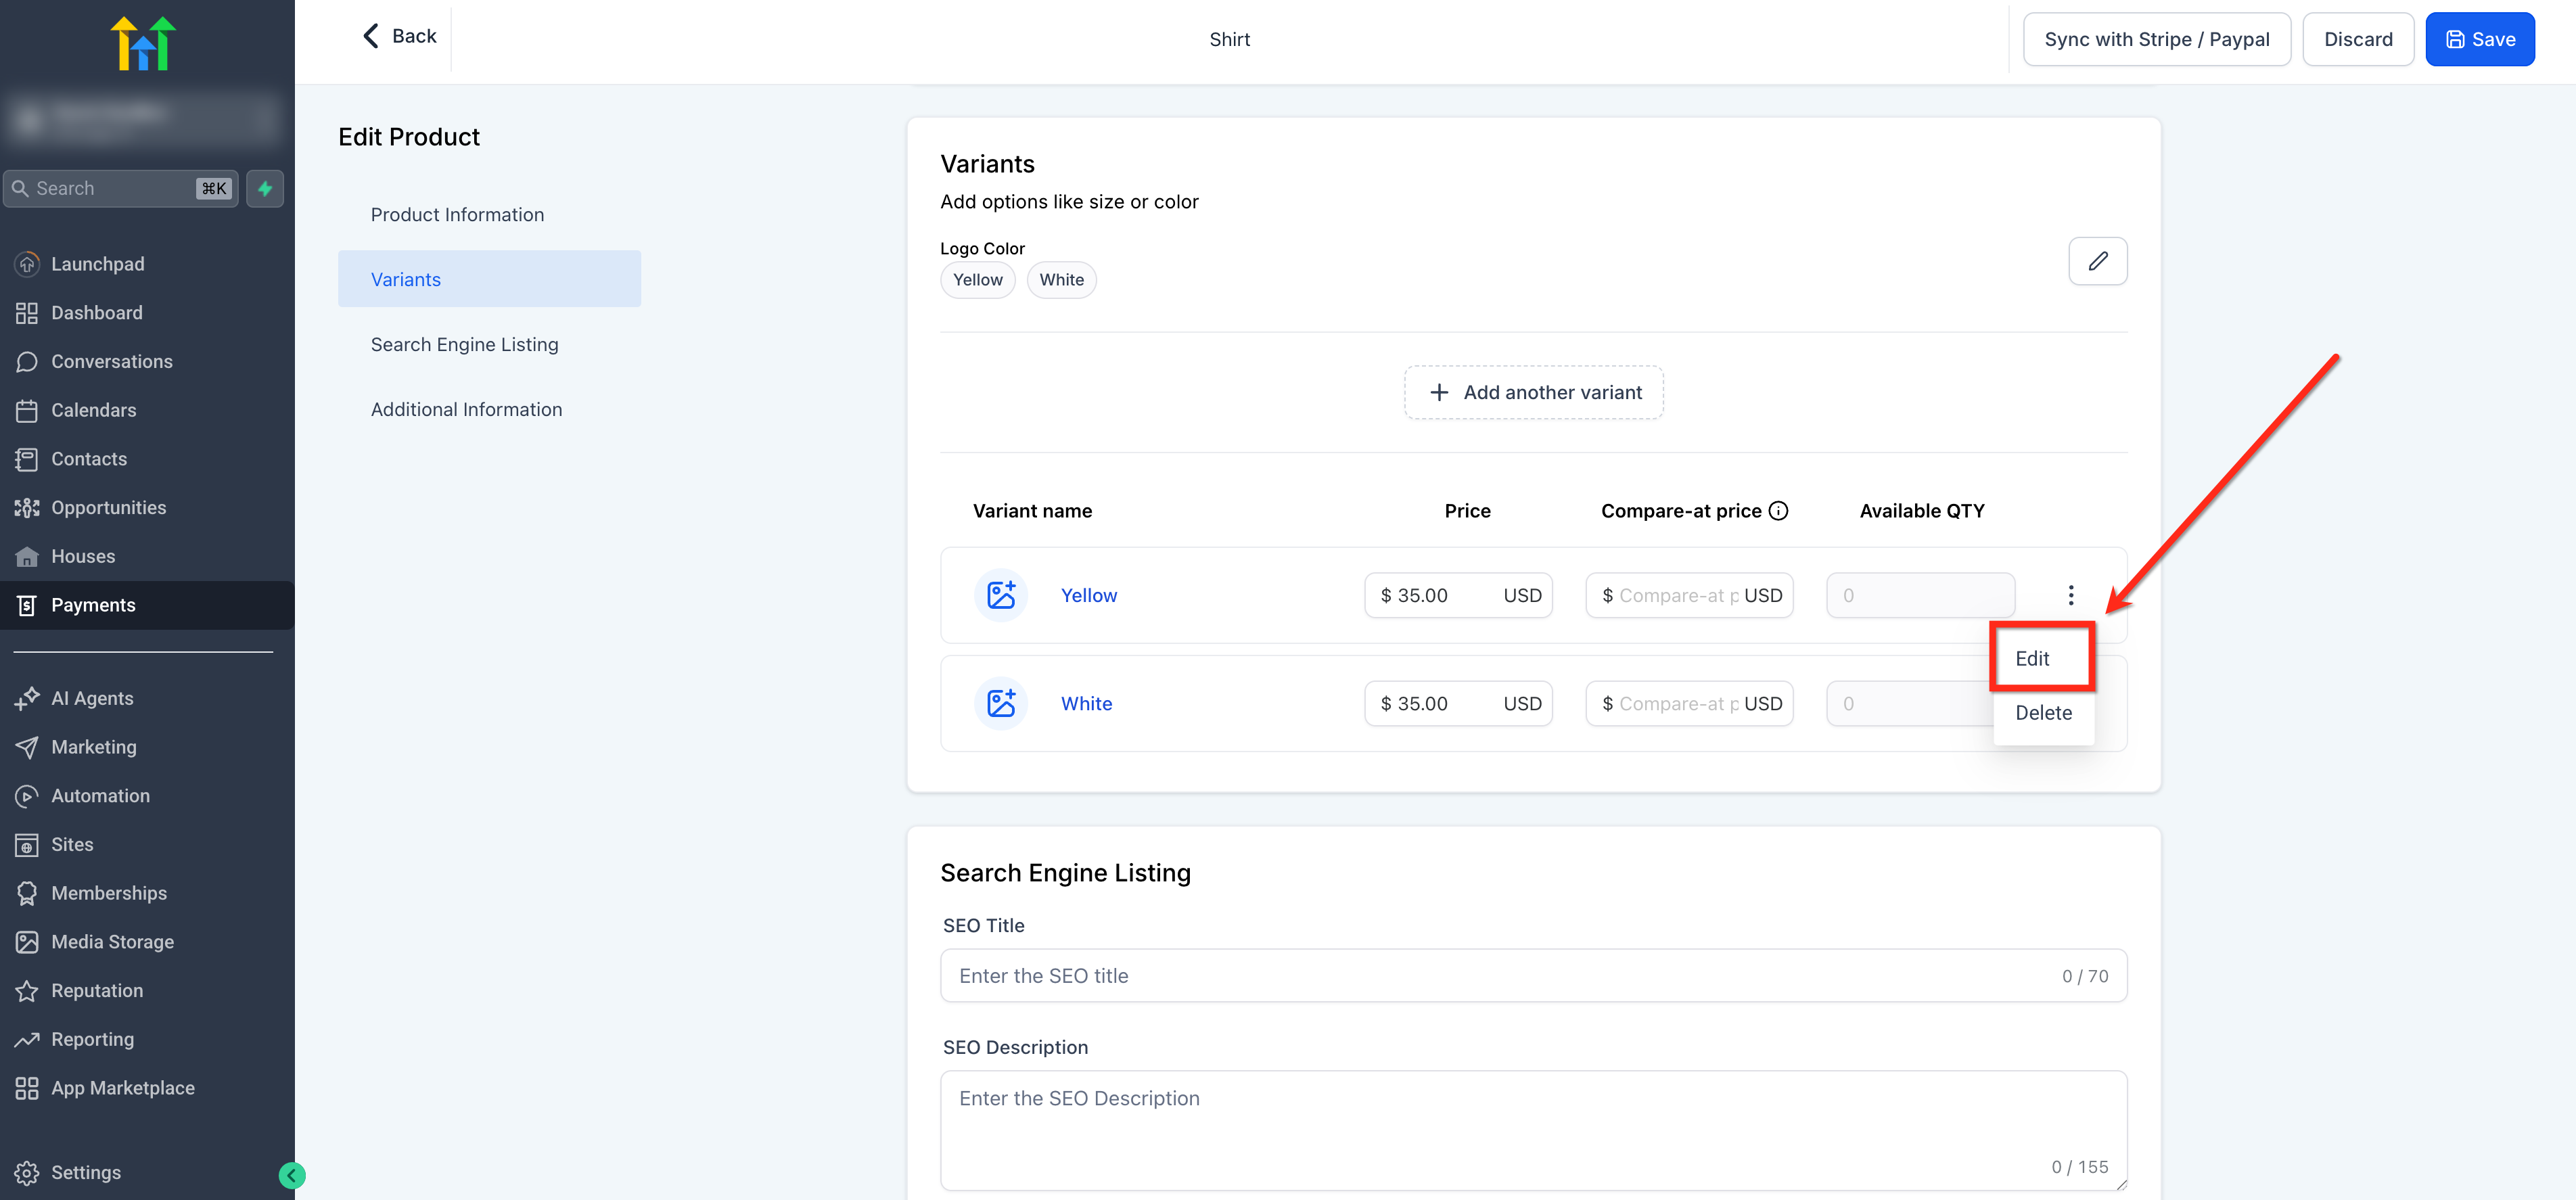
**Step 2: Edit Variant (image 8 of 12)**
This screenshot appears in the "Step 2: Edit Variant" section of "Add and Track Product Cost Price & Margin". The text alongside this image reads: Click Edit on the variant you want to configure. Immediately after, the guide continues: Inside the variant's Pricing section, check the Add Margin checkbox.
- What to click: Click Edit on the variant you want to configure.
- Controls: Edit
- Next: Inside the variant's Pricing section, check the Add Margin checkbox.
#### **Step 3:** Enable the Add Margin Checkbox
Inside the variant's Pricing section, check the **Add Margin** checkbox.
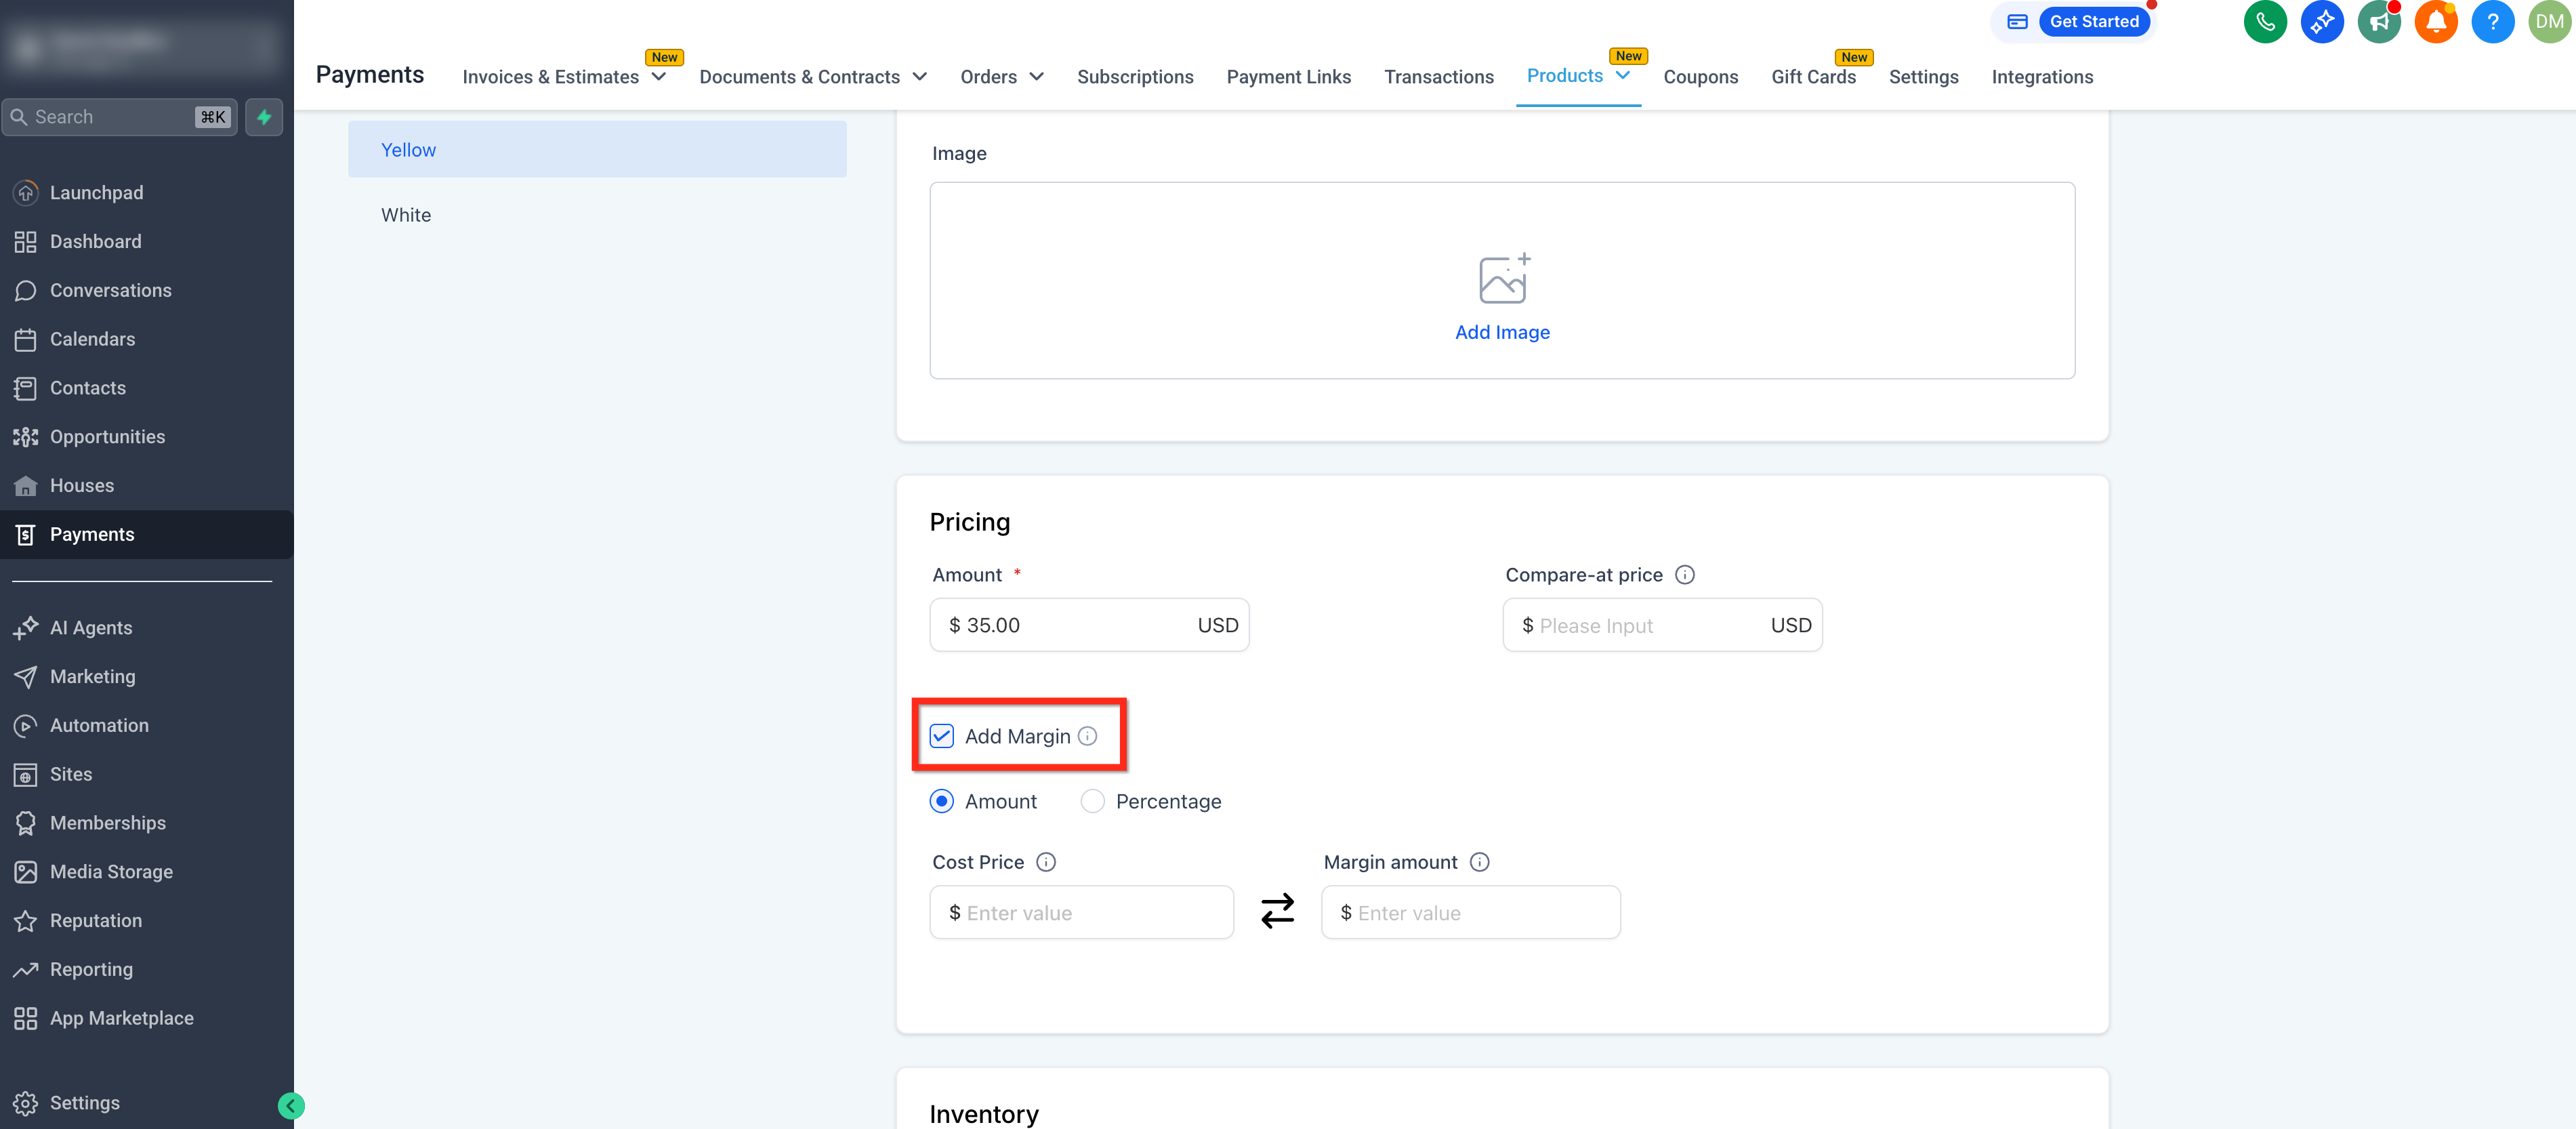
**Step 3: Enable the Add Margin Checkbox (image 9 of 12)**
This screenshot appears in the "Step 3: Enable the Add Margin Checkbox" section of "Add and Track Product Cost Price & Margin". The text alongside this image reads: Inside the variant's Pricing section, check the Add Margin checkbox. Immediately after, the guide continues: Select either amount or percentage based on what you would like the margin to be represented as. Then enter either value and the other calculates automatically based on your selling price.
- What this covers: Inside the variant's Pricing section, check the Add Margin checkbox.
- Controls: Add Margin
- Next: Select either amount or percentage based on what you would like the margin to be represented as. Then enter either value and the other calculates automatically based on your selling price:
#### **Step 4:** Enter Cost Price or Margin
Select either amount or percentage based on what you would like the margin to be represented as. Then enter either value and the other calculates automatically based on your selling price:
- **Cost Price:** The amount it costs your business to deliver this product. Cannot be a negative number.
- **Margin:** The profit above cost. Toggle between Amount and Percentage mode using the toggle next to the field.
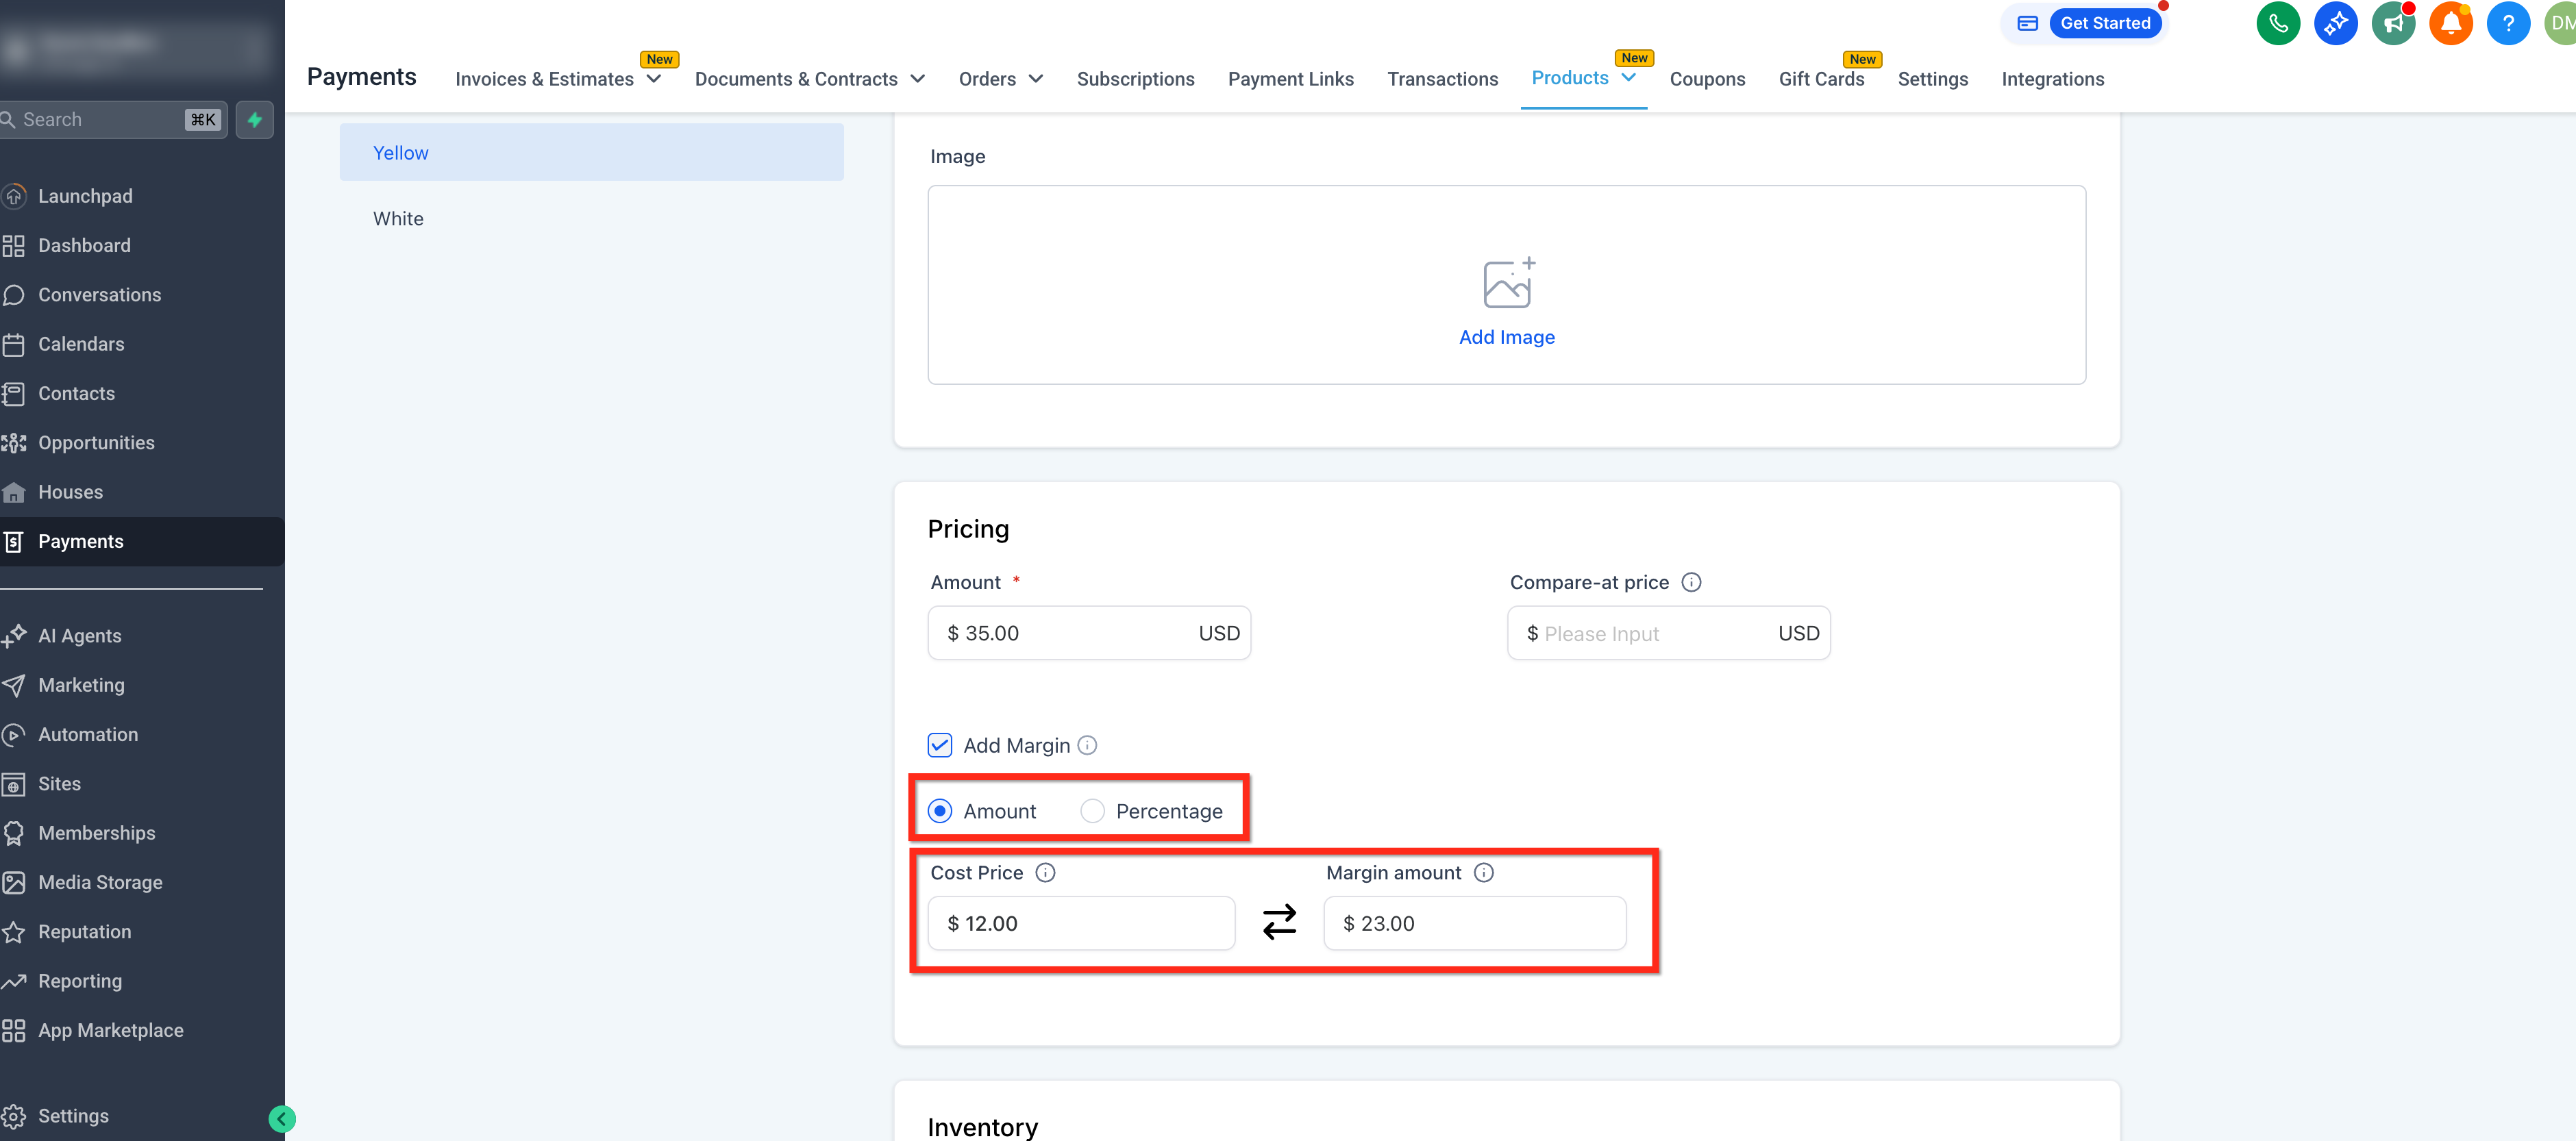
**Step 4: Enter Cost Price or Margin (image 10 of 12)**
This screenshot appears in the "Step 4: Enter Cost Price or Margin" section of "Add and Track Product Cost Price & Margin". The text alongside this image reads: Cost Price: The amount it costs your business to deliver this product. Cannot be a negative number. Margin: The profit above cost. Toggle between Amount and Percentage mode using the toggle next to the field. Immediately after, the guide continues: Save then repeat for each variant.
- What to choose: Cost Price: The amount it costs your business to deliver this product. Cannot be a negative number. Margin: The profit above cost. Toggle between Amount and Percentage mode using the toggle next to the field.
- Next: Save then repeat for each variant.
Full procedure:
1. Cost Price: The amount it costs your business to deliver this product. Cannot be a negative number.
2. Margin: The profit above cost. Toggle between Amount and Percentage mode using the toggle next to the field.
#### **Step 5:** Save and Repeat
Save then repeat for each variant.
**Tip:** Each price denomination and each variant combination has its own independent cost price and margin. This means you can track different margins per denomination (e.g., $25 vs $100 options) or per variant (e.g., Small vs Large).
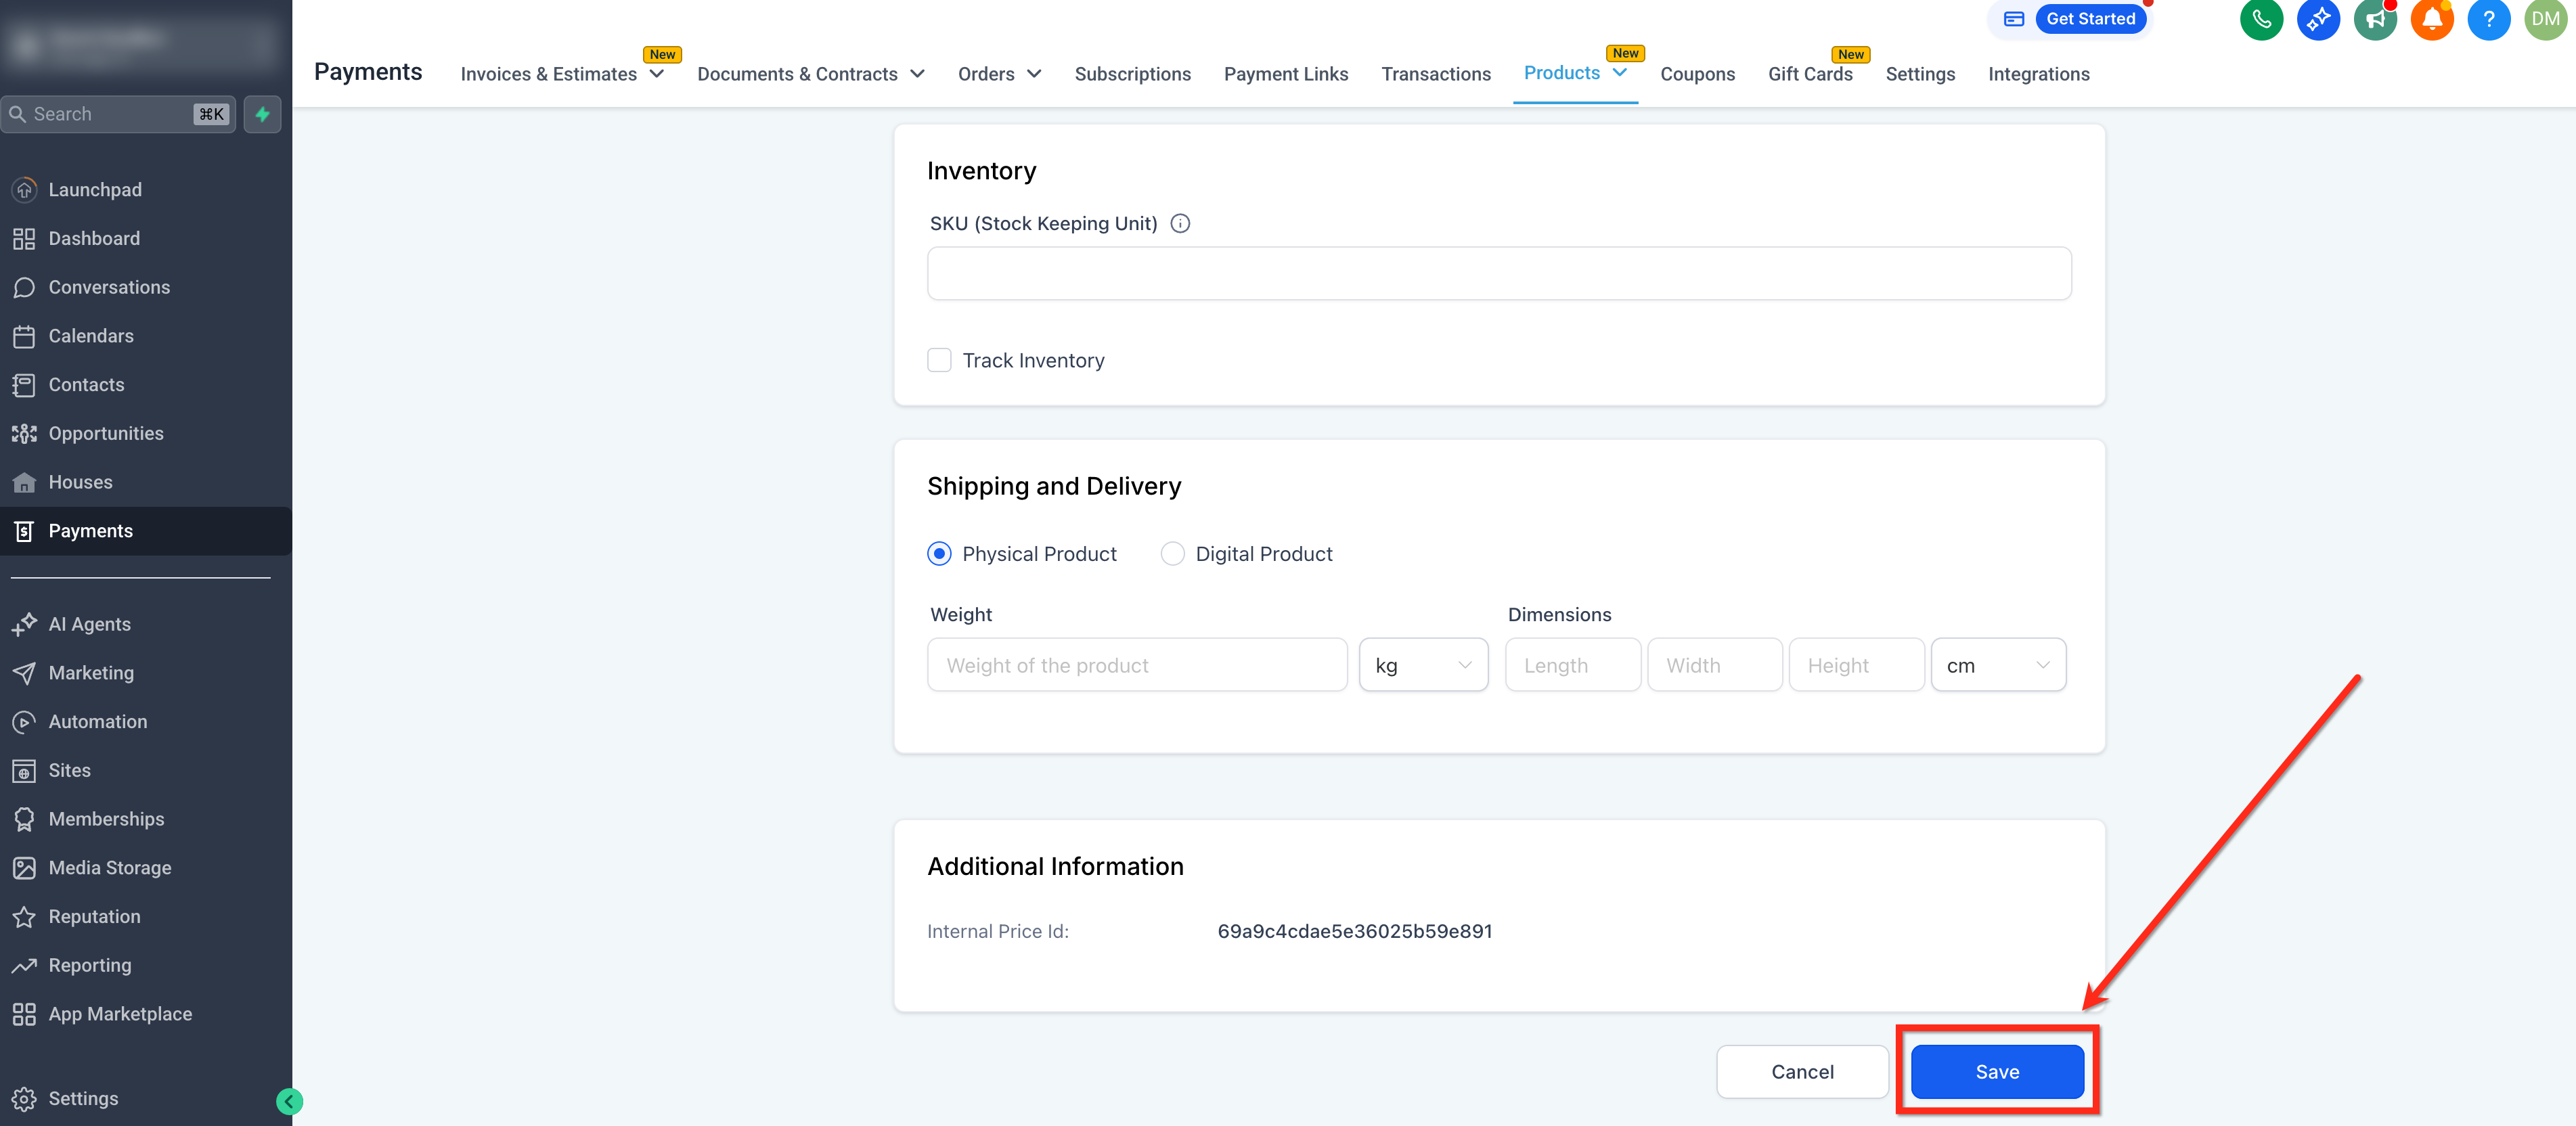
**Step 5: Save and Repeat (image 11 of 12)**
This screenshot appears in the "Step 5: Save and Repeat" section of "Add and Track Product Cost Price & Margin". The text alongside this image reads: Tip: Each price denomination and each variant combination has its own independent cost price and margin. This means you can track different margins per denomination (e.g., $25 vs $100 options) or per variant (e.g., Small vs Large). Immediately after, the guide continues: The two fields stay in sync automatically based on the selling price. Switching modes or changing the selling price recalculates the dependent field instantly.
- What this covers: Tip: Each price denomination and each variant combination has its own independent cost price and margin. This means you can track different margins per denomination (e.g., $25 vs $100 options) or per variant (e.g., Small vs Large).
- Next: The two fields stay in sync automatically based on the selling price. Switching modes or changing the selling price recalculates the dependent field instantly.
---
## **How Cost Price & Margin Sync**
The two fields stay in sync automatically based on the selling price. Switching modes or changing the selling price recalculates the dependent field instantly.
### **Amount Mode**
- **Margin** = Selling Price − Cost Price
- **Cost Price** = Selling Price − Margin
- **Cost Price** must be greater than or equal to 0 (>= 0)
- **Margin** can be Positive or Negative
### **Percentage Mode**
- **Margin %** = ((Selling Price − Cost Price) ÷ Cost Price) × 100
**Tip:** A Margin % above 100% is not valid unlike Markup which can be above 100. Since a margin is divided by cost price, it is restricted on the upper limit of 100% and a lower limit of -100%.
### **When Selling Price Changes**
If you update the selling price of a product, the system automatically recalculates margin based on the existing cost price. Similarly, switching between Amount and Percentage mode recalculates the fields without data loss.
---
## **How Cost Price Appears in Invoices & Calendars**
In Invoices and Calendars, selling prices can be manually overridden at the line item level. In these cases, cost price behavior works as follows:
- **Cost Price is always sourced from the original product price** . Currently it is not recalculated based on the overridden selling price.
- Margin is not recalculated at the invoice or calendar level.
- Setup fees on recurring products are excluded from margin logic.
- For subscription products, only the recurring amount is used for margin — not the setup fee.
---
## **Transactions CSV: Line Item Cost Price**
A new Line Item Cost Price column is available in the Transactions CSV export. This makes it possible to analyze profitability at the transaction and line item level.
### **How to Access the Export**
1. Go to **Payments** → **Transactions**.
2. Click **Export CSV**.
3. The **Line Item Cost Price** column appears automatically for all products in a transaction where cost price has been defined.
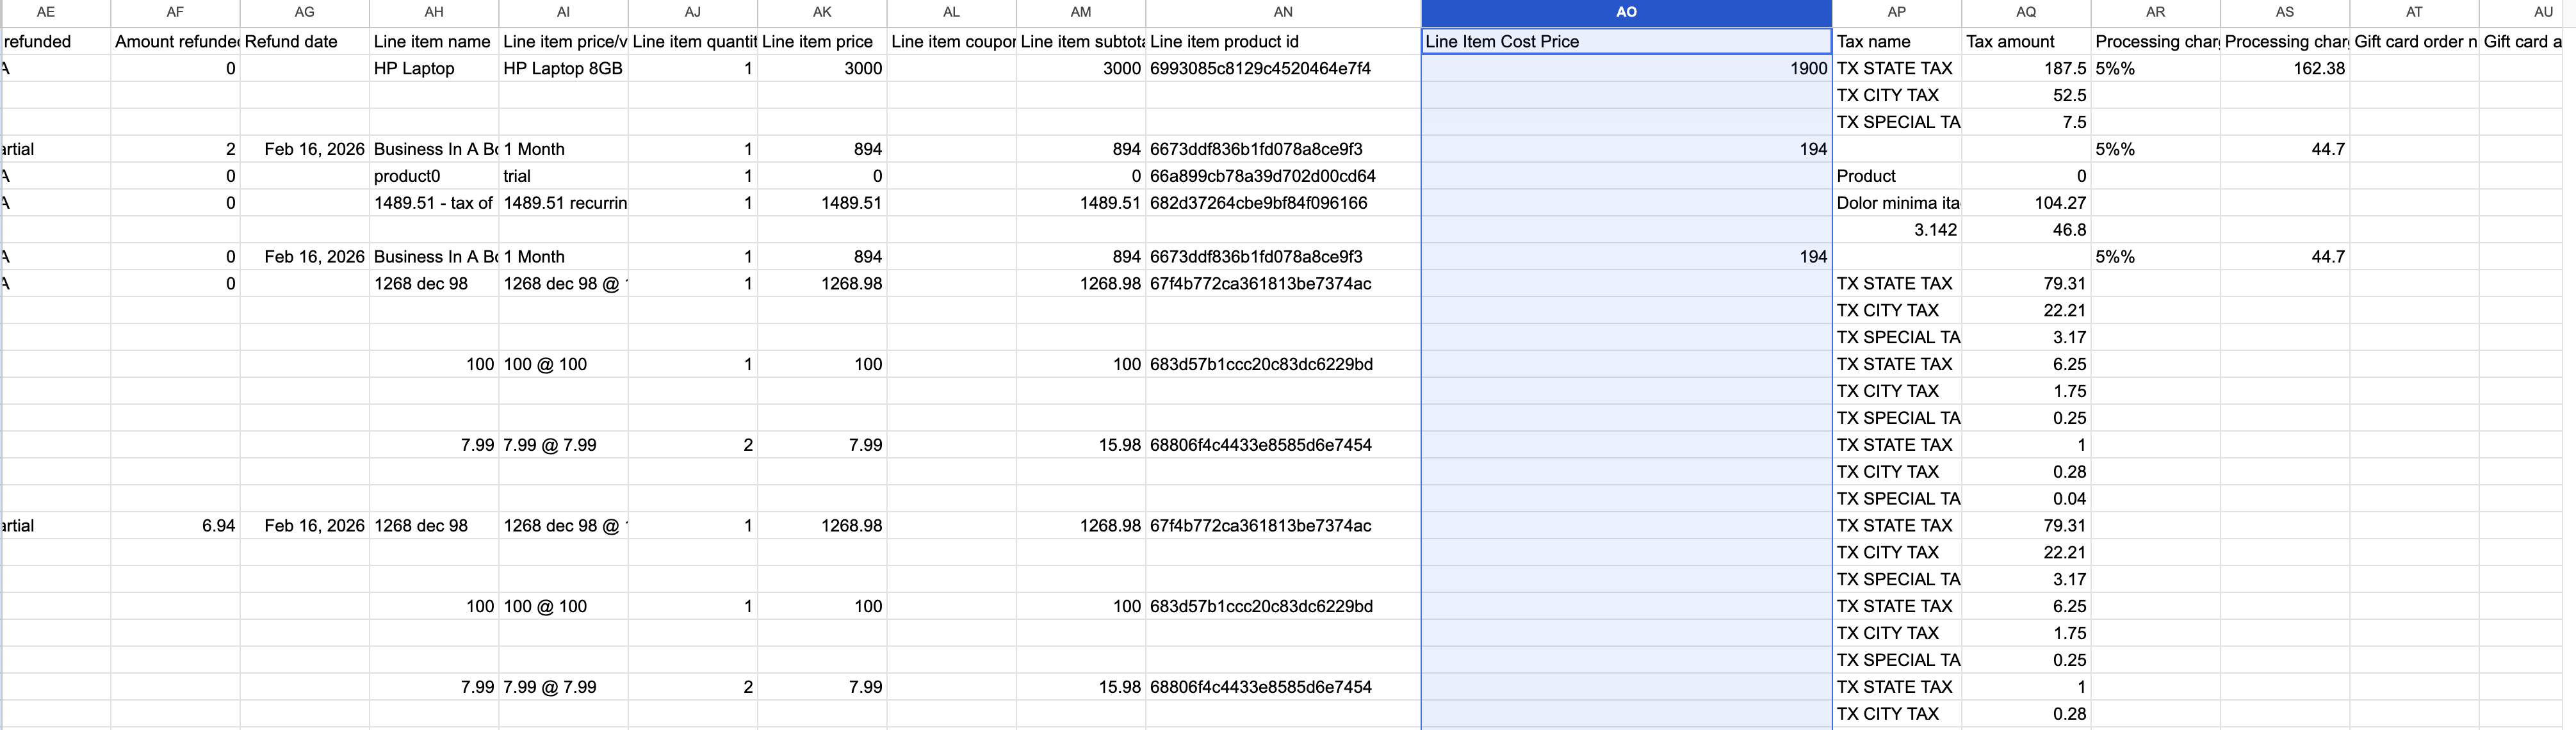
**How to Access the Export (image 12 of 12)**
This screenshot appears in the "How to Access the Export" section of "Add and Track Product Cost Price & Margin". The text alongside this image reads: Go to Payments → Transactions. Click Export CSV. The Line Item Cost Price column appears automatically for all products in a transaction where cost price has been defined. Immediately after, the guide continues: If cost price is defined for a product → the cost amount is shown. If cost price is not defined → the column is blank. For overridden prices in invoices or calendars → cost price from the original product is used. Applies to one-time….
- Where to go: Go to Payments → Transactions. Click Export CSV. The Line Item Cost Price column appears automatically for all products in a transaction where cost price has been defined.
- Controls: Payments, Transactions, Export CSV, Line Item Cost Price
- Next: If cost price is defined for a product → the cost amount is shown. If cost price is not defined → the column is blank. For overridden prices in invoices or calendars → cost price from the original product is used. Applies to one-time payments, subscription payments, and partial payments. Partial payments: The full product cost price is shown, not a prorated amount.
Full procedure:
1. Go to Payments → Transactions.
2. Click Export CSV.
3. The Line Item Cost Price column appears automatically for all products in a transaction where cost price has been defined.
### **Column Behavior**
- If cost price is defined for a product → the cost amount is shown.
- If cost price is not defined → the column is blank.
- For overridden prices in invoices or calendars → cost price from the original product is used.
- Applies to one-time payments, subscription payments, and partial payments.
- Partial payments: The full product cost price is shown, not a prorated amount.
**Important:** Cost price data is not applied retroactively. Only transactions created after cost price is configured for a product will have this column populated.
---
## **Frequently Asked Questions**
**Q: Can I add cost price to existing products?**
Yes. Open any existing product, edit the price or variant, and check the Add Margin checkbox. This does not affect past transactions — only future ones will carry the cost data.
**Q: What happens if I leave the fields blank after checking Add Margin?**
If the Add Margin checkbox is checked but no values are entered, the system treats Cost Price as equal to the Selling Price. This value is passed through to CSV exports.
**Q: Is cost price visible to customers?**
No. Cost price is an internal field and is not displayed to customers at checkout, on receipts, or on invoices.
**Q: Can I set different cost prices per variant?**
Yes. Each variant combination has its own independent cost price and margin fields, so you can track different profitability per variant.
**Q: Does changing a product's selling price update the cost price automatically?**
No. When the selling price changes, the margin is recalculated based on the existing cost price — the cost price itself does not change. This keeps your input intact while margin stays accurate.
**Q: Can I bulk-edit cost prices across multiple products?**
Not in this release. Bulk cost price editing is planned for a future phase as part of the bulk edit feature.
**Q: Are setup fees included in margin calculations for recurring products?**
No. Setup fees are excluded from margin logic. Only the recurring amount is used when calculating cost price and margin for subscription products.
**Q: Are historical transactions updated when I add cost price to a product?**
No. Cost price data is not applied retroactively. Only transactions created after you configure cost price for a product will include the Line Item Cost Price in exports.
---
## **Related Articles**
- [Export or Download Transactions as CSV](https://docs.ghlcustomercare.com/docs/payments/orders-subscriptions-and-transactions/export-or-download-transactions-as-csv)
- [Getting Started - Create & Sell Products](https://docs.ghlcustomercare.com/docs/getting-started-w-ghl-customer-care/commerce/getting-started-create-sell-products)
- [How to Add Product Weights, Dimension, and SKU Information in Your Ecom Store](https://docs.ghlcustomercare.com/docs/e-commerce-store/e-commerce-store/how-to-add-product-weights-dimension-and-sku-information-in-your-ecom-store)
- [How to Create Invoices in GHL Customer Care](https://docs.ghlcustomercare.com/docs/payments/invoices-and-estimates/how-to-create-invoices-in-ghl-customer-care)
---
Documentation for GHL Customer Care. Support: support@ghlcustomercare.com